소개
 ▶
▶유튜브 에서 시청하세요.
Imatest IT(산업 테스트)는 개발자가 자체 맞춤형 애플리케이션에서 Imatest의 강력한 이미지 품질 분석 도구에 액세스할 수 있도록 하는 애플리케이션 프로그래밍 인터페이스(API) 세트입니다.
Imatest IT는 64비트 Windows, MacOS 및 Linux에서 사용할 수 있으며, C , C++ , Python , Objective-C, .NET (Windows 전용 - C# 및 Visual Basic 포함) 및 LabVIEW용 라이브러리를 제공합니다. 또한 명령줄이나 스크립트에서 호출할 수 있는 독립 실행형 실행 파일도 포함되어 있습니다. API 라이브러리는 해당 GUI 기반 Imatest 마스터 모듈과 동일한 계산을 수행합니다.
Imatest IT는 모듈 라이브러리, 지원 문서, 샘플 코드 및 모듈과 연동되는 완벽한 애플리케이션을 포함하는 종합 패키지입니다.
Imatest IT는 Imatest Master와 별도로 운영되지만, IT 사용자는 최소한 하나의 Master 버전을 사내에 설치하는 것이 좋습니다 . IT 버전 과 Image Master 버전을 모두 포함하는 Imatest Ultimate Edition은 상당한 할인 혜택이 제공되므로 대부분의 사용자에게 최적의 선택입니다. 아래 2단계 에서 보시는 것처럼, 모든 IT 애플리케이션의 필수 요소인 테스트 구성 설정은 Master를 사용하면 훨씬 간편합니다.
Imatest IT 모듈
Imatest IT에는 20개의 이미지 분석 모듈이 포함되어 있습니다.
| SFR - 수동으로 지정한 경사진 모서리에서 MTF 및 관련 결과를 측정합니다. | SFRplus 는 Imatest의 고도로 자동화된 SFRplus 차트 및 모듈을 사용하여 MTF, 측면 색수차, 왜곡, 톤 응답 등을 측정합니다. |
| 별 - 지멘스 성도(일반적으로 정현파)를 사용하여 MTF 및 측면 색수차를 측정합니다. | 컬러체크 - 24패치 X-Rite 컬러체커를 사용하여 색 정확도, 노이즈, 톤 반응 등을 측정합니다. |
| 스텝차트 - 회색조 스텝차트를 통해 톤 응답, 감마, 노이즈 등을 측정합니다. | 웨지(Wedge) - ISO 12233:2000 및 eSFR ISO 차트에 나와 있는 쌍곡선 웨지를 사용하여 MTF를 측정합니다. |
| OIS - 이미지 안정화의 효율성을 측정합니다. | 균일도 - 평면 이미지에서 이미지 균일성, 색상 음영 및 핫픽셀/데드픽셀을 측정합니다. |
| 왜곡 - 격자 또는 체커보드 패턴을 사용하여 왜곡을 측정합니다. | eSFR ISO 는 향상된 ISO 12233:2014 차트를 사용하여 MTF, 색 정확도, 노이즈 및 톤 응답을 측정합니다. |
| 결함 - 평면 이미지에서 시각적으로 중요한 결함을 측정합니다. | 도트 패턴 - 도트 격자 패턴에서 발생하는 왜곡 및 측면 색수차를 측정합니다(I3A CPIQ 규격 준수). |
| 멀티테스트 - 다양한 테스트 차트 이미지를 분석하여 색 정확도, 톤 반응, 노이즈, SNR(신호 대 잡음비) 및 ISO 감도를 측정합니다. | 체커보드 테스트 - 체커보드 패턴의 타겟을 사용하여 MTF, 측면 색수차 및 왜곡을 측정합니다. |
| 랜덤 - 흩어진 동전이나 무작위(공간적으로 불변하는) 차트를 사용하여 텍스처 품질을 측정하는 모듈 | SFRreg - 하나 이상의 자동 감지된 SFRreg 타겟을 사용하여 MTF 및 측면 색수차를 측정합니다. |
| Log FC 는 신호 처리 효과(공간 주파수 및 대비의 함수로서의 MTF)를 로그 주파수-대비 차트를 사용하여 측정합니다. | 임의 차트 - Imatest의 다른 곳에서는 지원되지 않는 차트 디자인(사용자 지정 디자인 포함)에서 다양한 이미지 품질 요소를 측정합니다. |
| 산란광 분석 - 시야를 가로지르며 스캔하는 작고 밝은 광원의 이미지를 분석하여 정규화된 산란광 측정 이미지와 관련 출력값을 생성합니다. | 동심원 - ISO 8600-3 차트에서 시야각을 측정합니다. |
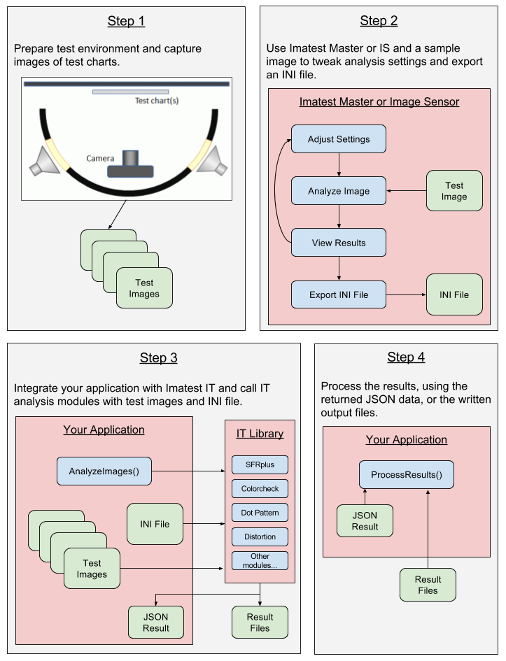
Imatest IT를 사용하여
이 그림에서 볼 수 있듯이, Imatest IT와의 협업은 4단계 프로세스로 진행됩니다. 각 단계는 이 문서에서 자세히 설명되어 있습니다.
1단계: 테스트 환경 준비 및 테스트 목표 설정
입력값 : 없음
출력 : 테스트 이미지
Imatest의 분석 모듈은 테스트 대상의 정확한 구도와 적절한 조명이 확보된 이미지를 필요로 합니다. 테스트 환경 설정이 완료되면 사용할 모듈에 필요한 테스트 대상의 이미지를 촬영하십시오.
2단계: 테스트 이미지로 INI 파일 구성
입력 : 테스트 이미지
출력물 : INI 파일
1단계에서 캡처한 테스트 이미지 샘플을 사용하여 Imatest Master로 이미지 파일을 분석합니다. 이때 응용 프로그램에 필요한 옵션을 선택하고 차트에 대한 관심 영역(ROI)을 설정합니다. 모든 준비가 완료되면 INI 파일을 내보내어 응용 프로그램 소스 파일과 함께 보관합니다.
Imatest 에서는 Imatest IT 설정 창의 "ini 파일 저장" 버튼을 사용하여 필요한 부분만 포함된 ini 파일을 저장할 수 있습니다.
3단계: Imatest IT 모듈 통합 및 호출
입력 : 테스트 이미지, INI 파일
출력 : 분석 결과
원하는 프로그래밍 언어를 사용하여 애플리케이션을 작성하고, 이미지와 INI 파일을 사용하여 모듈 함수를 호출하세요.
4단계: 결과 처리
입력값 : 분석 결과
출력 : 필요한 모든 것
분석 결과를 불러와 원하는 대로 사용하십시오.
Imatest IT 설치 중
아직 Imatest IT를 다운로드하지 않으셨다면 다운로드 페이지 에서 다운로드하실 수 있습니다.
다음으로, 여기에 있는 설치 지침을 따르십시오.
Imatest IT 설치가 완료되면 컴퓨터에서 활성화해야 합니다. 노드 고정형 또는 플로팅 라이선스를 활성화하려면 다음 지침을 따르세요. Imatest IT가 실행되는 컴퓨터에 인터넷 연결이 없는 경우 오프라인으로 활성화 할 수도 있습니다.
설치 후 작업
Linux 사용자만 해당 - LD_LIBRARY_PATH 업데이트
리눅스 컴퓨터에서는 LD_LIBRARY_PATH 환경 변수에 몇 가지 경로를 추가해야 합니다. 이를 위해 ~/.bashrc (또는 유사한 파일)을 편집하고 다음 줄을 추가해야 합니다.
export LD_LIBRARY_PATH=${LD_LIBRARY_PATH}:/usr/local/Imatest/v26.1/IT/bin
export LD_LIBRARY_PATH=${LD_LIBRARY_PATH}:/usr/local/Imatest/v26.1/IT/libs/library/cpp
export LD_LIBRARY_PATH=${LD_LIBRARY_PATH}:/usr/local/MATLAB/MATLAB_Runtime/R2024bruntime/glnxa64
export LD_LIBRARY_PATH=${LD_LIBRARY_PATH}:/usr/local/MATLAB/MATLAB_Runtime/R2024b/bin/glnxa64
export LD_LIBRARY_PATH=${LD_LIBRARY_PATH}:/usr/local/MATLAB/MATLAB_Runtime/R2024b/sys/os/glnxa64
export LD_LIBRARY_PATH=${LD_LIBRARY_PATH}:/usr/local/MATLAB/MATLAB_Runtime/R2024b/sys/opengl/lib/glnxa64
환경 변수 편집에 대한 자세한 내용은 이 문서를 참조하세요.
macOS 전용 - DYLD_LIBRARY_PATH 업데이트
macOS 컴퓨터에서는 ~/.bash_profile 파일에 다음 줄을 추가하여 DYLD_LIBRARY_PATH 환경 변수에 여러 경로를 추가해야 합니다.
인텔 macOS:
export DYLD_LIBRARY_PATH=${DYLD_LIBRARY_PATH}:/Applications/Imatest/IT/v26.1/bin
export DYLD_LIBRARY_PATH=${DYLD_LIBRARY_PATH}:/Applications/Imatest/IT/v26.1/libs/library/cpp
export DYLD_LIBRARY_PATH=${DYLD_LIBRARY_PATH}:/Applications/MATLAB/MATLAB_Runtime/R2024b/runtime/maci64
export DYLD_LIBRARY_PATH=${DYLD_LIBRARY_PATH}:/Applications/MATLAB/MATLAB_Runtime/R2024b/bin/maci64
애플 실리콘 macOS:
export DYLD_LIBRARY_PATH=${DYLD_LIBRARY_PATH}:/Applications/Imatest/IT/v26.1/bin
export DYLD_LIBRARY_PATH=${DYLD_LIBRARY_PATH}:/Applications/Imatest/IT/v26.1/libs/library/cpp
export DYLD_LIBRARY_PATH=${DYLD_LIBRARY_PATH}:/Applications/MATLAB/MATLAB_Runtime/R2024b/runtime/maca64
export DYLD_LIBRARY_PATH=${DYLD_LIBRARY_PATH}:/Applications/MATLAB/MATLAB_Runtime/R2024b/bin/maca64
macOS 전용 - MW_OUT_PROCESS 설정
macOS에서만, Imatest용 플롯을 생성하는 동안 특정 상황에서 MATLAB 런타임이 충돌할 수 있습니다. 이 문제는 Objective-C로 작성된 Concentric Rings 샘플에서 발견되었습니다. 해결 방법은 다음 환경 변수를 설정하는 것입니다(샘플 실행 시 자동으로 설정됨).
export MW_OUT_PROCESS=1
이 설정은 현재 셸에서 임시로 설정하거나 ~/.bash_profile 파일에 설정할 수 있습니다.
(선택 사항) - MCR 캐시를 사용하여 시작 시간 단축
Imatest IT 라이브러리를 처음 사용할 때는 임시 디렉터리에 압축을 풀어야 합니다. 시스템에 따라 몇 초 정도 소요될 수 있습니다. 특히 Imatest IT 구매 라이브러리를 사용하는 경우에는 사용할 때마다 이 과정이 필요할 수 있습니다.
Imatest IT 라이브러리의 반복적인 압축 해제를 방지하려면 MCR_CACHE_ROOT 와 MCR_CACHE_SIZE 라는 두 가지 환경 변수를 추가로 설정해야 합니다. MCR_CACHE_ROOT 변수는 MATLAB 런타임이 Imatest IT 라이브러리를 추출할 위치를 지정합니다. 모든 사용자가 쓰기 권한을 가진 특정 위치로 설정하면 운영 체제가 임시 파일을 정리할 때 해당 캐시가 삭제되지 않습니다. Imatest IT를 사용할 모든 사용자는 이 디렉터리에 대한 읽기 및 쓰기 권한이 있어야 합니다. 그렇지 않으면 Imatest IT 초기화 중에 알 수 없는 오류가 발생할 수 있습니다. MCR_CACHE_SIZE 변수는 MATLAB 런타임 캐시가 다른 라이브러리가 삭제되기 전에 확장될 수 있는 최대 크기(바이트)입니다. Imatest IT를 최상의 성능으로 실행하려면 이 값을 최소 900000000 으로 설정해야 하며, 이렇게 하면 일부 사용자의 경우 Imatest IT 시작 시간이 훨씬 빨라집니다.
여기에 제시된 지침에 따라 이러한 변수를 환경 변수에 추가하십시오.
윈도우
| 변수 이름 | 값 |
|---|---|
| MCR_CACHE_ROOT | C:ProgramDataImatestmcr_cache26.1IT |
| MCR_캐시_크기 | 900000000 |
리눅스
| 변수 이름 | 값 |
|---|---|
| MCR_CACHE_ROOT | /var/lib/imatest/mcr_cache/26.1/IT |
| MCR_캐시_크기 | 900000000 |
macOS
| 변수 이름 | 값 |
|---|---|
| MCR_CACHE_ROOT | $HOME/imatest/mcr_cache/26.1/IT |
| MCR_캐시_크기 | 900000000 |
참고로 macOS의 경우 이 폴더를 직접 생성해야 합니다.
추가 설치 단계
자세한 안내를 보려면 아래에서 원하는 인터페이스를 선택하세요.
애플리케이션이 Imatest IT C 또는 C++ DLL과 상호 작용하려면 시스템에서 해당 DLL의 위치를 알아야 합니다.
Imatest IT C 또는 C++ DLL을 시스템에서 사용할 수 있도록 하는 방법은 두 가지가 있습니다.
- 라이브러리 디렉터리를 시스템의 PATH 또는 LD_LIBRARY_PATH 변수에 추가하십시오(권장).
- DLL 파일을 애플리케이션이 있는 동일한 디렉터리에 복사하십시오.
PATH 또는 LD_LIBRARY_PATH 변수에 추가
사용할 인터페이스에 따라 다음 디렉터리를 시스템의 PATH (Windows) 또는 LD_LIBRARY_PATH (Linux) 변수에 추가하십시오. 추가 방법에 대한 자세한 내용은 시스템 환경 변수 편집을 참조하십시오.
참고: Linux 사용자는 C++ 라이브러리를 사용하는 경우 위의 추가 설치 단계를 따라 이미 이 단계를 완료했을 수 있습니다.
애플리케이션이 Imatest IT C 또는 C++ DLL과 상호 작용하려면 시스템에서 해당 DLL의 위치를 알아야 합니다.
Imatest IT C 또는 C++ DLL을 시스템에서 사용할 수 있도록 하는 방법은 두 가지가 있습니다.
- 라이브러리 디렉터리를 시스템의 PATH 또는 LD_LIBRARY_PATH 변수에 추가하십시오(권장).
- DLL 파일을 애플리케이션이 있는 동일한 디렉터리에 복사하십시오.
PATH 또는 LD_LIBRARY_PATH 변수에 추가
사용할 인터페이스에 따라 다음 디렉터리를 시스템의 PATH (Windows) 또는 LD_LIBRARY_PATH (Linux) 변수에 추가하십시오. 추가 방법에 대한 자세한 내용은 시스템 환경 변수 편집을 참조하십시오.
참고: Linux 사용자는 C++ 라이브러리를 사용하는 경우 위의 추가 설치 단계를 따라 이미 이 단계를 완료했을 수 있습니다.
| 운영 체제 | 변수 이름 | 값 |
|---|---|---|
| 윈도우 | 길 | C:Program FilesImatestv26.1ITlibslibraryc |
| 리눅스 | LD_LIBRARY_PATH | /usr/local/Imatest/v26.1/IT/libs/library/c |
| 운영 체제 | 변수 이름 | 값 |
|---|---|---|
| 윈도우 | 길 | C:Program FilesImatestv26.1ITlibslibrarycpp |
| 리눅스 | LD_LIBRARY_PATH | /usr/local/Imatest/v26.1/IT/libs/library/cpp |
| macOS | DYLD_LIBRARY_PATH | /Applications/Imatest/IT/v26.1/libs/library/cpp |
Imatest IT DLL 복사하기
PATH 또는 LD_LIBRARY_PATH 변수를 변경하지 않으려면 Imatest IT DLL을 프로젝트 실행 파일과 동일한 디렉터리에 복사하여 참조할 수도 있습니다.
Visual Studio 사용자는 빌드 후 이벤트를 추가하여 이 프로세스를 자동화할 수 있습니다.
- 솔루션 탐색기에서 프로젝트를 마우스 오른쪽 버튼으로 클릭하고 속성을 선택합니다.
- [구성 속성 및 빌드 이벤트] 에서 [빌드 후 이벤트]를 선택합니다.
- 명령줄 상자에 다음 내용을 추가하세요.
copy /Y "C:Program FilesImatestv26.1ITlibslibrarycimatest_library.dll" ";$(TargetDir)"
프로젝트의 각 구성에 대해 이 단계를 반복하십시오.
이제 imatest_library.dll 파일이 프로젝트의 target 디렉터리에 자동으로 복사되어 애플리케이션에서 로드할 수 있게 됩니다.
Imatest IT DLL 복사하기
PATH 또는 LD_LIBRARY_PATH 변수를 변경하지 않으려면 Imatest IT DLL을 프로젝트 실행 파일과 동일한 디렉터리에 복사하여 참조할 수도 있습니다.
Visual Studio 사용자는 빌드 후 이벤트를 추가하여 이 프로세스를 자동화할 수 있습니다.
- 솔루션 탐색기에서 프로젝트를 마우스 오른쪽 버튼으로 클릭하고 속성을 선택합니다.
- [구성 속성 및 빌드 이벤트] 에서 [빌드 후 이벤트]를 선택합니다.
- 명령줄 상자에 다음 내용을 추가하세요.
copy /Y "C:Program FilesImatestv26.1ITlibslibrarycppimatest_library.dll" "$(TargetDir)"
프로젝트의 각 구성에 대해 이 단계를 반복하십시오.
이제 imatest_library.dll 파일이 프로젝트의 target 디렉터리에 자동으로 복사되어 애플리케이션에서 로드할 수 있게 됩니다.
Objective-C/C++를 사용하여 애플리케이션이 Imatest IT C++ 라이브러리와 상호 작용하려면 시스템에서 해당 라이브러리의 위치를 알아야 합니다.
Imatest IT C++ 라이브러리를 시스템에서 사용할 수 있도록 하는 방법은 두 가지입니다.
- 라이브러리 디렉터리를 시스템의 DYLD_LIBRARY_PATH 변수에 추가하십시오.
- 라이브러리를 애플리케이션이 있는 동일한 디렉터리에 복사하세요.
DYLD_LIBRARY_PATH 변수에 추가
사용할 인터페이스에 따라 다음 폴더 경로를 시스템의 DYLD_LIBRARY_PATH 변수에 추가하십시오. 추가 방법에 대한 자세한 내용은 시스템 환경 변수 편집을 참조하십시오.
| 운영 체제 | 변수 이름 | 값 |
|---|---|---|
| macOS | DYLD_LIBRARY_PATH | /Applications/Imatest/IT/v26.1/libs/library/cpp |
| macOS | DYLD_LIBRARY_PATH | /Applications/Imatest/IT/v26.1/bin |
Imatest IT 라이브러리 복사하기
DYLD_LIBRARY_PATH 변수를 변경하지 않으려면 Imatest IT 라이브러리를 프로젝트 실행 파일과 동일한 디렉터리에 복사하여 참조할 수도 있습니다.
Xcode 사용자는 파일 복사 및 스크립트 실행 빌드 단계를 추가하여 이 프로세스를 자동화할 수 있습니다.
- 프로젝트 편집기에서 애플리케이션의 대상을 선택한 다음 빌드 단계 창으로 이동합니다.
- 편집기 메뉴로 이동한 다음 빌드 단계 추가:파일 복사 빌드 단계 추가를 선택합니다.
- 파일 복사 단계에서 대상을 제품 디렉터리 로 설정합니다.
- + 아이콘을 클릭한 다음 '다른 항목 추가...' 버튼을 클릭하세요.
- /Applications/Imatest/IT/v26.1/libs/library/cpp/ 경로로 이동하여 libImatest.dylib 파일을 선택하고 열기를 누른 다음 완료를 누릅니다.
- 파일 복사 단계에서 "로그인 시 복사" 옵션 을 선택 해제합니다.
- /Applications/Imatest/IT/v26.1/bin/ShaferFilechck.dylib에 대해서도 동일한 과정을 반복하십시오.
- 스크립트 실행 단계에 install_name_tool -change @loader_path/libImatest.dylib @rpath/libImatest.dylib ${TARGET_BUILD_DIR}/${WRAPPER_NAME}/Contents/MacOS/${TARGETNAME}를 추가하세요.
The Imatest IT Python Interface is shipped as a Python module. Before referencing it in your scripts, you will need to install it using Python's package manager. This must be done on the command line, and requires Administrator access. If you don't know how to open a Command Prompt with Administrator privileges in Windows, see this helpful article.
Note: Imatest IT only supports Python versions 3.9, 3.10, 3.11 and 3.12(see IT/Python Supported Python Versions).
First, navigate to the Imatest IT Python library directory.
Windows
cd C:Program FilesImatestv26.1ITlibslibrarypython
Linux
cd /usr/local/Imatest/v26.1/IT/libs/library/python
macOS
cd /Applications/Imatest/IT/v26.1/libs/library/python
Inside this directory is the IT python package, named imatest_it-26.1.0-py2.py3-none-any.whl for Imatest IT 26.1.0.
Next, run the following command to install the Imatest IT Python module:
Windows (assuming you are running Python 3.9 installed in C:Program FilesPython39)
C:Program FilesPython39python.exe -m pip install --find-links . imatest-it
or supply the *.whl file name to pip, for example
C:Program FilesPython39python.exe -m pip install imatest_it-26.1.0-py2.py3-none-any.whl
Linux
sudo python3 -m pip install --find-links . imatest-itor supply the *.whl file name to pip, for example
sudo python3 -m pip install imatest_it-26.1.0-py2.py3-none-any.whlmacOS
sudo -H python3 -m pip install --find-links . imatest-itor supply the *.whl file name to pip, for example
sudo -H python3 -m pip install imatest_it-26.1.0-py2.py3-none-any.whlYou will now be able to reference Imatest IT in your Python scripts using the import statement.
Imatest IT .NET 라이브러리를 사용하기 위해 추가적인 설치 단계는 필요하지 않습니다.
Imatest IT .NET 라이브러리를 사용하기 위해 추가적인 설치 단계는 필요하지 않습니다.
명령줄이나 스크립트 파일에서 Imatest IT EXE 프로그램을 간편하게 실행하려면 Imatest IT bin 디렉터리를 PATH 환경 변수에 추가해야 합니다.
Windows에서는 설치 중에 자동으로 수행되지만, EXE 프로그램을 실행하려고 할 때 "sfr.exe는 내부 또는 외부 명령, 실행 가능한 프로그램 또는 배치 파일로 인식되지 않습니다"와 같은 오류가 발생하는 경우 bin 디렉터리를 PATH 환경 변수에 수동으로 추가해야 할 수 있습니다.
다음 지침 에 따라 C:Program FilesImatestv26.1ITbin을 시스템 PATH 환경 변수에 추가하십시오. 변경 사항을 적용하려면 새 명령 프롬프트 창을 열어야 합니다.
명령줄이나 스크립트 파일에서 Imatest IT EXE 프로그램을 간편하게 실행하려면 Imatest IT bin 디렉터리를 PATH 환경 변수에 추가해야 합니다.
Linux 시스템에서는 $PATH:/usr/local/Imatest/v26.1/IT/bin을 PATH 환경 변수에 수동으로 추가해야 합니다. 다음 지침을 참조하십시오.
macOS 시스템에서는 $PATH:/Applications/Imatest/IT/v26.1/bin을 PATH 환경 변수에 수동으로 추가해야 합니다. 다음 지침을 참조하십시오.
1단계: 테스트 환경 준비 및 테스트 목표 설정
Imatest의 분석 모듈은 정확한 결과를 얻기 위해 테스트 대상의 구도와 조명이 적절한 이미지가 필요합니다. 이미지 테스트 환경 설정에 대한 자세한 내용은 이 문서를 참조하십시오.
Imatest는 이미지 분석의 정확도를 향상시키는 데 도움이 되는 다양한 테스트 차트를 제공합니다.
2단계: 테스트 이미지로 INI 파일 구성
테스트 이미지 외에도 Imatest IT 모듈 기능에 중요한 입력 요소는 INI 구성 파일 입니다. 이 파일에는 입력 이미지(예: ROI[관심 영역]), 분석 세부 정보 및 출력 파일 위치에 대한 설정이 포함되어 있습니다. 애플리케이션에서 Imatest IT를 사용하기 전에 특정 테스트 요구 사항에 맞게 하나 이상의 INI 파일을 구성해야 합니다.
Imatest Master를 사용하여 INI 파일 생성
Imatest IT 전용 INI 파일 설정
Imatest IT 관련 설정을 구성하려면 메인 창 메뉴 모음에서 [설정]을 선택한 다음 [IT 및 합격/불합격 설정...]을 선택하십시오. 이 창에 있는 IT 관련 설정에 대한 자세한 설명은 이 문서를 참조하십시오. 변경 사항을 적용한 후 [확인] 을 클릭하십시오.
이미지 분석 INI 파일 설정
Imatest IT를 사용하여 실행할 테스트의 프레임 및 크기와 일치하는 테스트 대상 이미지 파일을 확보한 후, 필요한 모듈을 사용하여 Imatest Master로 분석하십시오. 이미지의 픽셀 수가 실제 운영 환경에서 사용할 이미지와 동일한지 확인하십시오.
원하는 결과를 얻을 때까지 다양한 설정으로 테스트를 반복하십시오.
INI 파일 내보내기
관심 영역(ROI), 계산 세부 정보, 출력 파일 및 폴더 위치 등 요구 사항에 맞게 IT 설정을 구성했으면 Imatest 메인 창으로 돌아가 메뉴 모음에서 INI 파일 설정 , 설정 저장...을 선택합니다. INI 파일을 저장할 위치를 선택하고 알아보기 쉬운 이름으로 지정합니다. 이 파일 이름은 Imatest IT 모듈 함수를 호출할 때 두 번째 입력 매개변수가 됩니다.
Imatest 에서는 Imatest IT 설정 창의 "ini 파일 저장" 버튼을 사용하여 필요한 부분만 포함된 ini 파일을 저장할 수 있습니다.

왼쪽의 각 상자에서 모듈을 선택한 다음 "ini 파일 저장"을 눌러 최대 4개의 모듈을 제어하는 파일을 만들 수 있습니다. 위 예시에서 [sfr] 및 [sfrreg] 모듈의 ini 섹션과 함께 [imatest], [api], [dcraw], [rdraw], [sqf] 및 [visnoise] 모듈의 ini 섹션이 적절한 경우 포함됩니다.
3단계: Imatest IT 모듈 통합 및 호출
테스트 이미지와 INI 파일이 준비되었으므로 이제 애플리케이션을 통합하고 Imatest IT의 모듈 기능을 사용하여 이미지를 분석할 수 있습니다.
자세한 안내를 보려면 아래에서 원하는 인터페이스를 선택하세요.
Windows (Visual Studio) Project Setup
First, you need to configure your project to be able to find the Imatest IT and b Runtime libraries. To do this, right click on the project and choose Properties. Add the following include directories in the sections under Configuration Properties:
| Category | Property | Value |
|---|---|---|
| C/C++ / General | Additional Include Directories | C:Program FilesMATLABMATLAB RuntimeR2024bexterninclude C:Program FilesImatestv26.1ITlibslibraryc |
| Linker / General | Additional Include Directories | C:Program FilesMATLABMATLAB RuntimeR2024bexternlibwin64microsoft C:Program FilesImatestv26.1ITlibslibraryc |
| Linker / Input | Additional Dependencies | mclmcrrt.lib imatest_library.lib |
Note: Imatest only supports 64-bit architectures. You must use the x64 platform configuration when using Imatest IT in your projects. You may need to manually add this platform configuration to your project first. For information on how to do this, see this article.
macOS
Note: For macOS the Imatest IT C library must be used from an Objective-C wrapper. Please see the Objective-C documentation for details.
Initializing the Imatest IT Library
Now that your project references are set up, the next step is to include the imatest_library.h header file. Add this line to the top of your source file:
#include "imatest_library.h"Next, initialize the MATLAB Runtime application state by calling mclInitializeApplication(const char **options, int count). Most users can ignore the options and count parameters; just pass in NULL and 0, respectively. The function will return 0 if successful, allowing you to trap errors and handle them gracefully. This should only be called once during the life of your application.
#include "imatest_library.h"
int main()
{
    if (!mclInitializeApplication(NULL,0))
    {
        printf("Error: could not initialize application properly.n");
        return -1001;
    }
    /// ...
}
The last initialization step is to call imatest_libraryInitialize(). This will prepare the Imatest IT library for use. The function also returns 0 if it is successful.
#include "imatest_library.h"
int main()
{
    if (!mclInitializeApplication(NULL,0))
    {
        printf("Error: could not initialize the MATLAB Runtime properly.n");
        return -1001;
    }
    if(!imatest_libraryInitialize())
    {
        printf("Error: could not initialize the Imatest IT library properly.n");
        return -1002;
    }
    /// ...
}
Calling the Imatest IT C Library Interface
Now that the MATLAB Runtime and Imatest IT library are all ready to go, the next step is the prepare the arguments that will be passed into the IT module functions. Each of the IT modules has the same method signature (with the exception of OIS). In this example, we will use the sfr function. The signature for the SFR module function looks like this:
bool mlfSfr_shell(int nargout, mxArray** nret, mxArray* inputFile, mxArray* rootDir, mxArray* inputKeys, mxArray* opMode, mxArray* varargin);
The Imatest IT C library encapsulates all input and output arguments inside mxArray types. This is a generic pointer type that can represent any data type. See below for more information on using mxArrays.
The Imatest IT C library parameters are listed here:
| Parameter Name | Data Type | Description |
|---|---|---|
| nargout | int | The number of expected output arguments. This will always be 1 for the JSON result string. |
| &nret | mxArray** [const char*] | The output object, which will be a string wrapped in an mxArray. |
| inputFile | mxArray* [const char*] | Image file path. A full path name may be used (and is recommended), such as "C:Program FilesImatestv26.1ITsamplesimagessfr_example.jpg". If a relative path name is used, the path is relative to your calling program, not the value of the rootDir parameter. Multiple files can be analyzed by using a wildcard (*) symbol in the path. For example, if the inputFile parameter is "C:ImatestiPhone6_*.jpg", all .jpg files in the folder C:Imatest with filenames beginning with "iPhone6_" will be analyzed. |
| rootDir | mxArray* [const char*] | Directory containing your INI file. If you do not pass a file path in as the first item in the varargin parameter, then Imatest IT will use a file named imatest-v2.ini found in this directory as your INI configuration. |
| inputKeys | mxArray* [const char*] | This value should always be the string "JSON". XML output has been deprecated. |
| opMode | mxArray* [const char*] | String containing one of the following operation codes, which tells Imatest IT how to analyze your image(s), and how to read the values contained in the varargin parameter. If you are supplying your own full path to an INI file, and it is the first item in the varargin collection, then use one of these values: -7, -8, -10, or -17. If your INI file is named imatest-v2.ini and resides in the directory passed in as rootDir, then use one of these values: -5, -6, -9, and -15. The different opCode values direct how Imatest IT will behave. For more information on the different op modes supported by Imatest IT, see this article. |
| varargin | mxArray* [multiple const char*] | This is a catch all array structure for other parameters required by the various opModes. The contents of this array depend on which op mode you are using, and on how many images you will be processing. For information on how to populate this array, see here. |
Working with mxArrays
The Imatest IT C library receives and returns data via mxArray pointers. The MATLAB Runtime provides helper methods for allocating, interacting with, and deallocating mxArray structures.
Most of the Imatest IT C library input parameters (with the exception of varargin and raw image data passed in when using direct read mode) are strings (const char*) wrapped as mxArrays. You can create these mxArray pointers by using the mxCreateString(const char *str) function.
Before your program terminates, you must deallocate all of your mxArray pointers using the mxDestroyArray(mxArray *pm) function, and then set the pointers to NULL.
Here is an example of the typical lifecycle of an mxArray string parameter:
// Declare the pointer variable
mxArray *inputFile = NULL;
// Initialize the mxArray with a string
inputFile = mxCreateString("C:\Program Files\Imatest\v26.1\IT\samples\images\sfr_example.jpg");
// Make calls to Imatest IT library
// ...
// Destroy the mxArray
mxDestroyArray(inputFile);
inputFile = NULL;
The varargin parameter is a Matlab Cell Array containing zero or more additional input parameters, depending on the op mode. To initialize this parameter, use the mxCreateCellMatrix(int rows, int columns) function. You should create the varargin cell array with the exact number of cells required for your op mode. The rows parameter should always be 1, and the columns parameter should be the number of parameters you will be supplying.
You can then set the individual cells using mxSetCell(mxArray *array, int index, mxArray *value), where array is the varargin pointer, index is a zero-based index, and value is an mxArray pointer to the value being added to the array.
The varargin parameter is deallocated in the same way as other mxArrays, and you should not deallocate the individual cells of the array.
mxArray *varargin = NULL, *iniFile = NULL, *inputFile2 = NULL;
iniFile = mxCreateString("C:\Program Files\Imatest\v26.1\IT\samples\cpp\Imatest_INI\imatest-v2.ini");
inputFile2 = mxCreateString("C:\Program Files\Imatest\v26.1\IT\samples\images\sfr_example.jpg");
varargin = mxCreateCellMatrix(1, 2);
mxSetCell(varargin, 0, iniFile);
mxSetCell(varargin, 1, inputFile2);
// ...
mxDestroyArray(varargin);
Calling Imatest IT Modules
Now that the library is initialized, and all of the input parameters are set up, it is time to call the Imatest IT analysis function. This example uses the SFR module, but the same code can be used to call the rest of the Imatest modules (with the exception of OIS, which has different inputs).
The first parameter will always be 1, and the second is a reference to an mxArray* pointer that will contain the JSON output of the analysis. If the function returns false, it means an error has occurred. Check the stdout and stderr streams for details on what went wrong, and see the section Error Handling below for information on handling errors gracefully.
When the call is successful, the JSON output will reside inside the outputJSON pointer. You can extract the string using the mxArrayToString(const mxArray *array_ptr) function.
if (!mlfSfr_shell(1, &outputJSON, inputFile, rootDir, inputKeys, opMode, varargin))
{
    printf("*** Error calling SFR.  Check output messages for details. ***n");
}
else
{
    jsonOutput = mxArrayToString(outputJSON);
    printf(jsonOutput);
}
When you are finished making calls to the Imatest IT C library, you then need to make three more function calls to terminate the library and the MATLAB Runtime.
mlfIt_terminate();
imatest_libraryTerminate();
mclTerminateApplication();
Windows (Visual Studio) Project Setup
First, you need to configure your project to be able to find the Imatest IT and MATLAB Runtime libraries. To do this, right click on the project and choose Properties. Add the following include directories in the sections under Configuration Properties:
| Category | Property | Value |
|---|---|---|
| C/C++ / General | Additional Include Directories | C:Program FilesMATLABMATLAB RuntimeR2024bexterninclude C:Program FilesImatestv26.1ITlibslibrarycpp |
| Linker / General | Additional Include Directories | C:Program FilesMATLABMATLAB RuntimeR2024bexternlibwin64microsoft C:Program FilesImatestv26.1ITlibslibrarycpp |
| Linker / Input | Additional Dependencies | mclmcrrt.lib imatest_library.lib |
Note: Imatest only supports 64-bit architectures. You must use the x64 platform configuration when using Imatest IT in your projects. You may need to manually add this platform configuration to your project first. For information on how to do this, see this article.
macOS
Note: For macOS the Imatest IT C++ library must be used from an Objective-C wrapper. Please see the Objective-C documentation for details.
Initializing the Imatest IT Library
Now that your project references are set up, the next step is to include the imatest_library.h header file. Add this line to the top of your source file:
#include "imatest_library.h"Next, initialize the MATLAB Runtime application state by calling mclInitializeApplication(const char **options, int count). Most users can ignore the options and count parameters; just pass in NULL and 0, respectively. The function will return 0 if successful, allowing you to trap errors and handle them gracefully.
#include "imatest_library.h"
int main()
{
    if (!mclInitializeApplication(NULL,0))
    {
        std::cerr << "Error: could not initialize the MATLAB Runtime properly." << std::endl;
        return -1001;
    }
    /// ...
}
The last initialization step is to call imatest_libraryInitialize(). This will prepare the Imatest IT library for use. The function also returns 0 if it is successful.
#include "imatest_library.h'
int main()
{
    if (!mclInitializeApplication(NULL,0))
    {
        std::cerr << "Error: could not initialize the MATLAB Runtime properly." << std::endl;
        return -1001;
    }
    if(!imatest_libraryInitialize())
    {
        std::cerr << "Error: could not initialize the Imatest IT library properly." << std::endl;
        return -1002;
    }
    /// ...
}
Calling the Imatest IT C++ Library Interface
Now that the MATLAB Runtime and Imatest IT library are all ready to go, the next step is the prepare the arguments that will be passed into the IT module functions. Each of the IT modules has the same method signature (with the exception of OIS). In this example, we will use the sfr function. The signature for the SFR module function looks like this:
void sfr_shell(int nargout, mwArray& nret, const mwArray& inputFile, const mwArray& rootDir, const mwArray& inputKeys, const mwArray& opMode, const mwArray& varargin);
The Imatest IT C++ library encapsulates all input and output arguments inside mwArray objects. This is a generic wrapper class that can represent any data type. See below for more information on using mwArrays.
The Imatest IT C++ library parameters are listed here:
| Parameter Name | Data Type | Description |
|---|---|---|
| nargout | int | The number of expected output arguments. This will always be 1 for the JSON result string. |
| nret | mwArray& [const char*] | The output object, which will be a string wrapped in an mwArray object. |
| inputFile | mwArray& [const char*] | Image file path. A full path name may be used (and is recommended), such as "C:Program FilesImatestv26.1ITsamplesimagessfr_example.jpg". If a relative path name is used, the path is relative to your calling program, not the value of the rootDir parameter. Multiple files can be analyzed by using a wildcard (*) symbol in the path. For example, if the inputFile parameter is "C:ImatestiPhone6_*.jpg", all .jpg files in the folder C:Imatest with filenames beginning with "iPhone6_" will be analyzed. |
| rootDir | mwArray& [const char*] | Directory containing your INI file. If you do not pass a file path in as the first item in the varargin parameter, then Imatest IT will use a file named imatest-v2.ini found in this directory as your INI configuration. |
| inputKeys | mwArray& [const char*] | This value should always be the string "JSON". XML output has been deprecated. |
| opMode | mwArray& [const char*] | String containing one of the following operation codes, which tells Imatest IT how to analyze your image(s), and how to read the values contained in the varargin parameter. If you are supplying your own full path to an INI file, and it is the first item in the varargin collection, then use one of these values: -7, -8, -10, or -17. If your INI file is named imatest-v2.ini and resides in the directory passed in as rootDir, then use one of these values: -5, -6, -9, and -15. The different opCode values direct how Imatest IT will behave. For more information on the different op modes supported by Imatest IT, see this article. |
| varargin | mwArray& [multiple const char*] | This is a catch all array structure for other parameters required by the various op modes. The contents of this array depend on which op mode you are using, and on how many images you will be processing. For information on how to populate this array, see here. |
Working with mwArrays
The Imatest IT C++ library receives and returns data via mwArray objects. Unlike the C library, the C++ library's mwArray class is object-oriented, and also takes care of allocating and deallocating automatically. There is no need to manually destroy the mwArray objects.
Most of the Imatest IT C++ library input parameters (with the exception of varargin and raw image data passed in when using direct read mode) are strings (const char) wrapped as mwArray objects. You can create these mwArray pointers by passing a const char into the constructor.
mwArray opMode("-5");
The varargin parameter is a Matlab Cell Array containing zero or more additional input parameters, depending on the opMode. To initialize this parameter, use the mwArray(int num_rows, int num_cols, mxClassID mxID) constructor, passing 1 for num_rows, the number of extra arguments required as num_cols, and the constant mxCELL_CLASS as mxID. The num_cols value should be the exact number of cells required for your op mode. See this article for more information on populating the varargin parameter.
You can then set the individual cells using the mwArray object's Get(int row, int column) and Set(const mwArray& arr) methods. Note that the row and column parameters are 1-based indexes.
/// Set the first cell of varargin to be the iniFilePath
varargin.Get(1,1).Set(iniFilePath);
Calling Imatest IT Modules
Now that the library is initialized, and all of the input parameters are set up, it is time to call the Imatest IT analysis function. This example uses the SFR module, but the same code can be used to call the rest of the Imatest modules (with the exception of OIS, which has different inputs).
The first parameter will always be 1, and the second is a reference to an uninitialized mwArray variable that will contain the JSON output of the analysis. If the function throw an exception, it means an error has occurred. Check the exception messages and stdout and stderr streams for details on what went wrong. See the section on Error Handling below for more information on catching and handling exceptions gracefully.
When the call is successful, the JSON output will reside inside the outputJSON pointer. You can extract the string by calling the mwArray.ToString() method, then converting that result to a const char*. Note that you must declare the mwString variable separately for this to work.
sfr_shell(1, outputJSON, inputFile, rootDir, inputKeys, opMode, varargin)
mwString mwStr = outputJSON.ToString();
const char* strOutputJSON = (const char*)mwStr;
std::cout << strOutputJSON << std::endl;
When you are finished making calls to the Imatest IT C++ library, you then need to make three more function calls to terminate the library and the Matlab Runtime.
it_terminate();
imatest_libraryTerminate();
mclTerminateApplication();
XCode Project Setup
First, you need to configure your project to be able to find the Imatest IT and MATLAB Runtime libraries. To do this, in the project editor, go to Build Settings and add the follow paths and linker flags:
| Category | Property | Value |
|---|---|---|
| Search Paths | Header Search Paths | /Applications/Imatest/IT/v26.1/libs/library/cpp /Applications/MATLAB/MATLAB_Runtime/R2024b/extern/include |
| Search Paths | Library Search Paths | /Applications/Imatest/IT/v26.1/libs/library/cpp /Applications/MATLAB/MATLAB_Runtime/R2024b/runtime/maci64 |
| Linking | Other Linker Flags | -lmwmclmcrrt -lImatest |
Note: Imatest only supports the x86_64 architecture.
Next, in the General pane,
-
- Go to the Linked Frameworks and Libraries section
-
- Click the + button
-
- Click the Add Other... button
-
- Navigate to /Applications/Imatest/IT/v26.1/libs/library/cpp
-
- select libImatest.dylib and click Open.
-
- Add Cocoa.Framework in a similar fashion if it has not been added.
Additional step for Apple Silicon
In order to avoid an error in MATLAB Runtime execution, for Apple Silicon builds only please define the following environment variable prior to execution:
MW_OUT_PROCESS=1
Adding Symbolic Breakpoints to XCode projects
When the MATLAB Runtime initializes it emits SIGSEGV and SIGBUS. The MATLAB Runtime will properly handle this issue on its own if left to do so. The easiest way deal with this in XCode is to set symbolic break points and add commands that instruct the debugger to ignore these signals. Without these commands, the debugger will break on those signals when the MATLAB Runtime initializes and runs.
-
- Go to Debug:Break Points:Create Symbolic Breakpoint.
-
- In the Symbol field, type NSApplicationMain
-
- Set the Action dropdown to 'Debugger Command'
-
- In the command field enter process handle --pass true --stop false --notify true SIGSEGV
-
- Check 'Automatically continue after evaluating'
-
- Repeat steps 1-5 adding another symbolic with the following command process handle --pass true --stop false --notify true SIGBUS
Initializing the Imatest IT Library
Now that your project references are set up, the next step is to include the libImatest.h header file. Add these lines after your other includes and imports:
#define HRESULT HRESULT_MATLAB
#include "libImatest.h"
#include "mclmcrrt.h"
#include "mclcppclass.h"
#undef HRESULT
Note that mclmcrrt.h defines HRESULT, which is also defined by Cocoa headers, so we use the preprocessor to redefine HRESULT in mclmcrrt.h and dependent header files to resolve the conflict.
Next, initialize the MATLAB Runtime application state by calling mclInitializeApplication(const char **options, int count). Most users can ignore the options and count parameters; just pass in NULL and 0, respectively. The function will return 0 if successful, allowing you to trap errors and handle them gracefully. This should only be called once during the life of your application. The last initialization step is to call libImatestInitialize(). This will prepare the Imatest IT library for use. The function also returns 0 if it is successful. Since in Cocoa all non-GUI methods cannot run on the main thread, detach a thread to run the method. The methods below are added to the AppDelegate class for the UI.
- (void) applicationWillFinishLaunching:(NSNotification *)aNotification
{
    NSLog(@"Processing applicationWillFinishLaunching event");
    [NSThread detachNewThreadSelector:@selector(initApp:) toTarget:self withObject:nil];
}
- (void)initApp:(id)param
{
    @autoreleasepool {
        NSLog(@"Executing initialization thread...");
        mclmcrInitialize();
        if (!mclInitializeApplication(NULL,0))
        {
            NSString *stringError =
            [NSString stringWithCString:mclGetLastErrorMessage()
                               encoding:NSMacOSRomanStringEncoding];
            NSLog(@"Initializing the MATLAB Runtime failed");
            NSLog(@"%@", stringError);
            return;
        }
        NSLog(@"Initializing Imatest IT library");
        if (!libImatestInitialize()
        {
            NSString *stringError =
            [NSString stringWithCString:mclGetLastErrorMessage()
                               encoding:NSMacOSRomanStringEncoding];
            NSLog(@"Initializing the IT library failed");
            libImatestPrintStackTrace();
            NSLog(@"%@", stringError);
            return;
        }
        NSLog(@"Initialized");
    }
}
Calling the Imatest IT C++ Library Interface
Now that the MATLAB Runtime and Imatest IT library are all ready to go, the next step is the prepare the arguments that will be passed into the IT module functions. Each of the IT modules has the same method signature (with the exception of OIS). In this example, we will use the sfrplus function. The signature for the SFR module function looks like this:
void sfrplus_shell(int nargout, mwArray& nret, const mwArray& inputFile, const mwArray& rootDir, const mwArray& inputKeys, const mwArray& opMode, const mwArray& varargin);
The Imatest IT C++ library encapsulates all input and output arguments inside mwArray objects. This is a generic wrapper class that can represent any data type. See below for more information on using mwArrays.
The Imatest IT C++ library parameters are listed here:
| Parameter Name | Data Type | Description |
|---|---|---|
| nargout | int | The number of expected output arguments. This will always be 1 for the JSON result string. |
| nret | mwArray& [const char*] | The output object, which will be a string wrapped in an mwArray object. |
| inputFile | mwArray& [const char*] | Image file path. A full path name may be used (and is recommended), such as "C:Program FilesImatestv26.1ITsamplesimagessfr_example.jpg". If a relative path name is used, the path is relative to your calling program, not the value of the rootDir parameter. Multiple files can be analyzed by using a wildcard (*) symbol in the path. For example, if the inputFile parameter is "C:ImatestiPhone6_*.jpg", all .jpg files in the folder C:Imatest with filenames beginning with "iPhone6_" will be analyzed. |
| rootDir | mwArray& [const char*] | Directory containing your INI file. If you do not pass a file path in as the first item in the varargin parameter, then Imatest IT will use a file named imatest-v2.ini found in this directory as your INI configuration. |
| inputKeys | mwArray& [const char*] | This value should always be the string "JSON". XML output has been deprecated. |
| opMode | mwArray& [const char*] | String containing one of the following operation codes, which tells Imatest IT how to analyze your image(s), and how to read the values contained in the varargin parameter. If you are supplying your own full path to an INI file, and it is the first item in the varargin collection, then use one of these values: -7, -8, -10, or -17. If your INI file is named imatest-v2.ini and resides in the directory passed in as rootDir, then use one of these values: -5, -6, -9, and -15. The different opCode values direct how Imatest IT will behave. For more information on the different op modes supported by Imatest IT, see this article. |
| varargin | mwArray& [multiple const char*] | This is a catch all array structure for other parameters required by the various op modes. The contents of this array depend on which op mode you are using, and on how many images you will be processing. For information on how to populate this array, see here. |
Working with mwArrays
The Imatest IT C++ library receives and returns data via mwArray objects. Unlike the C library, the C++ library's mwArray class is object-oriented, and also takes care of allocating and deallocating automatically. There is no need to manually destroy the mwArray objects.
Most of the Imatest IT C++ library input parameters (with the exception of varargin and raw image data passed in when using direct read mode) are strings (const char) wrapped as mwArray objects. You can create these mwArray pointers by passing a const char into the constructor.
mwArray opMode("-5");
The varargin parameter is a Matlab Cell Array containing zero or more additional input parameters, depending on the opMode. To initialize this parameter, use the mwArray(int num_rows, int num_cols, mxClassID mxID) constructor, passing 1 for num_rows, the number of extra arguments required as num_cols, and the constant mxCELL_CLASS as mxID. The num_cols value should be the exact number of cells required for your op mode. See this article for more information on populating the varargin parameter.
You can then set the individual cells using the mwArray object's Get(int row, int column) and Set(const mwArray& arr) methods. Note that the row and column parameters are 1-based indexes.
/// Set the first cell of varargin to be the iniFilePath
varargin.Get(1,1).Set(iniFilePath);
Calling Imatest IT Modules
Now that the library is initialized, and all of the input parameters are set up, it is time to call the Imatest IT analysis function. This example uses the SFR module, but the same code can be used to call the rest of the Imatest modules (with the exception of OIS, which has different inputs).
The first parameter will always be 1, and the second is a reference to an uninitialized mwArray variable that will contain the JSON output of the analysis. If the function throw an exception, it means an error has occurred. Check the exception messages and stdout and stderr streams for details on what went wrong. See the section on Error Handling below for more information on catching and handling exceptions gracefully.
When the call is successful, the JSON output will reside inside the outputJSON mwArray.
- (void)postTest: (id)param
{
    @autoreleasepool {
        try{
            // Declare and initialize outputJSON, fileParam, pathParam, keysParam, modeParam, and varargin mwArray's
            NSLog(@"Running test.");
            sfrplus_shell(1, outputJSON, fileParam, pathParam, keysParam, modeParam, varargin);
            // Process JSON returned in outputJSON mwArray
        } catch (mwException ex){
            NSLog(@"Error");
            NSLog(@"%s", ex.what());
            ex.print_stack_trace();
        }
    }
}
- (void)runTest
{
     // Start a new thread to run sfrplus_shell()
     [NSThread detachNewThreadSelector:@selector(postTest:) toTarget:self withObject:nil];
}
The JSON string returned in outputJSON has UTF-16 encoding. This can be converted to a NSString with the following
auto numel = outputJSON.NumberOfElements();
std::u16string buffer(numel+1, 0);
outputJSON.GetCharData(&abuffer[0], numel);
char* data = (char*)buffer.data();
unsigned long size = buffer.size()*sizeof(char16_t);
NSString* jsonString =[[NSString alloc] initWithBytes:data length:size encoding:NSUTF16LittleEndianStringEncoding];
When you are finished making calls to the Imatest IT C++ library, you then need to make three more function calls (it_terminate(), libImatestTerminate(), and mclTerminateApplication) to terminate the library and the Matlab Runtime.
- (NSApplicationTerminateReply)applicationShouldTerminate:(NSApplication *)sender
{
    [NSThread detachNewThreadSelector:@selector(terminateApp:) toTarget:self withObject:sender];
    return NSTerminateLater;
}
-(void)terminateApp:(NSApplication *)theApplication
{
    NSLog(@"Executing termination thread");
    it_terminate();
    libImatestTerminate();
    mclTerminateApplication();
    [theApplication replyToApplicationShouldTerminate: YES];
}
Note: Imatest only supports 64-bit architectures. You must use the 64-bit version of Python when using Imatest IT.
Calling the Imatest IT Python Interface
At the top of your script file, include this line to import the ImatestLibrary class from the imatest.it module:
from imatest.it import ImatestLibraryNext, create an instance of the ImatestLibrary class. Behind the scenes, the ImatestLibrary constructor will start up the Matlab MCR Runtime and load all the IT libraries into memory. This will take a few seconds the first time you run it, but should be faster on subsequent runs, especially if you have set your system's environment variables to the recommended values as described above.
from imatest.it import ImatestLibrary
imatestLib = ImatestLibrary()
Now that the Matlab MCR and Imatest IT library are all ready to go, the next step is the prepare the arguments that will be passed into the IT module functions. Each of the IT modules has the same method signature (with the exception of OIS). In this example, we will use the sfr function. The signature for the SFR module function looks like this:
sfr(input_file=None, root_dir=None, op_mode=None, ini_file=None, raw_data=None, json_args=None)
The Imatest IT Python library parameters are listed here:
| Parameter Name | Data Type | Description |
|---|---|---|
| input_file | string or list | Image file path. A full path name may be used (and is recommended), such as "C:Program FilesImatestv26.1ITsamplesimagessfr_example.jpg". If a relative path name is used, the path is relative to your calling program, not the value of the root_dir parameter. Multiple files can be analyzed by passing in a list of file names, or by using a wildcard (*) symbol in the path. For example, if the input_file parameter is "C:ImatestiPhone6_*.jpg", all .jpg files in the folder C:Imatest with filenames beginning with "iPhone6_" will be analyzed. |
| root_dir | string | Directory containing your INI file. If you do not pass a file path in as the ini_file parameter, then Imatest IT will use a file named imatest-v2.ini found in this directory as your INI configuration. |
| op_mode | string | String containing one of the following operation codes, which tells Imatest IT how to analyze your image(s), or if you are using Direct Read mode. Valid values for the op_mode parameter are found in constants of the ImatestLibrary class: ImatestLibrary.OP_MODE_SEPARATE, ImatestLibrary.OP_MODE_SIGNAL_AVERAGE, ImatestLibrary.OP_MODE_TEMPORAL, and ImatestLibrary.OP_MODE_DIRECT_READ. For more information on the different op modes supported by Imatest IT, see this article. |
| ini_file | string (optional) | If you want to use an INI file that is not named imatest-v2.ini, you will need to supply the path to the file as the ini_file parameter. |
| raw_data | string (optional) | The raw image data. Only used when using OP_MODE_DIRECT_READ. For more information on direct read mode, see this article. |
| json_args | string (optional) | A JSON string containing metadata about how to interpret the image in the raw_data parameter. Only used when using OP_MODE_DIRECT_READ. For more information on direct read mode, see this article. |
Calling Imatest IT Modules
Now that the library is initialized, and all of the input parameters are set up, it is time to call the Imatest IT analysis function. This example uses the SFR module, but the same code can be used to call the rest of the Imatest modules (with the exception of OIS, which has different inputs).
It's easiest to call the sfr using named parameters, as shown below. An exception will be thrown if something goes wrong - you should catch it and handle it gracefully. Check the exception message and stdout and stderr streams for details on what went wrong, and see the Error Handling section below for more information on gracefully handling exceptions.
When the call is successful, the function will return a string containing JSON-encoded output.
from imatest.it import ImatestLibrary
import json
imatestLib = ImatestLibrary()
result = imatestLib.sfr(input_file=input_file,
                        root_dir=root_dir,
                        op_mode=ImatestLibrary.OP_MODE_SEPARATE,
                        ini_file=ini_file)
print(result)
When you are finished making calls to the Imatest IT Python library, you then need to call terminate_library() to unload the library and the Matlab Runtime.
imatestLib.terminate_library();
Running the Imatest IT Python library on macOS
Note: Due to a limitation in how the IT Python library is constructed, you must call any python code via the mwpython.sh script provided by Mathworks at /Applications/MATLAB/MATLAB_Runtime/R2024b/bin. It is recommended that you set the PYTHON_HOME environment variable if you wish to use a particular python interpreter. Also, the only supported means to call mwpython is to call a script directly (not a module using the -m flag in python). For example
export PATH=/Applications/MATLAB/MATLAB_Runtime/R2024b/bin:$PATH
export PYTHON_HOME=/Library/Frameworks/Python.framework/Versions/3.9
mwpython some_script.py
Windows (Visual Studio) Project Setup
To use the Imatest IT .NET libraries in your Visual Studio project, first you need to add a reference to the library DLL in your project.
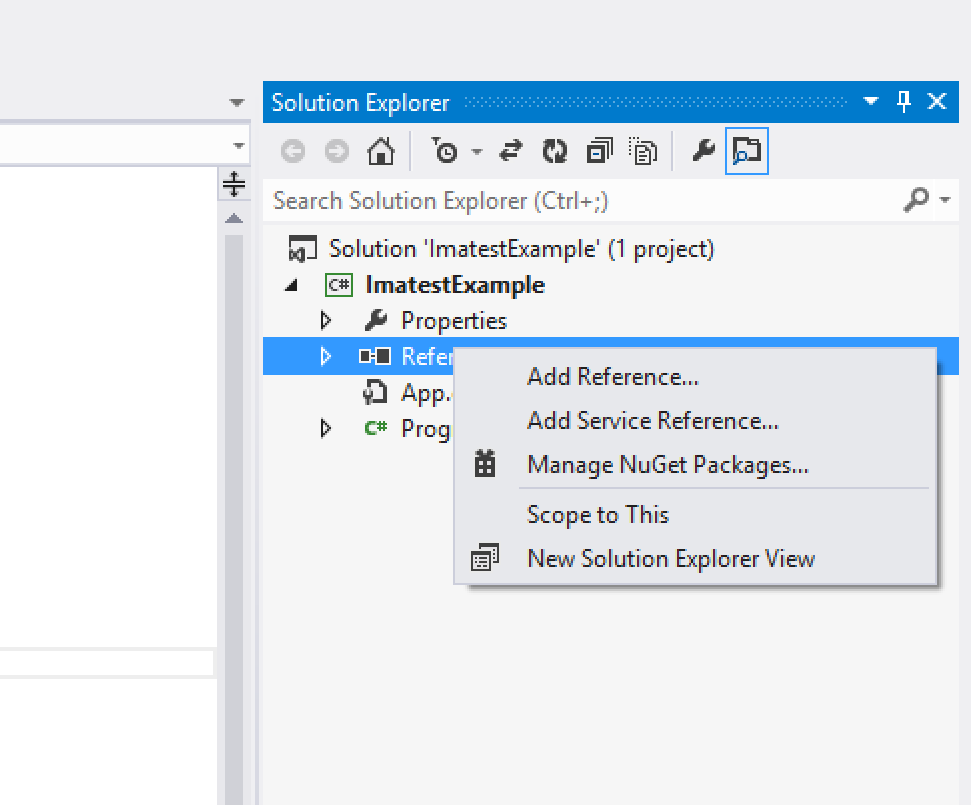
Once your project is created in Visual Studio, right click on the References section of the Solution Explorer and choose Add Reference….
In the Reference Manager window, choose Browse on the left-hand side, then click the Browse… button at the bottom.
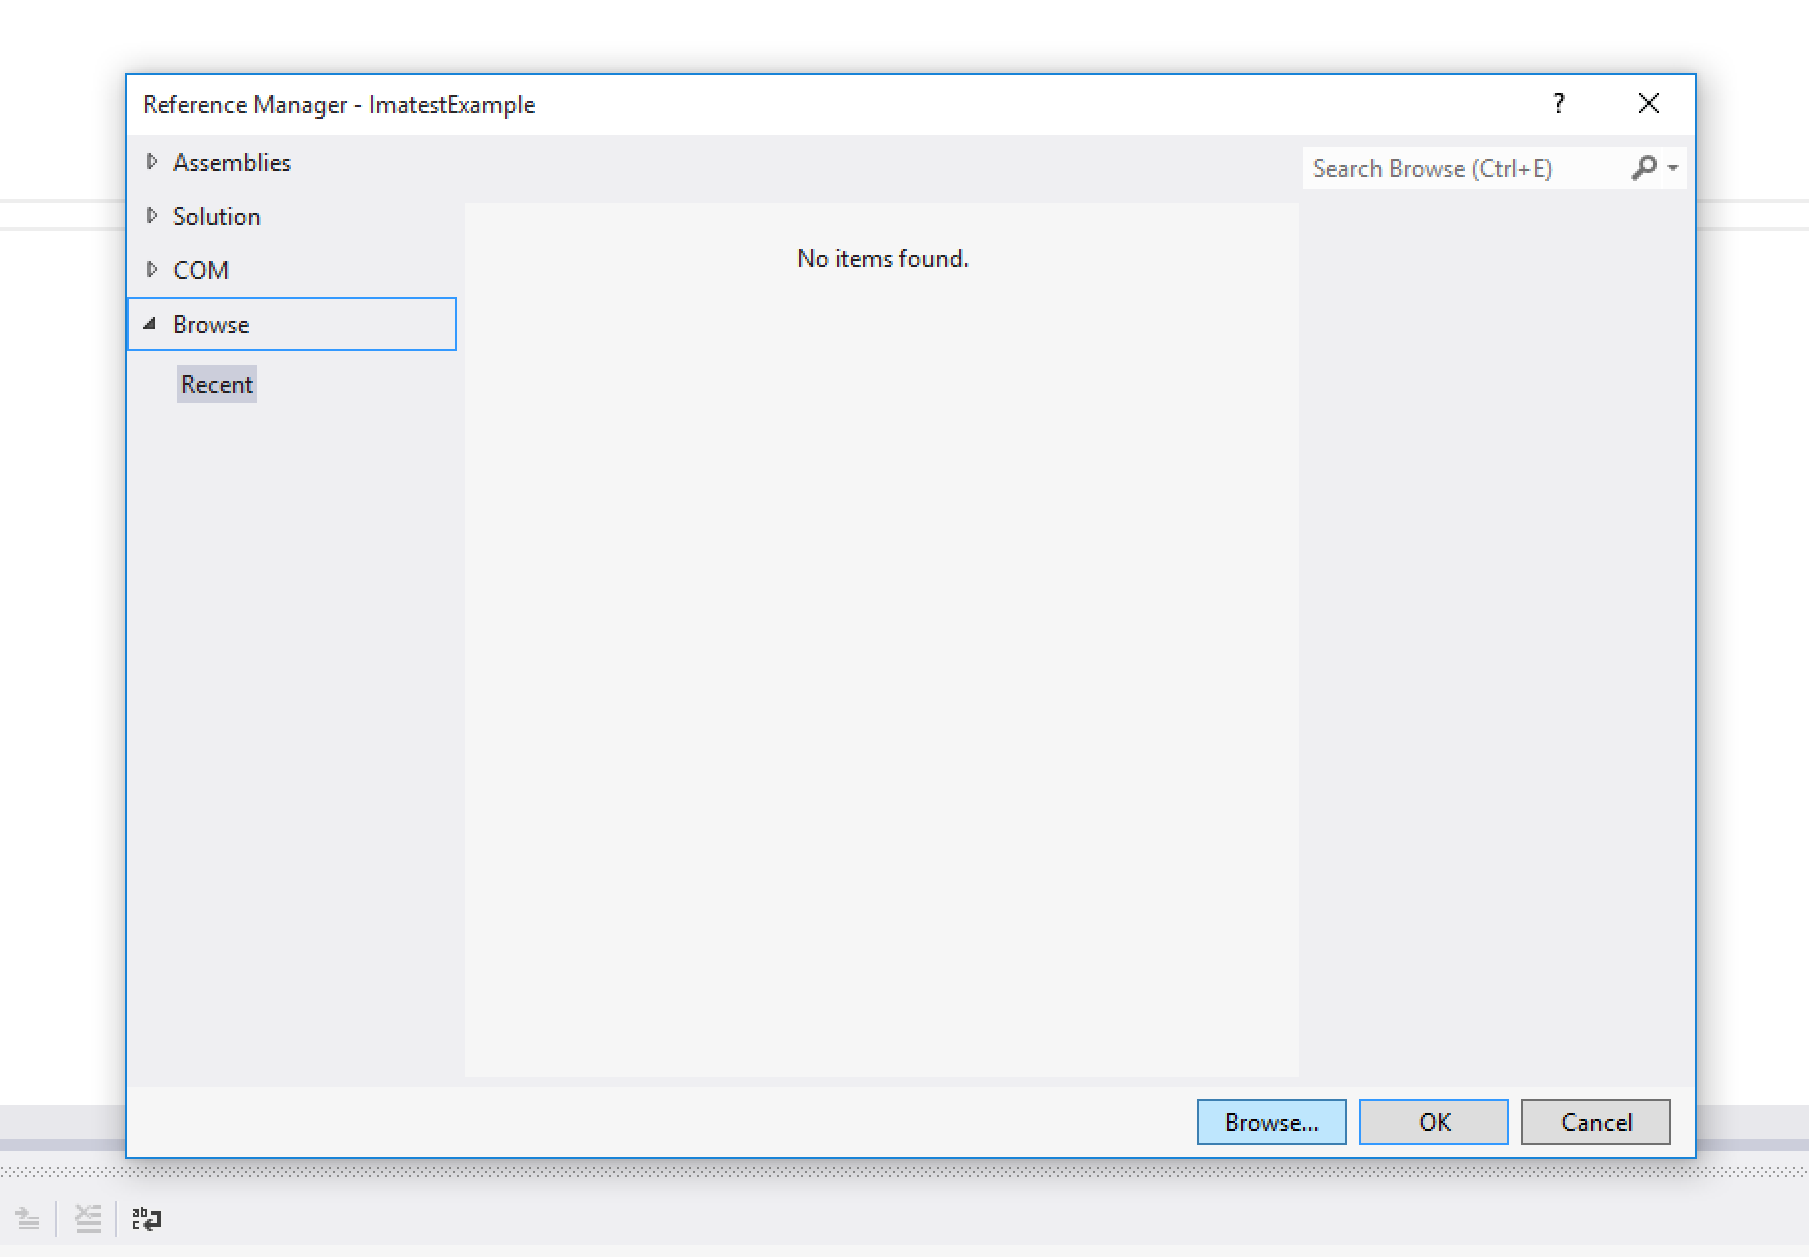
Navigate to the .NET library directory of your Imatest IT installation (by default, C:Program FilesImatestv26.1ITlibslibrary.NET.NET 4.8 for .NET Framework 4.8 and C:Program FilesImatestv26.1ITlibslibrary.NET.NET 9.0 for .NET 9.0 ), choose Imatest.IT.dll, and click the Add button.
Note: You do not need to add the IT.dll reference to your project.
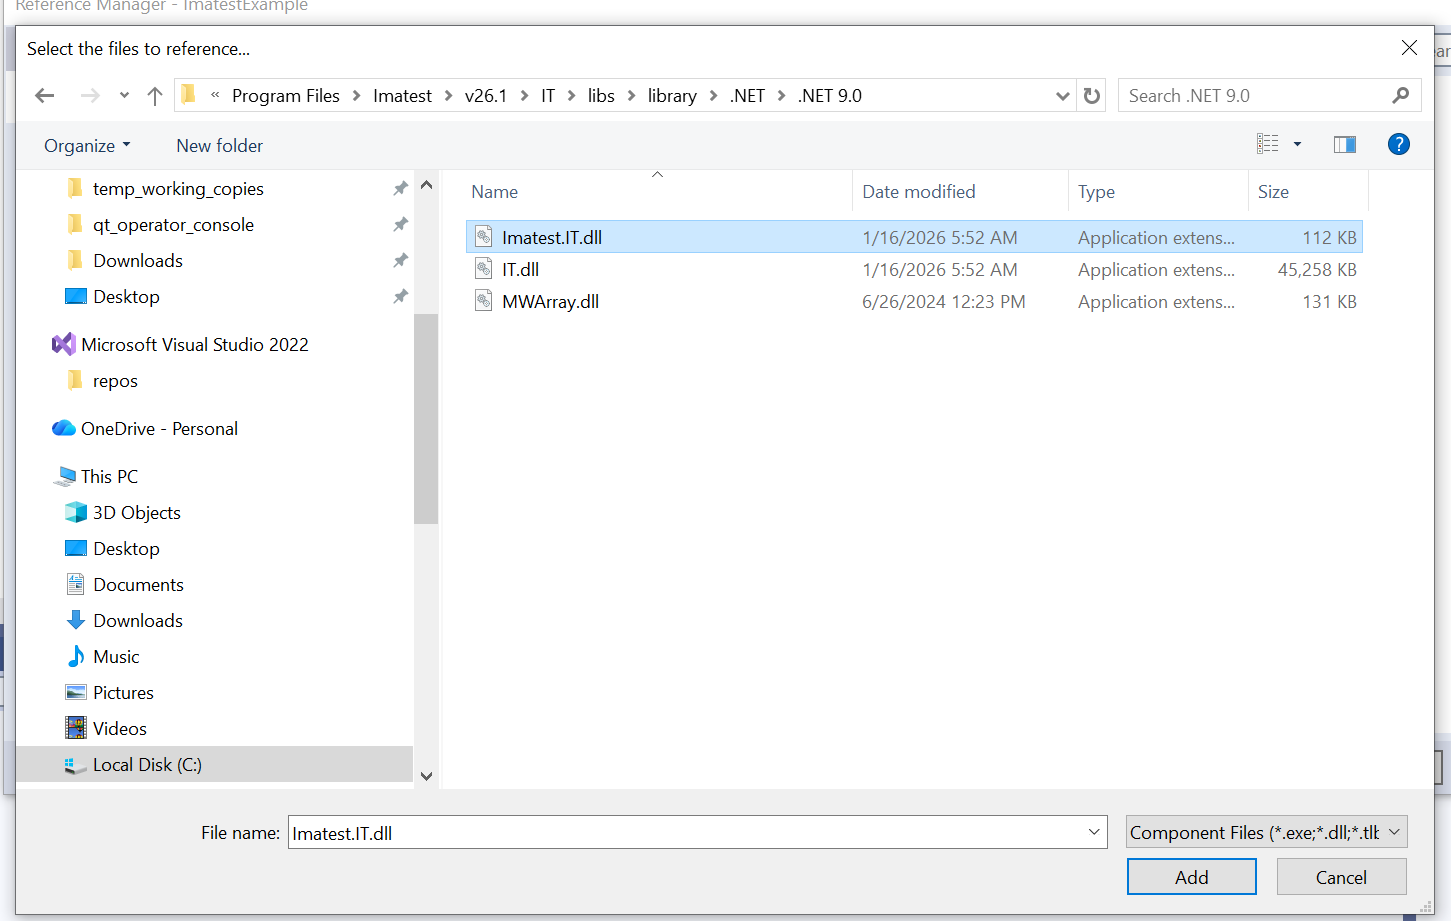
Click OK to close the Reference Manager window.
Note: Imatest only supports 64-bit architectures. You must use the x64 platform when running .NET applications. The Any CPU platform will throw runtime errors.
Calling the Imatest IT .NET Interface
using Imatest.IT;
Next, create an instance of the Imatest.IT.Library class. Behind the scenes, the Imatest.IT.Library constructor will start up the Matlab MCR Runtime and load all the IT libraries into memory. This will take a few seconds the first time you run it, but should be faster on subsequent runs, especially if you have set your system's environment variables to the recommended values as described above.
Imatest.IT.Library implements the IDisposable interface, and we recommend that you wrap your library instance inside of a using statement to ensure that the Dispose() method is called properly. The Dispose() method cleans up the Matlab Runtime, and also releases your floating license seat, if you are using a floating license.
using Imatest.IT;
class Program
{
    static void Main(string[] args)
    {
        using (Library itLib = new Library())
        {
            // ....
        }
    }
}
Now that the Matlab MCR and Imatest IT library are all ready to go, the next step is the prepare the arguments that will be passed into the IT module functions. Each of the IT modules has the same overloaded method signatures (with the exception of OIS). In this example, we will use the SFR.JSON methods. The signatures for the SFR module function looks like this:
string SFR.JSON(string rootDir, string inputFile, OperationMode opMode)
string SFR.JSON(string rootDir, IEnumerable<string> inputFiles, OperationMode opMode)
string SFR.JSON(string rootDir, string inputFile, OperationMode opMode, string iniFilePath)
string SFR.JSON(string rootDir, IEnumerable<string> inputFiles, OperationMode opMode, string iniFilePath)
string SFR.JSON(string rootDir, byte[] inputBytes, DirectReadOptions directReadOptions)
string SFR.JSON(string rootDir, byte[] inputBytes, DirectReadOptions directReadOptions, string iniFilePath)
The Imatest IT .NET library parameters are listed here:
| Parameter Name | Data Type | Description |
|---|---|---|
| rootDir | string | Directory containing your default INI file. If you do not pass a file path in as optional the iniFile parameter, then Imatest IT will use a file named imatest-v2.ini found in this directory as your INI configuration. |
| inputFile | string | Image file path. A full path name may be used (and is recommended), such as "C:Program FilesImatestv26.1ITsamplesimagessfr_example.jpg". If a relative path name is used, the path is relative to your calling program, not the value of the rootDir parameter. Multiple files can be analyzed by using a wildcard (*) symbol in the path. For example, if the input_file parameter is "C:ImatestiPhone6_*.jpg", all .jpg files in the folder C:Imatest with filenames beginning with "iPhone6_" will be analyzed. |
| inputFiles | IEnumerable<string> | A list of image file paths. Full path names may be used (and are recommended), such as "C:Program FilesImatestv26.1ITsamplesimagessfr_example.jpg". If relative path names are used, the path is relative to your calling program, not the value of the rootDir parameter. |
| opMode | OperationMode | Enum value for one of the available operation modes, which tells Imatest IT how to analyze your image(s). Valid values for the opMode parameter are: OperationMode.Separate, OperationMode.SignalAverage, and OperationMode.Temporal. For more information on the different op modes supported by Imatest IT, see this article. |
| iniFile | string (optional) | If you want to use an INI file that is not named imatest-v2.ini, you will need to supply the path to the file as the iniFile parameter. |
| inputBytes | byte[], ushort[], or uint[] (optional) | The raw image data. Only used if you are passing in image data directly using Direct Read Mode. For more information on direct read mode, see this article. |
| directReadOptions | DirectReadOptions (optional) | A an object containing metadata about how to interpret the image in the inputBytes parameter. Only used when using Direct Read Mode. For more information on direct read mode, see this article. |
Calling Imatest IT Modules
Now that the library is initialized, and all of the input parameters are set up, it is time to call the Imatest IT analysis function. This example uses the SFR module, but the same code can be used to call the rest of the Imatest modules (with the exception of OIS, which has different inputs).
We recommend always wrapping your Imatest IT calls in try/catch blocks. If anything goes wrong, an Exception will be thrown. You should handle these exceptions gracefully. Check the exception message for details on what went wrong, and see the section on Error Handling below for more information.
When the call is successful, the function will return a string containing JSON-encoded output.
using Imatest.IT;
class Program
{
    static void Main(string[] args)
    {
        using (Library itLib = new Library())
        {
            try {
                string result = itLib.SFR.JSON(rootDir, inputFile, OperationMode.Separate, iniFilePath);
            } catch (Exception ex) {
                Console.Out.WriteLine(ex.Message);
            }
        }
    }
}
Windows (Visual Studio) Project Setup
To use the Imatest IT .NET libraries in your Visual Studio project, first you need to add a reference to the library DLL in your project.
Once your project is created in Visual Studio, right click on the References section of the Solution Explorer and choose Add Reference….
In the Reference Manager window, choose Browse on the left-hand side, then click the Browse… button at the bottom.
Navigate to the .NET library directory of your Imatest IT installation (by default, C:Program FilesImatestv26.1ITlibslibrary.NET.NET 4.8 for .NET Framework 4.8 and C:Program FilesImatestv26.1ITlibslibrary.NET.NET 9.0 for .NET 9.0), choose Imatest.IT.dll, and click the Add button.
Note: You do not need to add the IT.dll reference to your project.
Click OK to close the Reference Manager window.
Note: Imatest only supports 64-bit architectures. You must use the x64 platform when running .NET applications. The Any CPU platform will throw runtime errors.
Calling the Imatest IT .NET Interface
At the top of your source code file, add an Imports statement for Imatest.IT:
Imports Imatest.IT
Next, create an instance of the Imatest.IT.Library class. Behind the scenes, the Imatest.IT.Library constructor will start up the Matlab MCR Runtime and load all the IT libraries into memory. This will take a few seconds the first time you run it, but should be faster on subsequent runs, especially if you have set your system's environment variables to the recommended values as described above.
Imatest.IT.Library implements the IDisposable interface, and we recommend that you wrap your library instance inside of a Using statement to ensure that the Dispose() method is called properly. The Dispose() method cleans up the Matlab Runtime, and also releases your floating license seat, if you are using a floating license.
Imports Imatest.IT
Module Program
    Sub Main()
        Using itLib = New Library()
            ' ...
        End Using
    End Sub
End Module
Now that the Matlab MCR and Imatest IT library are all ready to go, the next step is the prepare the arguments that will be passed into the IT module functions. Each of the IT modules has the same overloaded method signatures (with the exception of OIS). In this example, we will use the SFR.JSON methods. The signatures for the SFR module function looks like this:
SFR.JSON(String rootDir, String inputFile, OperationMode opMode) As String
SFR.JSON(String rootDir, IEnumerable(Of String) inputFiles, OperationMode opMode) As String
SFR.JSON(String rootDir, String inputFile, OperationMode opMode, String iniFilePath) As String
SFR.JSON(String rootDir, IEnumerable(Of String) inputFiles, OperationMode opMode, String iniFilePath) As String
SFR.JSON(String rootDir, Byte() inputBytes, DirectReadOptions directReadOptions) As String
SFR.JSON(String rootDir, Byte() inputBytes, DirectReadOptions directReadOptions, String iniFilePath) As String
The Imatest IT .NET library parameters are listed here:
| Parameter Name | Data Type | Description |
|---|---|---|
| rootDir | String | Directory containing your default INI file. If you do not pass a file path in as optional the iniFile parameter, then Imatest IT will use a file named imatest-v2.ini found in this directory as your INI configuration. |
| inputFile | String | Image file path. A full path name may be used (and is recommended), such as "C:Program FilesImatestv26.1ITsamplesimagessfr_example.jpg". If a relative path name is used, the path is relative to your calling program, not the value of the rootDir parameter. Multiple files can be analyzed by using a wildcard (*) symbol in the path. For example, if the input_file parameter is "C:ImatestiPhone6_*.jpg", all .jpg files in the folder C:Imatest with filenames beginning with "iPhone6_" will be analyzed. |
| inputFiles | IEnumerable(Of String) | A list of image file paths. Full path names may be used (and are recommended), such as "C:Program FilesImatestv26.1ITsamplesimagessfr_example.jpg". If relative path names are used, the path is relative to your calling program, not the value of the rootDir parameter. |
| opMode | OperationMode | Enum value for one of the following operation codes, which tells Imatest IT how to analyze your image(s). Valid values for the opMode parameter are: OperationMode.Separate, OperationMode.SignalAverage, and OperationMode.Temporal. For more information on the different op modes supported by Imatest IT, see this article. |
| iniFile | String (optional) | If you want to use an INI file that is not named imatest-v2.ini, you will need to supply the path to the file as the iniFile parameter. |
| inputBytes | Byte(), UShort(), or UInteger() (optional) | The raw image data. Only used if you are passing in image data directly using Direct Read Mode. For more information on direct read mode, see this article. |
| directReadOptions | DirectReadOptions (optional) | A an object containing metadata about how to interpret the image in the inputBytes parameter. Only used when using Direct Read Mode. For more information on direct read mode, see this article. |
Calling Imatest IT Modules
Now that the library is initialized, and all of the input parameters are set up, it is time to call the Imatest IT analysis function. This example uses the SFR module, but the same code can be used to call the rest of the Imatest modules (with the exception of OIS, which has different inputs).
We recommend always wrapping your Imatest IT calls in try/catch blocks. If anything goes wrong, an Exception will be thrown. You should handle these exceptions gracefully. Check the exception message for details on what went wrong, and see the section on Error Handling below for more information.
When the call is successful, the function will return a string containing JSON-encoded output.
Imports Imatest.IT
Module Program
    Sub Main()
        Using itLib = New Library()
            Try
                Dim result = itLib.SFR.JSON(rootDir, imagePath, OperationMode.Separate, iniFilePath)
            Catch ex As Exception
                Console.Out.WriteLine(ex.Message)
            End Try
        End Using
    End Sub
End Module
Calling the Imatest IT EXE Interface
The Imatest IT EXE Library can be called using Windows or Linux script files. We recommend making sure that the IT bin directory is in your PATH variable. On Windows, this should already happen when Imatest IT is installed. You may need to add to your path manually on Linux. For more information on viewing and editing system environment variables, see this article.
All Imatest IT EXE executables accept the following arguments (except for OIS, which uses different inputs):
sfr.exe op-mode input-file bin-directory ini-file [result-directory] [other-images ...]
The Imatest IT EXE library parameters are listed here:
| Parameter Name | Description |
|---|---|
| op_mode | One of the following operation codes, which tells Imatest IT how to analyze your image(s). Valid values for the op_mode parameter are: -1 (Separate Analysis), -11 (Signal Average Analysis), and -12 (Temporal Noise Analysis). For more information on the different op modes supported by Imatest IT, see this article. |
| input-file | Image file path. A full path name may be used (and is recommended), such as "C:Program FilesImatestv26.1ITsamplesimagessfr_example.jpg". If a relative path name is used, the path is relative to your calling program. Multiple files can be analyzed by using a wildcard (*) symbol in the path. For example, if the input_file parameter is "C:ImatestiPhone6_*.jpg", all .jpg files in the folder C:Imatest with filenames beginning with "iPhone6_" will be analyzed. |
| bin-directory | The location of the Imatest IT bin directory. By default, this will be "C:Program FilesImatestv26.1ITbin". |
| ini-file | The full path to the INI configuration file you will be using. |
| result-directory | The directory where Imatest IT's output files will be written to. |
| other-images | The path(s) to other images that will be analyzed besides the initial input-file image. |
Calling Imatest IT Modules
Imatest IT EXE modules are called using the command line, or in .bat files.
Note: You should not include a trailing '' when passing in directory names, otherwise you may get an error (see here).
sfr.exe "-1" "C:ImatestSamplessfr_example.jpg" "C:Program FilesImatestv26.1ITbin" "C:ImatestSamplesimatest-v2.ini" "C:ImatestSamplesResults"
When the module is finished running, the result files will be written to the result-directory folder (in this case, C:ImatestSamplesResults).
Calling the Imatest IT EXE Interface
The Imatest IT EXE Library can be called using macOS or Linux Bash script files. We recommend making sure that the IT bin directory is in your PATH variable. You may need to add to your path manually on macOS and Linux. For more information on viewing and editing system environment variables, see this article.
All Imatest IT EXE executables accept the following arguments (except for OIS, which uses different inputs):
./run_sfr.sh op-mode input-file bin-directory ini-file [result-directory] [other-images ...]
The Imatest IT EXE library parameters are listed here:
| Parameter Name | Description |
|---|---|
| op_mode | One of the following operation codes, which tells Imatest IT how to analyze your image(s). Valid values for the op_mode parameter are: -1 (Separate Analysis), -11 (Signal Average Analysis), and -12 (Temporal Noise Analysis). For more information on the different op modes supported by Imatest IT, see this article. |
| input-file | Image file path. A full path name may be used (and is recommended), such as "/Applications/Imatest/IT/v26.1/samples/images/sfr_example.jpg". If a relative path name is used, the path is relative to your calling program. Multiple files can be analyzed by using a wildcard (*) symbol in the path. For example, if the input_file parameter is "$HOME/Imatest/iPhone6_*.jpg", all .jpg files in the folder $HOME/Imatest with filenames beginning with "iPhone6_" will be analyzed. |
| bin-directory | The location of the Imatest IT bin directory. By default, this will be "/Applications/Imatest/IT/v26.1/bin" on macOS, and "/usr/local/Imatest/v26.1/IT/bin" on Linux. |
| ini-file | The full path to the INI configuration file you will be using. |
| result-directory | The directory where Imatest IT's output files will be written to. |
| other-images | The path(s) to other images that will be analyzed besides the initial input-file image. |
Calling Imatest IT Modules
Imatest IT EXE modules are called using the command line with the .sh files.
Note: You should not include a trailing '' when passing in directory names, otherwise you may get an error (see here).
./run_sfr.sh "-1" "$HOME/ImatestSamples/sfr_example.jpg" "/Applications/Imatest/IT/v26.1/bin" "$HOME/ImatestSamples/imatest-v2.ini" "$HOME/ImatestSamples/Results"
When the module is finished running, the result files will be written to the result-directory folder (in this case, $HOME/ImatestSamples/Results).
Step 4: Process the Results
The Imatest IT module functions output their results as JSON, XML, and CSV formatted text files. The C, C++, Python, and .NET libraries also return results as a JSON formatted string to the calling program.
Using the JSON Result in Code
Imatest IT's JSON result string, which is returned to the calling program, can be parsed and processed using third party JSON libraries. A list of JSON libraries for several languages can be found at json.org.
The result strings are packaged as nested property/value objects, and the first property is always [module]Results, as seen in this excerpt from an SFRplus call:
Note: If you analyze multiple files in a single call, only the last file's results will be returned to the calling program. The others will be written to output files in the Results directory.
If you find that a result you need is missing from the returned JSON, please contact us and we can add it in the next minor release of Imatest IT.
Imatest IT Output Files
Imatest IT also writes its results to text files, which are formatted in XML, CSV, and JSON. By default, these files are written to a Results folder in the same folder as the images themselves. You can change the location by using Imatest Master to change your INI configuration settings, in the Auto mode settings for the modules you will be using:
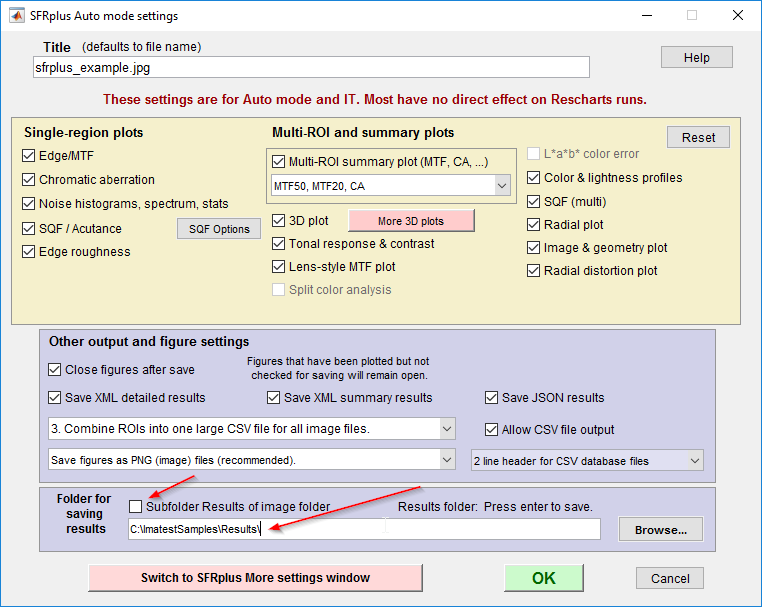
Performance Tip: If you do not need some or all of the output files, you can disable them using the same Auto mode settings window. This will make your Imatest IT calls run a little faster. Just uncheck each of the outputs that you do not require.
Error Handling
Select your preferred interface below to see the best ways to handle errors using Imatest IT.
In the Imatest C library, if an error occurs within one of the analysis module functions, a false result will be returned. You can then use the mlfGetExceptionID(int nargout, mxArray** errID, mxArray** errName) function to extract an Error ID and Error Name, which map into the Imatest IT Exception Hierarchy.
To make handling these exceptions easier, Imatest IT includes an optional header file, imatest_exception_IDs.h, which maps each of the Error IDs to an enum. To include this header file, add #include "imatest_exception_ids.h" to your source file. You can read more about the Exception Hierarchy here.
Here is an example of how you can catch and gracefully handle exceptions using the Imatest IT C Library:
int retVal;
mxArray *errorID = NULL, *errorName = NULL;
enum ImatestExceptionIDs errorCode;
const char* errorNameStr;
...
if (!mlfSfr_shell(nargout, &outputJSON, inputFile, rootDir, inputKeys, opMode, varargin))
{
    if (mlfGetExceptionID(2, &errorID, &errorName))
    {
        errorCode = (enum ImatestExceptionIDs)mxGetScalar(errorID);
        printf("*** Error ID: %dn", errorCode);
        switch (errorCode)
        {
            case kImatestFileNotFoundException:
                printf("File not found exception.n");
                break;
            case kBadFramingException:
                printf("Bad framing exception.n");
                break;
            default:
                errorNameStr = mxArrayToString(mxGetCell(errorName, 0));
                printf("*** Unexpected Error: %sn", errorNameStr);
                break;
        }
        mxDestroyArray(errorID);
        mxDestroyArray(errorName);
        retVal = errorCode;
    }
    else {
        printf("*** Unknown Error.n");
        retVal = -1005;
    }
}
else
{
   retVal = 0;
   ...
}
In the Imatest C++ library, if an error occurs within one of the analysis module functions, an mwException will be thrown. If you catch the exception, then you can use the getExceptionID(int nargout, mwArray& errID, mwArray& errName) function to extract an Error ID and Error Name, which map into the Imatest IT Exception Hierarchy.
To make handling these exceptions easier, Imatest IT includes an optional header file, imatest_exception_IDs.h, which maps each of the Error IDs to an enum. To include this header file, add #include "imatest_exception_ids.h" to your source file. You can read more about the Exception Hierarchy here.
Here is an example of how you can catch and gracefully handle exceptions using the Imatest IT C++ Library:
try
{
    sfr_shell(1, outputJSON, inputFile, rootDir, inputKeys, opMode, varargin)
}
catch (const mwException&  e)
{
    mwArray mwErrorID, mwErrorName;
    mwString mwErrorNameStr;
    getExceptionID(2, mwErrorID, mwErrorName);
    int err = (int)mwErrorID;
    switch (err)
    {
        case imatest::kImatestFileNotFoundException:
            std::cerr << "*** File was not found. Check the file path." << std::endl;
            break;
        case imatest::kBadFramingException:
            std::cerr << "*** Image is not framed correctly." << std::endl;
            break;
        default:
            mwErrorNameStr = mwErrorName.Get(1,1).ToString();
            std::cerr <<  "*** Unexpected Error: " << mwErrorNameStr << std::endl;
            break;
    }
    retVal = err;
}
In the Imatest C++ library, if an error occurs within one of the analysis module functions, an mwException will be thrown. If you catch the exception, then you can use the getExceptionID(int nargout, mwArray& errID, mwArray& errName) function to extract an Error ID and Error Name, which map into the Imatest IT Exception Hierarchy.
To make handling these exceptions easier, Imatest IT includes an optional header file, imatest_exception_IDs.h, which maps each of the Error IDs to an enum. To include this header file, add #include "imatest_exception_ids.h" to your source file. You can read more about the Exception Hierarchy here.
Here is an example of how you can catch and gracefully handle exceptions using the Imatest IT C++ Library with Objective-C++:
- (void)postTest: (id)param
{
    @autoreleasepool {
        try{
            // Declare and initialize outputJSON, fileParam, pathParam, keysParam, modeParam, and varargin mwArray's
            NSLog(@"Running test.");
            sfrplus_shell(1, outputJSON, fileParam, pathParam, keysParam, modeParam, varargin);
            // Process JSON returned in outputJSON mwArray
        } catch (mwException ex) {
            mwArray mwErrorID, mwErrorName;
            mwString mwErrorNameStr;
            getExceptionID(2, mwErrorID, mwErrorName);
            int err = (int)mwErrorID;
            switch (err)
            {
                case imatest::kImatestFileNotFoundException:
                    NSLog(@"*** File was not found. Check the file path.");
                    break;
                case imatest::kBadFramingException:
                    NSLog(@"*** Image is not framed correctly.");
                    break;
                default:
                    mwErrorNameStr = mwErrorName.Get(1,1).ToString();
                    NSLog(@"*** Unexpected Error: %s", (const char*)mwErrorNameStr);
                    break;
            }
            retVal = err;
        }
    }
}
- (void)runTest
{
     // Start a new thread to run sfrplus_shell()
     [NSThread detachNewThreadSelector:@selector(postTest:) toTarget:self withObject:nil];
}
In the Imatest Python library, if an error occurs within one of the analysis module functions, an ImatestException will be thrown. If you catch the exception, then you can get more information about using the error_id, error_name, and message properties.
Here is an example of how you can catch and gracefully handle exceptions using the Imatest IT Python Library. You can use the constants on the ImatestException class to handle certain error types in different ways. In this example, an ImatestException will be thrown because all floating license seats are currently being used:
from imatest.it import ImatestLibrary, ImatestException
...
try:
    result = imatestLib.sfr(input_file=input_file,
                            root_dir=root_dir,
                            op_mode=ImatestLibrary.OP_MODE_SEPARATE,
                            ini_file=ini_file)
except ImatestException as ex:
    if iex.error_id == ImatestException.FloatingLicenseException:
        print("All floating license seats are in use.  Exit Imatest on another computer and try again.")
    elif iex.error_id == ImatestException.LicenseException:
        print("License Exception: " + iex.message)
    else:
        print("*** Error calling sfr: %s" % (iex.message, ))
In the Imatest .NET library, if an error occurs within one of the analysis module functions, an Exception will be thrown. If you catch the exception, then you can get more information about it by calling the ImatestLibrary.GetLastException() and ImatestLibrary.GetExceptionName() methods.
Here is an example of how you can catch and gracefully handle exceptions using the Imatest IT .NET Library:
try
{
    string result = itLib.SFRplus.JSON(rootDir, imagePath, OperationMode.Separate, iniFile);
}
catch (Exception ex)
{
    ImatestException iex = lib.GetLastException();
    string errorName = lib.GetExceptionName();
    if (iex == ImatestException.FloatingLicenseException)
    {
        Console.Out.WriteLine("All floating license seats are in use.  Exit Imatest on another computer and try again.");
    }
    else if (iex == ImatestException.LicenseException)
    {
        Console.Out.WriteLine("License Exception: {0}: {1}", errorName, ex.Message);
    }
    else
    {
        Console.Out.WriteLine("An error has occurred:");
        Console.Out.WriteLine(ex.Message);
    }
}
In the Imatest .NET library, if an error occurs within one of the analysis module functions, an Exception will be thrown. If you catch the exception, then you can get more information about it by calling the ImatestLibrary.GetLastException() and ImatestLibrary.GetExceptionName() methods.
Here is an example of how you can catch and gracefully handle exceptions using the Imatest IT .NET Library:
Try
    Dim result = itLib.SFR.JSON(rootDir, imagePath, OperationMode.Separate, iniFile)
Catch ex As Exception
    Dim iex As ImatestException = library.GetLastException()
    Dim errorName As String = library.GetExceptionName()
    If iex = ImatestException.FloatingLicenseException Then
        Console.Out.WriteLine("All floating license seats are in use.  Exit Imatest on another computer and try again.")
    ElseIf iex = ImatestException.LicenseException Then
        Console.Out.WriteLine("License Exception: {0}: {1}", errorName, ex.Message)
    Else
        Console.Out.WriteLine("An error has occurred:")
        Console.Out.WriteLine(ex.Message)
    End If
End Try
In the Imatest EXE library, if an error occurs within one of the analysis module functions, the return code from the executable will be -1 instead of 0. If you are calling the executable from a batch script, you can check what the return code was to determine if an exception occurred or not.
Here is an example of how you can test for an exception using the Imatest IT EXE Library:
sfr.exe "-1" "'C:ImatestSamplessfr_example.jpg'" "'C:Program FilesImatestv26.1ITbin'" "'C:ImatestSamplesimatest-v2.ini'" "'C:ImatestSamplesResults'"
if %ERRORLEVEL% neq 0 (
    echo '*** Error calling sfr. Check output for details.'
)
In the Imatest EXE library, if an error occurs within one of the analysis module functions, the return code from the executable will be -1 instead of 0. If you are calling the executable from a batch script, you can check what the return code was to determine if an exception occurred or not.
Here is an example of how you can test for an exception using the Imatest IT EXE Library:
./run_sfr.sh "-1" "$HOME/ImatestSamples/sfr_example.jpg" "/Applications/Imatest/IT/v26.1/bin" "$HOME/ImatestSamples/imatest-v2.ini" "$HOME/ImatestSamples/Results"
if [ "$?" -ne "0" ]
    echo '*** Error calling sfr. Check output for details.'
fi
Sample Code
Imatest IT ships with several example projects in C++, Objective-C (macOS only), Python, C#, and Visual Basic. You can find them in the samples folder of your IT installation, along with example images of Imatest test charts that can be used for each of IT's analysis modules.
Imatest IT for Windows also comes with a sample GUI application that demonstrates integrating the IT .NET libraries in a full-featured GUI application. Using the example images provided in the samples folder, you can experiment with the different analysis modules. It also provides a simple way to interact with the Imatest Acquisition Library. Using this app, you can quickly connect and test any of the supported image capture devices and make sure they are working, without writing any code. The full source code for this app is included in the .NET C# samples folder.The available log levels are:
Advanced Topics
Direct Read Mode and Reading RAW Images
Images can be passed directly into Imatest IT as byte arrays using Direct Read Mode. The images can be processed RGB or RAW. Direct Read Mode is generally much faster than passing in image file paths, since the data is already in memory and does not need to be read from disk. Although it does require more initial setup effort, if your application is speed-critical or high-volume, we strongly recommend using Direct Read Mode.
For detailed instructions on using Imatest IT's Direct Read Mode, see this article.
Using the Imatest Image Acquisition Library
Images can be directly acquired in your application from supported devices using the Imatest IT Acquisition Library (C, C++, and .NET only).
For more information on the C and C++ version of the Acquisition Library, see this article. For the .NET version, see this article.
Using Pass/Fail Metrics
Pass/Fail results are included in the JSON results for those modules that support it (Blemish, Colorcheck, Distortion, Multitest, SFR, SFRplus, eSFR-ISO, Random, Star, Stepchart, and Uniformity). If you have configured Pass/Fail criteria, and included the Pass/Fail file in your INI file, then the tests will be run, and the results will be included as a separate JSON object called "passfail".
For more information on implementing Pass/Fail in Imatest, see this article.
Logging Levels and Redirecting Output
By default, the Imatest IT modules print some information to the standard output or console. Logging levels control the nature of the output (to standard out and to log file) and may be selected by INI file control or from the Settings menu on the main window of Imatest Master.
If your application does not have a console, or you want to store this output in another way, it is possible to redirect the standard out and standard error outputs.
Select your preferred interface below to see detailed instructions.
To redirect output text using the Imatest C or C++ libraries, you need to use the function imatest_libraryInitializeWithHandlers(mclOutputHandlerFcn error_handler, mclOutputHandlerFcn print_handler) instead of imatest_libraryInitialize(), passing in two pointers to functions that will handle the "error" and "standard" outputs, respectively. The functions accept a const char* input, and return an int, which is the number of characters processed.
int stdOutHandler(const char* str)
{
    // Record output
    ...
    return strlen(str);
}
int stdErrHandler(const char* str)
{
    // Record output
    ...
    return strlen(str);
}
if (!imatest_libraryInitializeWithHandlers(stdErrHandler, stdOutHandler))
{
   ...
To redirect output text using the Imatest C or C++ libraries, you need to use the function imatest_libraryInitializeWithHandlers(mclOutputHandlerFcn error_handler, mclOutputHandlerFcn print_handler) instead of imatest_libraryInitialize(), passing in two pointers to functions that will handle the "error" and "standard" outputs, respectively. The functions accept a const char* input, and return an int, which is the number of characters processed.
int stdOutHandler(const char* str)
{
    // Record output
    ...
    return strlen(str);
}
int stdErrHandler(const char* str)
{
    // Record output
    ...
    return strlen(str);
}
if (!imatest_libraryInitializeWithHandlers(stdErrHandler, stdOutHandler))
{
   ...
To redirect output text using the Imatest C++ libraries in Objective-C, you need to use the function libImatestInitializeWithHandlers(mclOutputHandlerFcn error_handler, mclOutputHandlerFcn print_handler) instead of libImatestInitialize(), passing in two pointers to functions that will handle the "error" and "standard" outputs, respectively. The functions accept a const char* input, and return an int, which is the number of characters processed.
int stdOutHandler(const char* str)
{
    // Record output
    ...
    return strlen(str);
}
int stdErrHandler(const char* str)
{
    // Record output
    ...
    return strlen(str);
}
if (!libImatestInitializeWithHandlers(stdErrHandler, stdOutHandler))
{
   ...
To redirect output text using the Imatest Python library, you need to pass in StringIO objects to the ImatestLibrary() constructor, as the stdout and stderr named parameters. You can extract the contents of these objects using the getvalue() method, and should call close() on them at the end of your script.
import StringIO
std_out = StringIO.StringIO()
std_err = StringIO.StringIO()
libImatest = ImatestLibrary(stdout=out_file, stderr=err_file)
# Call library methods …
print std_out.getvalue()
print std_err.getvalue()
std_out.close()
std_err.close()
To redirect output text using the Imatest .NET library, you need to use the Console.SetOut(TextWriter writer) and Console.SetError(TextWriter writer) methods. You must call these methods before creating the Imatest.IT.Library object.
StringWriter stdOut = new StringWriter();
StringWriter stdErr = new StringWriter();
Console.SetOut(stdOut);
Console.SetError(stdErr);
...
string stdOutText = stdOut.ToString();
string stdErrText = stdErr.ToString();
stdOut.Close();
stdErr.Close();
To redirect output text using the Imatest .NET library, you need to use the Console.SetOut(TextWriter writer) and Console.SetError(TextWriter writer) methods. You must call these methods before creating the Imatest.IT.Library object.
Dim stdOut As New StringWriter()
Dim stdErr As New StringWriter()
Console.SetOut(stdout)
Console.SetError(stderr)
...
Dim stdOutStr As String = stdOut.ToString()
Dim stdErrStr As String = stdErr.ToString()
stdOut.Close()
stdErr.Close()
To redirect output using the Imatest IT EXE interface, use the typical command line syntax you normally would use. For example,
sfr.exe "-1" "C:ImatestSamplessfr_example.jpg" "C:Program FilesImatestv26.1ITbin" "C:ImatestSamplesimatest-v2.ini" "C:ImatestSamplesResults" > "C:ImatestSamplesResultssfr_output.log" 2&>&1
will redirect stdout and stderr streams to "C:ImatestSamplesResultssfr_output.log".
To redirect output using the Imatest IT EXE interface, use the typical command line syntax you normally would use. For example,
./run_sfr.sh "-1" "$HOME/ImatestSamples/sfr_example.jpg" "/Applications/Imatest/IT/v26.1/bin" "$HOME/ImatestSamples/imatest-v2.ini" "$HOME/ImatestSamples/Results" > "$HOME/ImatestSamples/Results/sfr_output.log" 2&>&1
will redirect stdout and stderr streams to "$HOME/ImatestSamples/Results/sfr_output.log".
Advanced: Asynchronous Programming with Imatest IT .NET
With the Imatest IT .NET library, you can easily use write asynchronous module calls in your custom applications using the .NET Framework's async and await keywords along with Imatest IT .NET's JSONAsync() methods.
Making these simple changes can have dramatic effect on the responsiveness of applications, especially if they are GUI-based. To see the difference in action, run the Imatest IT .NET Sample Application found at C:Program FilesImatestv26.1ITsamples.NETImatestITSampleProjectImatestITSampleProject.exe and try both the Run and Run Async buttons. You will notice the application appears to freeze when using the non-async version, but is fully responsive when using the async methods.
Altering Existing Imatest IT .NET Code to be Asynchronous
There are only three changes that need to be made to convert single-threaded code into asynchronous code.:
-
- Add an async modifier to the signature in which the asynchronous code will be called.
-
- Add the await in front of the Imatest IT method call.
-
- Change the Imatest IT method call to use the new Async version.
Below is a code snippet of synchronous code making a simple call to the SFRPlus module:
protected void TestImage()
{
    using (Library lib = new Library())
    {
        string rootDir = @"C:ImatestSamples";
        string imagePath = @"C:ImatestSamplessfrplus_example.jpg";
        // Call Imatest IT library with JSON output
        string result = lib.SFRplus.JSON(rootDir, imagePath, OperationMode.Separate);
        Console.Out.WriteLine(result);
    }
}
Below is the same code that has been converted to call the SFRplus module asynchronously:
protected async void TestImage()
{
    using (Library lib = new Library())
    {
        string rootDir = @"C:ImatestSamples";
        string imagePath = @"C:ImatestSamplessfrplus_example.jpg";
        // Call Imatest IT library with JSON output
        string result = await lib.SFRplus.JSONAsync(rootDir, imagePath, OperationMode.Separate);
        // Continue other operations that do not rely on the result value of the test
        Console.Out.WriteLine(result);
    }
}
Initializing the Imatest IT .NET Libraries Asynchronously
The Imatest IT .NET and Imatest Acquisition Library classes have static CreateAsync() methods that can be called using the await keyword:
public async void InitializeApplication()
{
    /// Inside application initialization code
    /// The await keyword will automatically start a new thread to initialize the library,
    /// while code in the main thread continues to execute until the itLib object is
    /// actually used.
    Library itLib = await Library.CreateAsync();
    /// Continue initializing the rest of the application while the background thread
    /// initializes the rest of the application
    ...
    /// The main thread will wait here until the secondary thread is completed and the
    /// Library.CreateAsync() method has returned a Library object.
    await itLib.SFRplus.JSONAsync(rootDir, inputFile, OperationMode.Separate);
    /// At this point only the main thread is running
}
Parallel Processing
Imatest IT now allows you to analyze several different images in parallel,
using the new parallel_analyzer function.
Coming soon...
To use the parallel_analyzer, first create a list of analysis tasks that need to be run. Each task will be assigned to a different parallel process. The number of available concurrent processes depends on how many cores your machine has, though you can tell Imatest IT to use fewer cores if you need.
The parallel_analyzer_shell() C++ interface
The signature of the parallel_analyzer_shell() function is as follows:
parallel_analyzer_shell(int nargout, mwArray& results, const mwArray& tasks, const mwArray& iniFileName, const mwArray& runParallel, const mwArray& numWorkers);
| Parameter Name | Data Type | Description |
| nargout | int | The number of expected output arguments. This will be set to 1. |
| results | mwArray& [const char*] | The serialized JSON object array wrapped in a mwArray |
| tasks | const mwArray& [mxSTRUCT_CLASS] | The array of analysis tasks to run. For further information see below. |
| iniFileName | const mwArray& [const char*] | The path for the Imatest INI file used for analysis |
| runParallel | const mwArray& [bool] | A boolean set to true if parallel analysis is desired, otherwise set to false for serial operation. |
| numWorkers | const mwArray& [int] | The number of child processes to spawn. |
The tasks array is a mwArray of ClassID mxSTRUCT_CLASS. This data type has named fields, as with C++ structs. Each element of the task array has these fields:
input - The supplied image in the form of file path(s) or numeric array(s)
analysisID - An integer that tells IT which module to run. The allowed values are defined in the ImatestAnalysisIDs enum (see <IT installation root>libslibrarycppImatest_analysis_ids.h):
imatest::BLEMISH_ANALYSIS_ID
imatest::CHECKERBOARD_ANALYSIS_ID
imatest::COLORCHECK_ANALYSIS_ID
imatest::DISTORTION_ANALYSIS_ID
imatest::DOTPATTERN_ANALYSIS_ID
imatest::ESFRISO_ANALYSIS_ID
imatest::MULTITEST_ANALYSIS_ID
imatest::RANDOM_ANALYSIS_ID
imatest::SFR_ANALYSIS_ID
imatest::SFRPLUS_ANALYSIS_ID
imatest::SFRREG_ANALYSIS_ID
imatest::STAR_ANALYSIS_ID
imatest::UNIFORMITY_ANALYSIS_ID
imatest::WEDGE_ANALYSIS_ID
jsonMetaData - Image meta data in the form of serialized JSON object string. This field only needs to be filled when numeric arrays are being supplied.
An example of the creation of the tasks array for four image files is available in the parallel_analyzer sample project (<IT installation root>samplescppparallel_analyzermain.cpp). In this example, the tasks array is created with
mwSize numRows = 4; // There are 4 images to test
 mwSize numCols = 1;
 int numFields = 3;
 const char* fieldNames[] = {"input", "analysisID", "jsonMetadata"};
 mwArray tasks(numRows, numCols, numFields, fieldNames);
To supply values to the individual tasks, we make use of the Get(const char* fieldName, int numIndices, int index1, ...) accessor for mxSTRUCT_CLASS mwArrays:
// define the first task tasks.Get("input", 1, 1).Set(mwArray(".\sfrplus_example.jpg")); tasks.Get("analysisID", 1, 1).Set(sfrplusID); // define the second task tasks.Get("input", 1, 2).Set(mwArray(".\blemish_example.jpg")); tasks.Get("analysisID", 1, 2).Set(blemishID); //define the third task tasks.Get("input", 1, 3).Set(mwArray(".\colorcheck_example.jpg")); tasks.Get("analysisID", 1, 3).Set(colorcheckID); //define the fourth task tasks.Get("input", 1, 4).Set(mwArray(".\esfriso_example.jpg")); tasks.Get("analysisID", 1, 4).Set(esfrisoID);
It is important to note that this array is 1-indexed.
Creation of the remaining inputs is simpler; we use the mwArray contructors for scalar numeric values and strings.
mwArray iniFileName("..\Imatest_INI\imatest-v2.ini");
mwArray runParallel(true);
mwArray numWorkers(2);
Lastly, we call parallel_analyzer_shell() with the inputs.
mwArray out;
parallel_analyzer_shell(1, out, tasks, iniFileName, runParallel, numWorkers);
The results will be returned in the out mwArray, which contains a JSON encoded string that can be parsed into an object array with one result object per task. Each result object has this form:
{
   "data": {
      "dateRun": "18-Sep-2017 10:26:59",
      "ini_file_name": "C:\images\ini_file\imatest-v2.ini",
      "ini_time_size": "18-Sep-2017 10:26:45 21822B  MD5 = ac109f86b635bd5b4344d252969e64a7",
      "version": "Imatest 5.0.0  SFRplus",
      "title": "sfrplus_0123.jpg",
      "image_path_name": "C:\images\sfrplus_0123.jpg",
      ...
   },
   "errorID": "",
   "errorMessage": "",
   "errorReport": ""
}
If any exceptions occurred during processing, they will be reported in the errorID, errorMessage, and errorReport properties. While handling your results, you should always check whether the errorID property is empty or not before working with the data property.
In addition to the parallel_analyzer sample, IT also includes a C++ sample project that implements parallel processing using the Boost.Interprocess Library (<IT installation root>samplescppCPP_parallel_test_project). More information can be found in this article.
To use the parallel_analyzer, first create a list of analysis tasks that need to be run. Each task will be assigned to a different parallel process. The number of available concurrent processes depends on how many cores your machine has, though you can tell Imatest IT to use fewer cores if you need.
The parallel_analyzer_shell() C++ interface
The signature of the parallel_analyzer_shell() function is as follows:
parallel_analyzer_shell(int nargout, mwArray& results, const mwArray& tasks, const mwArray& iniFileName, const mwArray& runParallel, const mwArray& numWorkers);
| Parameter Name | Data Type | Description |
| nargout | int | The number of expected output arguments. This will be set to 1. |
| results | mwArray& [const char*] | The serialized JSON object array wrapped in a mwArray |
| tasks | const mwArray& [mxSTRUCT_CLASS] | The array of analysis tasks to run. For further information see below. |
| iniFileName | const mwArray& [const char*] | The path for the Imatest INI file used for analysis |
| runParallel | const mwArray& [bool] | A boolean set to true if parallel analysis is desired, otherwise set to false for serial operation. |
| numWorkers | const mwArray& [int] | The number of child processes to spawn. |
The tasks array is a mwArray of ClassID mxSTRUCT_CLASS. This data type has named fields, as with C++ structs. Each element of the task array has these fields:
input - The supplied image in the form of file path(s) or numeric array(s)
analysisID - An integer that tells IT which module to run. The allowed values are defined in the ImatestAnalysisIDs enum (see <IT installation root>/libs/library/cpp/Imatest_analysis_ids.h):
imatest::BLEMISH_ANALYSIS_ID
imatest::CHECKERBOARD_ANALYSIS_ID
imatest::COLORCHECK_ANALYSIS_ID
imatest::DISTORTION_ANALYSIS_ID
imatest::DOTPATTERN_ANALYSIS_ID
imatest::ESFRISO_ANALYSIS_ID
imatest::MULTITEST_ANALYSIS_ID
imatest::RANDOM_ANALYSIS_ID
imatest::SFR_ANALYSIS_ID
imatest::SFRPLUS_ANALYSIS_ID
imatest::SFRREG_ANALYSIS_ID
imatest::STAR_ANALYSIS_ID
imatest::UNIFORMITY_ANALYSIS_ID
imatest::WEDGE_ANALYSIS_ID
jsonMetaData - Image meta data in the form of serialized JSON object string. This field only needs to be filled when numeric arrays are being supplied.
An example of the creation of the tasks array for four image files is available in the parallel_analyzer sample project (<IT installation root>samplescppparallel_analyzermain.cpp). In this example, the tasks array is created with
 mwSize numRows = 4; // There are 4 images to test
 mwSize numCols = 1;
 int numFields = 3;
 const char* fieldNames[] = {"input", "analysisID", "jsonMetadata"};
 mwArray tasks(numRows, numCols, numFields, fieldNames);
To supply values to the individual tasks, we make use of the Get(const char* fieldName, int numIndices, int index1, …) accessor for mxSTRUCT_CLASS mwArrays:
// define the first task
tasks.Get("input", 1, 1).Set(mwArray(".\sfrplus_example.jpg"));
tasks.Get("analysisID", 1, 1).Set(sfrplusID);
// define the second task
tasks.Get("input", 1, 2).Set(mwArray(".\blemish_example.jpg"));
tasks.Get("analysisID", 1, 2).Set(blemishID);
//define the third task
tasks.Get("input", 1, 3).Set(mwArray(".\colorcheck_example.jpg"));
tasks.Get("analysisID", 1, 3).Set(colorcheckID);
//define the fourth task
tasks.Get("input", 1, 4).Set(mwArray(".\esfriso_example.jpg"));
tasks.Get("analysisID", 1, 4).Set(esfrisoID);
It is important to note that this array is 1-indexed.
Creation of the remaining inputs is simpler; we use the mwArray contructors for scalar numeric values and strings.
mwArray iniFileName("..\Imatest_INI\imatest-v2.ini");
mwArray runParallel(true);
mwArray numWorkers(2);
Lastly, we call parallel_analyzer_shell() with the inputs.
mwArray out;
parallel_analyzer_shell(1, out, tasks, iniFileName, runParallel, numWorkers);
The results will be returned in the out mwArray, which contains a JSON encoded string that can be parsed into an object array with one result object per task. Each result object has this form:
{
   "data": {
      "dateRun": "18-Sep-2017 10:26:59",
      "ini_file_name": "C:\images\ini_file\imatest-v2.ini",
      "ini_time_size": "18-Sep-2017 10:26:45 21822B  MD5 = ac109f86b635bd5b4344d252969e64a7",
      "version": "Imatest 5.0.0  SFRplus",
      "title": "sfrplus_0123.jpg",
      "image_path_name": "C:\images\sfrplus_0123.jpg",
      ...
   },
   "errorID": "",
   "errorMessage": "",
   "errorReport": ""
}
If any exceptions occurred during processing, they will be reported in the errorID, errorMessage, and errorReport properties. While handling your results, you should always check whether the errorID property is empty or not before working with the data property.
To use the parallel_analyzer, first create a list of analysis tasks that need to be run. Each task will be assigned to a different parallel process. The number of available concurrent processes depends on how many cores your machine has, though you can tell Imatest IT to use fewer cores if you need.
The task file
In the stand-alone executable version of parallel_analyzer, the list of tasks is supplied in the form of a JSON encoded file. In this JSON file, the list of tasks is represented by a JSON object array, where each individual task is an object within that array. For each task the following fields need to be defined:
input - The supplied image in the form of file path(s) or numeric array(s)
analysisID - An integer that tells IT which module to run. The allowed values are defined below:
| Module | Value |
| Blemish | 1 |
| Checkerboard | 2 |
| Colorcheck | 3 |
| Distortion | 4 |
| Dotpattern | 5 |
| eSFRiso | 6 |
| Multitest | 7 |
| Random | 8 |
| SFR | 9 |
| SFRplus | 10 |
| SFRreg | 11 |
| Star | 12 |
| Uniformity | 13 |
| Wedge | 14 |
jsonMetaData - Image meta data in the form of serialized JSON object. This field only needs to be filled when numeric arrays are being supplied.
As an example, suppose that there are two files named blemish_example.jpg and sfrplus_example.jpg in the current working directory that need to be analyzed by the Blemish and SFRplus modules, respectively. The contents of this tasks file is then
[
    {
        "input": "blemish_example.jpg",
        "analysisID": 1,
        "jsonMetadata": ""
    },
    {
        "input": "sfrplus_example.jpg",
        "analysisID": 10,
        "jsonMetadata": ""
    }
]
The parallel_analyzer_exe interface
The signature of the parallel_analyze executable is as follows:
parallel_analyzer_exe taskFileName iniFileName runParallel numWorkers [-o|--output_filename <filename>]
The required inputs are
taskFileName: The path to the JSON task file (see the Task File section below).
iniFileName: The path to the Imatest INI file
runParallel: A boolean value that is 1 if the user wants parallel processing and 0 if serial processing is desired.
numWorkers: An integer value indicating the number of child processes to invoke for analysis. The maximum value is the number of physical cores.
with remaining optional input
-o|--output_filename<filename>: Supply the full file path for the file into which the results are saved. Note that either '-o' or '--output_filename' can be used. If this optional input is not supplied, the results are saved to a file named 'results_<current date and time>.json'.
Continuing the above example, suppose that the task file (tasks.json) from above is in our Documents folder with the two image files and our INI file (imatest-v2.ini). The call to run the two tasks in parallel on two processes would be
cd %HOMEPATH%Documents
C:Program FilesImatestv26.1ITbinparallel_analyzer_exe.exe tasks.json imatest-v2.ini 1 2
The results will be saved to a JSON encoded file in the form of a JSON object array with one result object per task. Each result object has this form:
{
   "data": {
      "dateRun": "18-Sep-2017 10:26:59",
      "ini_file_name": "C:\images\ini_file\imatest-v2.ini",
      "ini_time_size": "18-Sep-2017 10:26:45 21822B  MD5 = ac109f86b635bd5b4344d252969e64a7",
      "version": "Imatest 5.0.0  SFRplus",
      "title": "sfrplus_0123.jpg",
      "image_path_name": "C:\images\sfrplus_0123.jpg",
      ...
   },
   "errorID": "",
   "errorMessage": "",
   "errorReport": ""
}
If any exceptions occurred during processing, they will be reported in the errorID, errorMessage, and errorReport properties. While handling your results, you should always check whether the errorID property is empty or not before working with the data property.
To use the parallel_analyzer, first create a list of analysis tasks that need to be run. Each task will be assigned to a different parallel process. The number of available concurrent processes depends on how many cores your machine has, though you can tell Imatest IT to use fewer cores if you need.
The task file
In the stand-alone executable version of parallel_analyzer, the list of tasks is supplied in the form of a JSON encoded file. In this JSON file, the list of tasks is represented by a JSON object array, where each individual task is an object within that array. For each task the following fields need to be defined:
input - The supplied image in the form of file path(s) or numeric array(s)
analysisID - An integer that tells IT which module to run. The allowed values are defined below:
| Module | Value |
| Blemish | 1 |
| Checkerboard | 2 |
| Colorcheck | 3 |
| Distortion | 4 |
| Dotpattern | 5 |
| eSFRiso | 6 |
| Multitest | 7 |
| Random | 8 |
| SFR | 9 |
| SFRplus | 10 |
| SFRreg | 11 |
| Star | 12 |
| Uniformity | 13 |
| Wedge | 14 |
jsonMetaData - Image meta data in the form of serialized JSON object. This field only needs to be filled when numeric arrays are being supplied.
As an example, suppose that there are two files named blemish_example.jpg and sfrplus_example.jpg in the current working directory that need to be analyzed by the Blemish and SFRplus modules, respectively. The contents of this tasks file is then
[
    {
        "input": "blemish_example.jpg",
        "analysisID": 1,
        "jsonMetadata": ""
    },
    {
        "input": "sfrplus_example.jpg",
        "analysisID": 10,
        "jsonMetadata": ""
    }
]
The parallel_analyzer_exe interface
The signature of the parallel_analyze executable is as follows:
./run_parallel_analyzer.sh taskFileName iniFileName runParallel numWorkers [-o|--output_filename FILENAME]
The required inputs are
taskFileName: The path to the JSON task file (see the Task File section below).
iniFileName: The path to the Imatest INI file
runParallel: A boolean value that is 1 if the user wants parallel processing and 0 if serial processing is desired.
numWorkers: An integer value indicating the number of child processes to invoke for analysis. The maximum value is the number of physical cores.
with remaining optional input
-o|--output_filename<filename>: Supply the full file path for the file into which the results are saved. Note that either '-o' or '--output_filename' can be used. If this optional input is not supplied, the results are saved to a file named 'results_<current date and time>.json'.
Continuing the above example, suppose that the task file (tasks.json) from above is in our Documents folder with the two image files and our INI file (imatest-v2.ini). The call on macOS to run the two tasks in parallel on two processes would be
cd ~/Documents
/Applications/Imatest/IT/v26.1/bin/run_parallel_analyzer.sh ./tasks.json ./imatest-v2.ini 1 2
And on Linux the command would be
cd ~/Documents
/usr/local/Imatest/v26.1/IT/bin/run_parallel_analyzer.sh ./tasks.json ./imatest-v2.ini 1 2
The results will be saved to a JSON encoded file in the form of a JSON object array with one result object per task. Each result object has this form:
{
   "data": {
      "dateRun": "18-Sep-2017 10:26:59",
      "ini_file_name": "C:\images\ini_file\imatest-v2.ini",
      "ini_time_size": "18-Sep-2017 10:26:45 21822B  MD5 = ac109f86b635bd5b4344d252969e64a7",
      "version": "Imatest 5.0.0  SFRplus",
      "title": "sfrplus_0123.jpg",
      "image_path_name": "C:\images\sfrplus_0123.jpg",
      ...
   },
   "errorID": "",
   "errorMessage": "",
   "errorReport": ""
}
If any exceptions occurred during processing, they will be reported in the errorID, errorMessage, and errorReport properties. While handling your results, you should always check whether the errorID property is empty or not before working with the data property.
Imatest IT allows you to analyze several different images in parallel, using the new parallel_analyzer function.
To use the parallel_analyzer, first create a list of analysis tasks that need to be run. Each task will be assigned to a different parallel process. The number of available concurrent processes depends on how many cores your machine has, though you can tell Imatest IT to use fewer cores if you need.
To create an analysis task, use the new_parallel_task function:
ImatestLibrary.new_parallel_task(image_files=None, image_data=None, analysis_type=None, image_data_meta_data=None)
| Parameter Name | Data Type | Description |
|---|---|---|
| image_files | str or list of strs | Either a file path to an image, or a list of file paths |
| image_data | str/bytes or array.array (numerical) | If you are providing raw image data, use this argument, which is either the read value of the image in str (Python 2.7) or bytes (Python 3.6, 3.7) form. If using image_data, you must include the image_data_meta_data argument, which you can get by calling ImatestLibrary.build_json_args() |
| analysis_type | enum | A flag telling Imatest IT which module to run. Valid values are constants on the ImatestLibrary class: ImatestLibrary.BLEMISH_ANALYSIS ImatestLibrary.CHECKERBOARD_ANALYSIS ImatestLibrary.COLORCHECK_ANALYSIS ImatestLibrary.DISTORTION_ANALYSIS ImatestLibrary.DOTPATTERN_ANALYSIS ImatestLibrary.ESFRISO_ANALYSIS ImatestLibrary.MULTITEST_ANALYSIS ImatestLibrary.RANDOM_ANALYSIS ImatestLibrary.SFR_ANALYSIS ImatestLibrary.SFRPLUS_ANALYSIS ImatestLibrary.SFRREG_ANALYSIS ImatestLibrary.STAR_ANALYSIS ImatestLibrary.UNIFORMITY_ANALYSIS ImatestLibrary.WEDGE_ANALYSIS |
| image_data_meta_data | dict | A dict object containing the direct read meta data, used to help interpret the raw byte data, and obtained by calling ImatestLibrary.build_json_args(). Required if using the image_data argument, not needed if using image_files. |
add each of your tasks to a list, then call ImatestLibrary.parallel_analyser, passing in the path to your INI file, True for run_parallel, and the number of worker processes you'd like to use:
ini_file = r'C:imagesini_fileimatest-v2.ini'
tasks = []
tasks.append(library.new_parallel_task(image_files=r'C:imagessfrplus_0123.jpg', analysis_type=ImatestLibrary.SFRPLUS_ANALYSIS))
tasks.append(library.new_parallel_task(image_files=[r'C:imagesblemish_0001.jpg', r'C:imagesblemish_0002.jpg', r'C:imagesblemish_0003.jpg'], analysis_type=ImageLibrary.BLEMISH_ANALYSIS))
....
result = library.parallel_analyzer(tasks=tasks, ini_file=ini_file, run_parallel=True, num_workers=4)
The result will be a JSON encoded string that can be parsed into an array of result objects using json.loads(result). Each result object has this form:
{
   "data": {
      "dateRun": "18-Sep-2017 10:26:59",
      "ini_file_name": "C:\images\ini_file\imatest-v2.ini",
      "ini_time_size": "18-Sep-2017 10:26:45 21822B  MD5 = ac109f86b635bd5b4344d252969e64a7",
      "version": "Imatest 5.0.0  SFRplus",
      "title": "sfrplus_0123.jpg",
      "image_path_name": "C:\images\sfrplus_0123.jpg",
      ...
   },
   "errorID": "",
   "errorMessage": "",
   "errorReport": ""
}
If any exceptions occurred during processing, they will be reported in the errorID, errorMessage, and errorReport properties. While handling your results, you should always check whether the errorID property is empty or not before working with the data property:
resultArr = json.loads(result)
for task_result in result_arr:
   if task_result['errorID']:
      # Gracefully handle the error
   else:
      result_data = task_result['data']
      # Process the results in the result_data dictionary
Imatest IT allows you to analyze several different images in parallel, using the new ParallelAnalyzer.Execute() method.
To use the ParallelAnalyzer, first create a List of ImatestTasks objects that contain images to be analyzed. Each task will be assigned to a different parallel process. The number of available concurrent worker processes depends on how many cores your machine has, though you can tell Imatest IT to use fewer workers if you need.
To create an ImatestTask, use one of the overloaded ImatestTask.Create() methods:
public static ImatestTask Create(string imageFilePath, ImatestModule module);
public static ImatestTask Create(IEnumerable<string> imageFilePaths, ImatestModule module);
public static ImatestTask Create(byte[] imageData, ImatestModule module, DirectReadOptions imageMetaData);
public static ImatestTask Create(UInt16[] imageData, ImatestModule module, DirectReadOptions imageMetaData);
public static ImatestTask Create(UInt32[] imageData, ImatestModule module, DirectReadOptions imageMetaData);
| Parameter Name | Data Type | Description |
|---|---|---|
| imageFilePath | string | A file path to an image |
| imageFilePaths | IEnumerable<string> | A collection of file paths to images |
| imageData | byte[], UInt16[], UInt32[] | Raw image data (if you are using direct read mode) |
| module | enum (ImatestLibrary) | A flag telling Imatest IT which module to run. Valid values are contained in the ImatestModule enum: ImatestModule.Blemish ImatestModule.Checkerboard ImatestModule.Colorcheck ImatestModule.Distortion ImatestModule.DotPattern ImatestModule.eSFRISO ImatestModule.Multitest ImatestModule.Random ImatestModule.SFR ImatestModule.SFRplus ImatestModule.SFRreg ImatestModule.Star ImatestModule.Uniformity ImatestModule.Wedge |
| imageMetaData | DirectReadOptions | An instance of the DirectReadOptions class that contains image meta data, used to help interpret the raw byte data. |
Add each of your tasks to a collection of type ImatestTask, then call Library.ParallelAnalyzer.Execute(), passing in the path to your INI file for iniFilePath, true for runInParallel, and the number of worker processes you'd like to use:
string inFile = "C:\images\ini_file\imatest-v2.ini";
List<ImatestTask> lstTasks = new List<ImatestTask>();
lstTasks.Add(ImatestTask.Create("C:\images\sfrplus_0123.jpg", ImatestModule.SFRplus));
lstTasks.Add(ImatestTask.Create(new List<string>() { "C:\image\blemish_0001.jpg", "C:\images\blemish_0002.jpg", "C:\images\blemish_0003.jpg" }, ImatestModule.Blemish));
....
string result = library.ParallelAnalyzer.Execute(lstTasks, iniFile, true, 2);
The result will be a JSON encoded string that can be parsed into an array of result objects using any .NET JSON library. Each result object has this form:
{
   "data": {
      "dateRun": "18-Sep-2017 10:26:59",
      "ini_file_name": "C:\images\ini_file\imatest-v2.ini",
      "ini_time_size": "18-Sep-2017 10:26:45 21822B  MD5 = ac109f86b635bd5b4344d252969e64a7",
      "version": "Imatest 5.0.0  SFRplus",
      "title": "sfrplus_0123.jpg",
      "image_path_name": "C:\images\sfrplus_0123.jpg",
      ...
   },
   "errorID": "",
   "errorMessage": "",
   "errorReport": ""
}
If any exceptions occurred during processing, they will be reported in the errorID, errorMessage, and errorReport properties. While handling your results, you should always check whether the errorID property is empty or not before working with the data property.
Imatest IT allows you to analyze several different images in parallel, using the new ParallelAnalyzer.Execute() method.
To use the ParallelAnalyzer, first create a List of ImatestTasks objects that contain images to be analyzed. Each task will be assigned to a different parallel process. The number of available concurrent worker processes depends on how many cores your machine has, though you can tell Imatest IT to use fewer workers if you need.
To create an ImatestTask, use one of the overloaded ImatestTask.Create() methods:
Public Shared Function Create(imageFilePath As String, [module] As ImatestModule) As ImatestTask
Public Shared Function Create(imageFilePaths As IEnumerable(Of String), [module] As ImatestModule) As ImatestTask
Public Shared Function Create(imageData() As Byte, [module] As ImatestModule, imageMetaData As DirectReadOptions) As ImatestTask
Public Shared Function Create(imageData() As UShort, [module] As ImatestModule, imageMetaData As DirectReadOptions) As ImatestTask
Public Shared Function Create(imageData() As UInteger, [module] As ImatestModule, imageMetaData As DirectReadOptions) As ImatestTask
| Parameter Name | Data Type | Description |
|---|---|---|
| imageFilePath | string | A file path to an image |
| imageFilePaths | IEnumerable<string> | A collection of file paths to images |
| imageData | byte[], UInt16[], UInt32[] | Raw image data (if you are using direct read mode) |
| module | enum (ImatestLibrary) | A flag telling Imatest IT which module to run. Valid values are contained in the ImatestModule enum: ImatestModule.Blemish ImatestModule.Checkerboard ImatestModule.Colorcheck ImatestModule.Distortion ImatestModule.DotPattern ImatestModule.eSFRISO ImatestModule.Multitest ImatestModule.Random ImatestModule.SFR ImatestModule.SFRplus ImatestModule.SFRreg ImatestModule.Star ImatestModule.Uniformity ImatestModule.Wedge |
| imageMetaData | DirectReadOptions | An instance of the DirectReadOptions class that contains image meta data, used to help interpret the raw byte data. |
Add each of your tasks to a collection of type ImatestTask, then call Library.ParallelAnalyzer.Execute(), passing in the path to your INI file for iniFilePath, true for runInParallel, and the number of worker processes you'd like to use:
Dim iniFilePath As String
Dim lstTasks As New List(Of ImatestTask)()
Dim result As String
iniFilePath = "C:\images\ini_file\imatest-v2.ini"
lstTasks.Add(ImatestTask.Create("C:\images\sfrplus_0123.jpg", ImatestModule.SFRplus))
lstTasks.Add(ImatestTask.Create("C:\image\blemish_0001.jpg" ImatestModule.Blemish))
List<ImatestTask> lstTasks = new List<ImatestTask>();
lstTasks.Add(ImatestTask.Create("C:\images\sfrplus_0123.jpg", ImatestModule.SFRplus));
lstTasks.Add(ImatestTask.Create(new List<string>() { "C:\image\blemish_0001.jpg", "C:\images\blemish_0002.jpg", "C:\images\blemish_0003.jpg" }, ImatestModule.Blemish));
....
result = library.ParallelAnalyzer.Execute(lstTasks, iniFilePath, True, 4)
The result will be a JSON encoded string that can be parsed into an array of result objects using any .NET JSON library. Each result object has this form:
{
   "data": {
      "dateRun": "18-Sep-2017 10:26:59",
      "ini_file_name": "C:\images\ini_file\imatest-v2.ini",
      "ini_time_size": "18-Sep-2017 10:26:45 21822B  MD5 = ac109f86b635bd5b4344d252969e64a7",
      "version": "Imatest 5.0.0  SFRplus",
      "title": "sfrplus_0123.jpg",
      "image_path_name": "C:\images\sfrplus_0123.jpg",
      ...
   },
   "errorID": "",
   "errorMessage": "",
   "errorReport": ""
}
If any exceptions occurred during processing, they will be reported in the errorID, errorMessage, and errorReport properties. While handling your results, you should always check whether the errorID property is empty or not before working with the data property.
Arbitrary Charts Module
Imatest IT now allows you to call the Arbitrary Charts module in using the new arbitrary_charts functions. For more information on the Arbitrary Charts modules, see this article.
Coming soon...
Coming soon...
The function prototype for Arbitrary Charts is
arbitrary_charts_shell(int nargout, mwArray& output, const mwArray& inputData, const mwArray& chartFile, const mwArray& iniFile, const mwArray& averageMode, const mwArray& optionsJson)
where the parameters are defined in the following table:
nargoutintAlways set this to 1. This parameter indicates the number of desired outputs.
| Parameter Name | Data Type | Description |
|---|---|---|
| output | mwArray(const char*) | This will contains the results in the form of a JSON-encoded UTF-16 string. |
| inputData | mwArray | The input image data. This can be in the form of a single image file path, a mwArray of type mxCELL_CLASS containing multiple image paths, or a mwArray of type mxCELL_CLASS containing numeric arrays. |
| chartFile | mwArray(const char*) | The file path to the chart definition file (see /26.1/arbitrary-charts/definitions). |
| iniFile | mwArray(const char*) | The file path to the INI file. |
| averageMode | mwArray(int) || mwArray(const char*) | This parameter allows you to specify whether if groups of files are averaged (averageMode == 1) or not (averageMode == 0). |
| optionsJson | mwArray(const char*) | This parameter is a JSON-encoded string that contains descriptive meta-data for the image. See below for more information. |
To begin, declare the iniFileParam and chartFileParam variables and supply the fully-qualified paths to INI and chart definition files.
- (void)runTest: (id)param
{
    @autoreleasepool {
        try{
            mwArray iniFileParam("/some/folder/imatest-v2.ini");
            mwArray chartFileParm("/some/folder/chart_definition.json");
Next the images need to be supplied either as one or more image files, or as image data arrays. If you want to supply more than one image file at a time you will need to first construct an mwArray of type mxCELL_CLASS. For example, if you had three images inputDataParam would be constructed as follows:
           mwArray inputDataParam(3, 1, mxCELL_CLASS);
           inputDataParam.Get(1, 1).Set(mwArray("/some/folder/image1.jpg"));
           inputDataParam.Get(1, 2).Set(mwArray("/some/folder/image2.jpg"));
           inputDataParam.Get(1, 3).Set(mwArray("/some/folder/image3.jpg"));
Alternatively, if you had only a single image file, you can construct inputDataParam by passing the image file path directly to the mwArray constructor
mwArray inputDataParam("/some/folder/image.jpg");
If you are supplying more than one image, you can specify whether the images should be averaged (averageMode == 1) or analyzed separately (averageMode == 0) using the averageModeParam, which can be set to contain a numeric value or a string such as
The remaining parameter to construct is optionsJson. The JSON properties defined in the optionsJson parameter are defined in the table below.
| Option Name | Data Type | Required? | Description |
|---|---|---|---|
| width | int | image data arrays only | The width of the image in pixels. |
| height | int | image data arrays only | The height of the image in pixels. |
| encoding | string | Yes | The data encoding format of the image data. For now the options are (case-insensitive):'intensity', 'sRGB', 'adobe_rgb', 'wide_gamut_rgb', 'pro_photo_rgb', 'apple_rgb', 'colormatch', 'rec_709_full', 'rec_709_legal', 'rec_2020_full', 'rec_2020_legal', 'aces'. Use 'intensity' for 1-channel grayscale data, while the others are for standard RGB encodings. |
| fileroot | string | image data arrays only | The file path to the source image file. |
| extension | string | image data arrays only | The file extension to the source image file. |
| serial_number | string | No | A string containing the serial number. |
| part_number | string | No | A string containing the part number. |
| crop_borders | double array | No | A 1 x 4 double array indicating the crop borders ( [Left Top Right Bottom] ). |
| lens_to_chart_distance_cm | double | No | The lens to chart distance in cm. |
| chart_height_cm | double | No | The chart height in cm. |
In this example, image files are being supplied, so we are only required to supply the image encoding, for example:
mwArray optionsJsonParam("{"encoding":"sRGB"}");
Lastly, we call arbitrary_charts_shell and supply the parameters that have been constructed
            // Call the library function
            mwArray output
            arbitrary_charts_shell(1, output, inputDataParam, chartFileParm, iniFileParam, averageModeParam, optionsJsonParam);
            // Extract the JSON-encoded string.
            // Note that the mwArray contains only UTF-16 strings, which we must load into an NSString
            auto numel = out.NumberOfElements();
            std::u16string buffer(numel+1, 0);
            out.GetCharData(&buffer[0], numel);
            char* data = (char*)buffer.data();
            unsigned long size = buffer.size()*sizeof(char16_t);
            NSString* jsonString =[[NSString alloc] initWithBytes:data length:size encoding:NSUTF16LittleEndianStringEncoding];
            // Process results
        } catch (mwException ex){
            NSLog(@"Error");
            NSLog(@"%s", ex.what());
            ex.print_stack_trace();
        }
    }
}
The result will be a JSON-encoded string of this form:
{
    "Info": {
        "Timestamp": "04-Oct-2017 09:09:08",
        "Version": "Imatest 5.1.0.25883 Alpha ",
        "Build": "2017-10-03",
        "Calculation_time_seconds": [44.36107732]
    },
    "Results_array_sources": "C:\images\P1858_combination_chart_example.jpg",
    "Results": {
...
    }
}
First, create an image options dictionary by calling ImatestLibrary.get_arbitrary_charts_options():
ImatestLibrary.get_arbitrary_charts_options(self, width=None, height=None, encoding=None, filename=None, extension=None, pixel_size=None)
| Parameter Name | Data Type | Description |
|---|---|---|
| width | int | Image width (in pixels) |
| height | int | Image height (in pixels) |
| encoding | str | The pixel encoding (i.e., "srgb", "intensity") |
| filename | str | (direct read only) The name of the file, used for results file names. |
| extension | str | (direct read only) The extension key used to decode the direct read image bytes, as configured in the Read Raw screen of Imatest Master. |
| pixel_size | enum | (direct read only) The pixel size of the direct read image. Use one of these constants: ImatestLibrary.PIXEL_SIZE_8_BIT_UNSIGNED ImatestLibrary.PIXEL_SIZE_16_BIT_UNSIGNED ImatestLibrary.PIXEL_SIZE_32_BIT_UNSIGNED |
Once you have the options object, you can then call the one of the arbitrary_charts functions:
ImatestLibrary.arbitrary_charts_separate(self, image_files=None, image_data=None, chart_file=None, ini_file=None, options=None)
ImatestLibrary.arbitrary_charts_signal_average(self, image_files=None, image_data=None, chart_file=None, ini_file=None, options=None)
The arbitrary_charts_separate function will analyze multiple inputs separately, while the arbitrary_charts_signal_average function will combine two images' results into a single signal averaged result.
| Parameter Name | Data Type | Description |
|---|---|---|
| image_files | str or list of strs | Either a file path to an image, or a list of file paths |
| image_data | str/bytes or array.array (numerical) | If you are providing raw image data, use this argument, which is the read value of the image in bytes (Python 3.9, 3.10, 3.11, 3.12) form. If using image_data, you must include the required parameters into the ImatestLibrary.get_arbitrary_charts_options() method |
| chart_file | str | The path to the chart definition file. |
| ini_file | str | The path to the INI file. |
| options | dict | The dict object returned by calling ImatestLibrary.get_arbitrary_charts_options(). |
The result will be a JSON-encoded string, which can be converted to a dict using json.loads(), of this form:
{
    "Info": {
        "Timestamp": "04-Oct-2017 09:09:08",
        "Version": "Imatest 5.1.0.25883 Alpha ",
        "Build": "2017-10-03",
        "Calculation_time_seconds": [44.36107732]
    },
    "Results_array_sources": "C:\images\P1858_combination_chart_example.jpg",
    "Results": {
     ...
    }
}
First, create an ArbitraryChartOptions object:
ArbitraryChartOptions arbChartOptions = new ArbitraryChartOptions();
arbChartOptions.Encoding = ImageEncoding.sRGB;
arbChartOptions.Width = 1296;
arbChartOptions.Height = 808;
| Property Name | Data Type | Description |
|---|---|---|
| Width | int | Image width (in pixels) |
| Height | int | Image height (in pixels) |
| Encoding | enum (ImageEncoding) | The pixel encoding: ImageEncoding.sRGB ImageEncoding.Intensity |
| Filename | string | (direct read only) The name of the file, used for results file names. |
| Extension | string | (direct read only) The extension key used to decode the direct read image bytes, as configured in the Read Raw screen of Imatest Master. |
Once you have the ArbitraryChartOptions object, you can then call the one of the ArbitraryCharts methods:
public string Separate(string inputFile, string chartFile, string iniFile, ArbitraryChartOptions options);
public string Separate(IEnumerable<string> inputFiles, string chartFile, string iniFile, ArbitraryChartOptions options);
public string Separate(byte[] imageData, string chartFile, string iniFile, ArbitraryChartOptions options);
public string Separate(ushort[] imageData, string chartFile, string iniFile, ArbitraryChartOptions options);
public string Separate(uint[] imageData, string chartFile, string iniFile, ArbitraryChartOptions options);
public Task<string> SeparateAsync(string inputFile, string chartFile, string iniFile, ArbitraryChartOptions options);
public Task<string> SeparateAsync(IEnumerable<string> inputFiles, string chartFile, string iniFile, ArbitraryChartOptions options);
public Task<string>; SeparateAsync(byte[] imageData, string chartFile, string iniFile, ArbitraryChartOptions options);
public Task<string> SeparateAsync(ushort[] imageData, string chartFile, string iniFile, ArbitraryChartOptions options);
public Task<string> SeparateAsync(uint[] imageData, string chartFile, string iniFile, ArbitraryChartOptions options);
public string SignalAverage(IEnumerable<string> inputFiles, string chartFile, string iniFile, ArbitraryChartOptions options);
public Task<string> SignalAverageAsync(IEnumerable<string> inputFiles, string chartFile, string iniFile, ArbitraryChartOptions options);
The ArbitraryCharts.Separate methods will analyze multiple inputs separately, while the ArbitraryCharts.SignalAverage method will combine two images' results into a single signal averaged result.
| Parameter Name | Data Type | Description |
|---|---|---|
| inputFile(s) | string or IEnumberable | Either a file path to an image, or a list of file paths |
| imageData | byte[], UInt16[], UInt32[] | Raw image data (if you are using direct read mode) |
| chartFile | str | The path to the chart definition file. |
| iniFile | str | The path to the INI file. |
| options | dict | The ArbitraryChartOptions object. |
The result will be a JSON-encoded string, which can be parsed using any .NET JSON library, of this form:
{
    "Info": {
        "Timestamp": "04-Oct-2017 09:09:08",
        "Version": "Imatest 5.1.0.25883 Alpha ",
        "Build": "2017-10-03",
        "Calculation_time_seconds": [44.36107732]
    },
    "Results_array_sources": "C:\images\P1858_combination_chart_example.jpg",
    "Results": {
...
    }
}
First, create an ArbitraryChartOptions object:
Dim arbChartOptions As ArbitraryChartOptions
arbChartOptions = new ArbitraryChartOptions()
arbChartOptions.Encoding = ImageEncoding.sRGB
arbChartOptions.Width = 1296
arbChartOptions.Height = 808
| Property Name | Data Type | Description |
|---|---|---|
| Width | int | Image width (in pixels) |
| Height | int | Image height (in pixels) |
| Encoding | enum (ImageEncoding) | The pixel encoding: ImageEncoding.sRGB ImageEncoding.Intensity |
| Filename | string | (direct read only) The name of the file, used for results file names. |
| Extension | string | (direct read only) The extension key used to decode the direct read image bytes, as configured in the Read Raw screen of Imatest Master. |
Once you have the ArbitraryChartOptions object, you can then call the one of the ArbitraryCharts methods:
Public Function Separate(inputFile As String, chartFile As String, iniFile As String, options As ArbitraryChartOptions) As String
Public Function Separate(inputFiles As IEnumerable(Of String), chartFile As String, iniFile As String, options As ArbitraryChartOptions) As String
Public Function Separate(imageData() As Byte, chartFile As String, iniFile As String, options As ArbitraryChartOptions) As String
Public Function Separate(imageData() As UShort, chartFile As String, iniFile As String, options As ArbitraryChartOptions) As String
Public Function Separate(imageData() As UInteger, chartFile As String, iniFile As String, options As ArbitraryChartOptions) As String
Public Function SeparateAsync(inputFile As String, chartFile As String, iniFile As String, options As ArbitraryChartOptions) As Task(Of String)
Public Function SeparateAsync(inputFiles As IEnumerable(Of String), chartFile As String, iniFile As String, options As ArbitraryChartOptions) As Task(Of String)
Public Function SeparateAsync(imageData() As Byte, chartFile As String, iniFile As String, options As ArbitraryChartOptions) As Task(Of String)
Public Function SeparateAsync(imageData() As UShort, chartFile As String, iniFile As String, options As ArbitraryChartOptions) As Task(Of String)
Public Function SeparateAsync(imageData() As UInteger, chartFile As String, iniFile As String, options As ArbitraryChartOptions) As Task(Of String)
Public Function SignalAverage(inputFiles As IEnumerable(Of String), chartFile As String, iniFile As String, options As ArbitraryChartOptions) As String
Public Function SignalAverageAsync(inputFiles As IEnumerable(Of String), chartFile As String, iniFile As String, options As ArbitraryChartOptions) As Task(Of String)
The ArbitraryCharts.Separate methods will analyze multiple inputs separately, while the ArbitraryCharts.SignalAverage method will combine two images' results into a single signal averaged result.
| Parameter Name | Data Type | Description |
|---|---|---|
| inputFile(s) | string or IEnumberable | Either a file path to an image, or a list of file paths |
| imageData | byte[], UInt16[], UInt32[] | Raw image data (if you are using direct read mode) |
| chartFile | str | The path to the chart definition file. |
| iniFile | str | The path to the INI file. |
| options | dict | The ArbitraryChartOptions object. |
The result will be a JSON-encoded string, which can be parsed using any .NET JSON library, of this form:
{
    "Info": {
        "Timestamp": "04-Oct-2017 09:09:08",
        "Version": "Imatest 5.1.0.25883 Alpha ",
        "Build": "2017-10-03",
        "Calculation_time_seconds": [44.36107732]
    },
    "Results_array_sources": "C:\images\P1858_combination_chart_example.jpg",
    "Results": {
...
    }
}
The Arbitrary Charts IT/EXE module has the following command-line interface
Usage: user_defined_charts.exe inputData chartFile iniFile averageMode optionsJsonFile
Positional arguments:
    inputData   the image file path
    chartFile   the chart definition file path
    iniFile     the Imatest INI file path
    averageMode  specify whether if groups of files are averaged (averageMode == 1) or not (averageMode == 0).
    optionsJsonFile  the file path to a JSON-encoded file that specifies the allowed options (see below)
The optionsJsonFile input corresponds to a JSON-encoded file with the following object properties:
| Option Name | Data Type | Required? | Description |
|---|---|---|---|
| encoding | string | Yes | The data encoding format of the image data. For now the options are (case-insensitive):'intensity', 'sRGB', 'adobe_rgb', 'wide_gamut_rgb', 'pro_photo_rgb', 'apple_rgb', 'colormatch', 'rec_709_full', 'rec_709_legal', 'rec_2020_full', 'rec_2020_legal', 'aces'. Use 'intensity' for 1-channel grayscale data, while the others are for standard RGB encodings. |
| serial_number | string | No | A string containing the serial number. |
| part_number | string | No | A string containing the part number. |
| crop_borders | double array | No | A 1 x 4 double array indicating the crop borders ( [Left Top Right Bottom] ). |
| lens_to_chart_distance_cm | double | No | The lens to chart distance in cm. |
To run the Arbitrary Charts module on a single image, as an example we can analyze using the sample image and chart definition file included with the C++ Arbitrary Charts sample. The image that is used in the sample has an sRGB encode. So we produce a JSON file that we arbitrarily name "options.json" and add the following contents
{
  "encoding": "sRGB"
}
We then run user_defined_charts.exe with
user_defined_charts.exe "C:Program FilesImatestv26.1ITsamplescpparbitrary_chartsP1858_combination_chart_example.jpg" "C:Program FilesImatestv26.1ITsamplescpparbitrary_chartsP1858_combination_variant.json" "C:Program FilesImatestv26.1ITsamplescppImatest_INIimatest-v2.ini" "0" "options.json"
JSON results are saved to %HOMEDRIVE%%HOMEPATH%Results by default.
The Arbitrary Charts IT/EXE module has the following command-line interface
Usage: user_defined_charts inputData chartFile iniFile averageMode optionsJsonFile
Positional arguments:
    inputData   the image file path
    chartFile   the chart definition file path
    iniFile     the Imatest INI file path
    averageMode  specify whether if groups of files are averaged (averageMode == 1) or not (averageMode == 0).
    optionsJsonFile  the file path to a JSON-encoded file that specifies the allowed options (see below)
The optionsJsonFile input corresponds to a JSON-encoded file with the following object properties:
| Option Name | Data Type | Required? | Description |
|---|---|---|---|
| encoding | string | Yes | The data encoding format of the image data. For now the options are (case-insensitive):'intensity', 'sRGB', 'adobe_rgb', 'wide_gamut_rgb', 'pro_photo_rgb', 'apple_rgb', 'colormatch', 'rec_709_full', 'rec_709_legal', 'rec_2020_full', 'rec_2020_legal', 'aces'. Use 'intensity' for 1-channel grayscale data, while the others are for standard RGB encodings. |
| serial_number | string | No | A string containing the serial number. |
| part_number | string | No | A string containing the part number. |
| crop_borders | double array | No | A 1 x 4 double array indicating the crop borders ( [Left Top Right Bottom] ). |
| lens_to_chart_distance_cm | double | No | The lens to chart distance in cm. |
To run the Arbitrary Charts module on a single image, as an example we can analyze using the sample image and chart definition file included with the Objective-C Arbitrary Charts sample provided for macOS, or the C++ Arbitrary Charts sample for Linux. The image that is used in the sample has an sRGB encode. So we produce a JSON file that we arbitrarily name "options.json" and add the following contents
{
  "encoding": "sRGB"
}
We then execute run_user_defined_charts.sh with
./run_user_defined_charts.sh "/Applications/Imatest/IT/v26.1/samples/images/P1858_combination_chart_example.jpg" "/Applications/Imatest/IT/v26.1/samples/images/P1858_combo_variant.json" "/Applications/Imatest/IT/v26.1/samples/Objective-C/Imatest_INI/imatest-v2.ini" "0" "options.json"
JSON results are saved to $HOME/Results by default.
Concentric Rings Module
Coming soon ...
The signature of the concentric_rings_shell() function is as follows:
concentric_rings_shell(int nargout, mwArray& jsonManifest, const mwArray& imagePaths, const mwArray& iniFile);
| Parameter Name | Data Type | Description |
| nargout | int | Number of output arguments. Set to 1. |
| jsonManifest | mwArray& [const char*] | The serialized JSON object array wrapped in a mwArray |
| imagePaths | const mwArray& [const char*] | A mwArray of type mxCELL_CLASS that contains a list of image file path strings or a mwArray of type mxCHAR_CLASS for a single image file path string |
| iniFile | const mwArray& [const char*] | The path for the Imatest INI file used for analysis |
Single Image Example
For the case of a single image, it is simpler to assign the imagePaths to an mwArray of type mxCHAR_CLASS, like the following
// iniFilePath is the file path for the Imatest INI file
mwArray iniFilePath("..\Imatest_INI\imatest-v2.ini");
mwArray imagePaths(".\concentric_rings_example.png");
mwArray jsonManifestFileList;
concentric_rings_shell(1, jsonManifestFileList, imagePaths, iniFilePath);
Multiple Images Example
For multiple images to be analyzed as a batch of separate images, the imagePaths parameter needs to be an mwArray of type mxCELL_CLASS, like as follows:
// iniFilePath is the file path for the Imatest INI file
mwArray iniFilePath("..\Imatest_INI\imatest-v2.ini");
mwArray imagePaths(1, 2, mxCELL_CLASS);
// The mwArray::Get() accessor uses a 1-based index with a prototype of the form
 // Get(num_indices, index1, ...)
imagePaths.Get(1, 1).Set(mwArray(".\concentric_rings_example_1.png"));
imagePaths.Get(1, 2).Set(mwArray(".\concentric_rings_example_2.png"));
mwArray jsonManifestFileList;
concentric_rings_shell(1, jsonManifestFileList, imagePaths, iniFilePath);
JSON Output
The jsonManifestFileList variable in the examples above contains a JSON encoded object with the following fields
{
    "summaryFiles": [
         // A list of file paths to the summary files for this run, which contain the results and settings used
     ],
    "plotFiles": [
        // A list of file paths to plots saved for this run.
    ]
}
Each file in "summaryFiles" is a JSON encoded object that includes results information as well as details of the analysis execution. The JSON object is as follows with "..." used to omit details for the sake of brevity.
{
  "concentric_ring": {
    "imatest": {
      ...
      "ini_file": {
        "filename": ...,
        "md5": ..."
      },
      ...
    },
    "inputs": {
      "image_file": {
        "filename": ...,
        "md5": ...
      },
      "settings": {
        ...
        }
      }
    },
    "results": {
      "regmark_data": {
        ...
      },
      "summary": {
        "fov": {
          ...
        },
        "field_angle": {
          ...
        }
      },
      "raw_data": {
        ...
      }
    }
  }
}
The signature of the concentric_rings_shell() function is as follows:
concentric_rings_shell(int nargout, mwArray& jsonManifest, const mwArray& imagePaths, const mwArray& iniFile);
| Parameter Name | Data Type | Description |
| nargout | int | Number of output arguments. Set to 1. |
| jsonManifest | mwArray& [const char*] | The serialized JSON object array wrapped in a mwArray |
| imagePaths | const mwArray& [const char*] | A mwArray of type mxCELL_CLASS that contains a list of image file path strings or a mwArray of type mxCHAR_CLASS for a single image file path string |
| iniFile | const mwArray& [const char*] | The path for the Imatest INI file used for analysis |
Single Image Example
For the case of a single image, it is simpler to assign the imagePaths to an mwArray of type mxCHAR_CLASS, like the following:
NSString* samplesRootPath = [[[[@__FILE__ stringByDeletingLastPathComponent] stringByDeletingLastPathComponent] stringByDeletingLastPathComponent] stringByDeletingLastPathComponent];
NSString* imageFolderPath = [[samplesRootPath stringByDeletingLastPathComponent] stringByAppendingPathComponent:@"images"];
NSString* iniFolderPath = [samplesRootPath stringByAppendingPathComponent:@"Imatest_INI"];
NSString* iniFilePath = [iniFolderPath stringByAppendingPathComponent:@"imatest-v2.ini"];
NSString* imageFilePath = [imageFolderPath stringByAppendingPathComponent:@"concentric_rings_example.png"];
// iniFile is the file path for the Imatest INI file
mwArray iniFileParam([iniFilePath cStringUsingEncoding:NSASCIIStringEncoding]);
// In the next example, we utilize the fileListInput parameter instead
mwArray imagePathsInput([imageFilePath cStringUsingEncoding:NSASCIIStringEncoding]);
mwArray jsonManifest;
concentric_rings_shell(1, jsonManifest, imagePathsInput, iniFileParam);
Multiple Images Example
For multiple images to be analyzed as a batch of separate images, the imagePaths parameter needs to be an mwArray of type mxCELL_CLASS, like as follows:
NSString* samplesRootPath = [[[[@__FILE__ stringByDeletingLastPathComponent] stringByDeletingLastPathComponent] stringByDeletingLastPathComponent] stringByDeletingLastPathComponent];
NSString* imageFolderPath = [[samplesRootPath stringByDeletingLastPathComponent] stringByAppendingPathComponent:@"images"];
NSString* iniFolderPath = [samplesRootPath stringByAppendingPathComponent:@"Imatest_INI"];
NSString* iniFilePath = [iniFolderPath stringByAppendingPathComponent:@"imatest-v2.ini"];
NSString* imageFilePath1 = [imageFolderPath stringByAppendingPathComponent:@"concentric_rings_example_1.png"];
NSString* imageFilePath2 = [imageFolderPath stringByAppendingPathComponent:@"concentric_rings_example_2.png"];
// iniFile is the file path for the Imatest INI file
mwArray iniFileParam([iniFilePath cStringUsingEncoding:NSASCIIStringEncoding]);
// In the next example, we utilize the imagePathsInput parameter instead
mwArray imagePathsInput(1, 2, mxCELL_CLASS);
// The mwArray::Get() accessor uses a 1-based index with a prototype of the form
// Get(num_indices, index1, ...)
imagePathsInput.Get(1, 1).Set(mwArray([imageFilePath1 cStringUsingEncoding:NSASCIIStringEncoding]));
imagePathsInput.Get(1, 2).Set(mwArray([imageFilePath2 cStringUsingEncoding:NSASCIIStringEncoding]));
mwArray jsonManifest;
concentric_rings_shell(1, jsonManifest, imagePathsInput, iniFileParam);
JSON Output
The jsonManifestFileList variable in the examples above contains a JSON encoded object with the following fields
{
    "summaryFiles": [
         // A list of file paths to the summary files for this run, which contain the results and settings used
     ],
    "plotFiles": [
        // A list of file paths to plots saved for this run.
    ]
}
Each file in "summaryFiles" is a JSON encoded object that includes results information as well as details of the analysis execution. The JSON object is as follows with "..." used to omit details for the sake of brevity.
{
  "concentric_ring": {
    "imatest": {
      ...
      "ini_file": {
        "filename": ...,
        "md5": ..."
      },
      ...
    },
    "inputs": {
      "image_file": {
        "filename": ...,
        "md5": ...
      },
      "settings": {
        ...
        }
      }
    },
    "results": {
      "regmark_data": {
        ...
      },
      "summary": {
        "fov": {
          ...
        },
        "field_angle": {
          ...
        }
      },
      "raw_data": {
        ...
      }
    }
  }
}
Concentric Ring analysis is accomplished using one of the following overloaded methods in Imatest.IT.Library.ConcentricRings:
string JSON(string iniFilePath, string[] imageFilePaths)
string JSON(string iniFilePath, string imageFilePath)
async Task<string> JSONAsync(string iniFilePath, string[] imageFilePaths)
async Task<string> JSONAsync(string iniFilePath, string imageFilePath)
Example
Below is an example Concentric Rings analysis with exception handling details omitted with "..." for the sake of brevity.
using System;
using System.Collections.Generic;
using System.Linq;
using System.Text;
using System.IO;
using Imatest.IT;
namespace Imatest.IT.Samples.ConcentricRings
{
    class Program
    {
        /*
        * This code will execute the Imatest Concentric Rings function on the file
        * 'concentric_rings_example.png' which should be a capture of a concentric rings test chart.
        *
        * */
        public const string EXAMPLE_IMAGE = "concentric_rings_example.png";
        static void Main(string[] args)
        {
            using (Library lib = new Library())
            {
                try
                {
                    DirectoryInfo currentDirectory = new DirectoryInfo(Directory.GetCurrentDirectory());
                    string rootDir = currentDirectory.Parent.Parent.Parent.FullName;
                    string iniFilePath = Path.Combine(rootDir, "imatest-v2.ini");
                    // C:Program FilesImatestv26.1ITsamplesimages
                    string sampleImagesDir = Path.Combine(currentDirectory.Parent.Parent.Parent.Parent.Parent.Parent.FullName, "images");
                    List<string> imagePaths = new List<string> {
                        Path.Combine(sampleImagesDir, EXAMPLE_IMAGE),
                    };
                    // Call Imatest IT library with JSON output
                    string jsonManifestFileList = lib.ConcentricRings.JSON(iniFilePath, imagePaths.ToArray());
                    Console.Out.WriteLine(result);
                }
                catch (Exception ex)
                {
                    ...
                }
            }
            Console.Out.WriteLine("Press enter to exit...");
            Console.In.Read();
        }
    }
}
JSON Output
The jsonManifestFileList variable in the examples above contains a JSON encoded object with the following fields
{
    "summaryFiles": [
         // A list of file paths to the summary files for this run, which contain the results and settings used
     ],
    "plotFiles": [
        // A list of file paths to plots saved for this run.
    ]
}
Each file in "summaryFiles" is a JSON encoded object that includes results information as well as details of the analysis execution. The JSON object is as follows with "..." used to omit details for the sake of brevity.
{
  "concentric_ring": {
    "imatest": {
      ...
      "ini_file": {
        "filename": ...,
        "md5": ..."
      },
      ...
    },
    "inputs": {
      "image_file": {
        "filename": ...,
        "md5": ...
      },
      "settings": {
        ...
        }
      }
    },
    "results": {
      "regmark_data": {
        ...
      },
      "summary": {
        "fov": {
          ...
        },
        "field_angle": {
          ...
        }
      },
      "raw_data": {
        ...
      }
    }
  }
}
Concentric Ring analysis is accomplished using one of the following overloaded methods in Imatest.IT.Library.ConcentricRings:
JSON(iniFilePath as String, imageFilePaths as String()) as String
string JSON(iniFilePath as String, string imageFilePath as String) as String
<Awaitable> JSONAsync(iniFilePath as String, string[] imageFilePaths) as Task(Of String)
<Awaitable> JSONAsync(iniFilePath as String, imageFilePath as String) as Task(Of String)
Example
Below is an example Concentric Rings analysis with exception handling details omitted with "…" for the sake of brevity.
Imports System.IO
Imports Imatest.IT
Module Program
    ' In this example program, the image files should be located
    ' in the same directory as this example script, and the 'imatest-v2.ini' file
    ' should be located in the "ini_file" directory in the Python samples directory.
    '
    ' Certain diagnostic lines are written to standard out for diag.
    '
    Public Const EXAMPLE_IMAGE As String = "concentric_rings_example.png"
    Public Sub Main()
        Using library = New Library()
            Try
                Dim currentDirectory As DirectoryInfo
                Dim rootDir As String
                Dim iniFilePath As String
                Dim sampleImagesDir As String
                Dim jsonManifestFileList As String
                Dim imagePaths(1) As String
                currentDirectory = New DirectoryInfo(Directory.GetCurrentDirectory())
                rootDir = currentDirectory.Parent.Parent.Parent.FullName
                iniFilePath = Path.Combine(rootDir, "imatest-v2.ini")
                ' C:Program FilesImatestv26.1ITsamplesimages
                sampleImagesDir = Path.Combine(currentDirectory.Parent.Parent.Parent.Parent.Parent.Parent.FullName, "images")
                imagePaths(0) = Path.Combine(sampleImagesDir, EXAMPLE_IMAGE)
                ' Call Imatest IT library with JSON output
                jsonManifestFileList = library.ConcentricRings.JSON(iniFilePath, imagePaths)
                Console.Out.WriteLine(result)
            Catch ex As Exception
                ...
            End Try
        End Using
        Console.Out.WriteLine("Press enter to exit...")
        Console.In.Read()
    End Sub
End Module
JSON Output
The jsonManifestFileList variable in the examples above contains a JSON encoded object with the following fields
{
    "summaryFiles": [
         // A list of file paths to the summary files for this run, which contain the results and settings used
     ],
    "plotFiles": [
        // A list of file paths to plots saved for this run.
    ]
}
Each file in "summaryFiles" is a JSON encoded object that includes results information as well as details of the analysis execution. The JSON object is as follows with "..." used to omit details for the sake of brevity.
{
  "concentric_ring": {
    "imatest": {
      ...
      "ini_file": {
        "filename": ...,
        "md5": ..."
      },
      ...
    },
    "inputs": {
      "image_file": {
        "filename": ...,
        "md5": ...
      },
      "settings": {
        ...
        }
      }
    },
    "results": {
      "regmark_data": {
        ...
      },
      "summary": {
        "fov": {
          ...
        },
        "field_angle": {
          ...
        }
      },
      "raw_data": {
        ...
      }
    }
  }
}
Concentric Rings IT/EXE has the following command line interface:
Concentric Rings IT/EXE
Usage: concentric_rings_exe [OPTIONS] ini-file image-paths...
Positionals:
  ini-file TEXT REQUIRED      The path to the Imatest INI file.
  image-paths TEXT ... REQUIRED
                              One or more image file paths
Options:
  -h,--help                   Print this help message and exit
  -v,--version                Display program version information and exit
  --echo-result-manifest      After a successful run, echo the result manifest json to stdout.
Example
concentric_rings_exe "pathtoimatest-v2.ini" "anotherpathmy_image.jpg"
Concentric Rings IT/EXE has the following command line interface:
Concentric Rings IT/EXE
Usage: concentric_rings_exe [OPTIONS] ini-file image-paths...
Positionals:
  ini-file TEXT REQUIRED      The path to the Imatest INI file.
  image-paths TEXT ... REQUIRED
                              One or more image file paths
Options:
  -h,--help                   Print this help message and exit
  -v,--version                Display program version information and exit
  --echo-result-manifest      After a successful run, echo the result manifest json to stdout.
Example
./run_concentric_rings_exe.sh "path/to/imatest-v2.ini" "another/path/to/my_image.jpg"
Stray Light Module
Coming soon…
The signature of the stray_light_shell() function is as follows:
stray_light_shell(int nargout, mwArray& jsonManifest, const mwArray& iniFilePath, const mwArray& configInput, const mwArray& fileListInput)
| Parameter Name | Data Type | Description |
| nargout | int | The number of expected output arguments. This will be set to 1. |
| jsonManifest | mwArray& [const char*] | The serialized JSON object array wrapped in a mwArray |
| iniFilePath | const mwArray& [const char*] | The path for the Imatest INI file used for analysis |
| configInput | const mwArray& [const char*] | An mwArray containing either a file path to a Stray Light config file (*.slconfig), or a Stray Light config in the form of a JSON-encoded string |
| fileListInput | const mwArray& [const char*] | A mwArray of type mxCELL_CLASS that contains a list of image file path strings |
The stray_light_shell() function has two mutually exclusive use cases:
-
- Input only a list of file paths via the fileListInput parameter, with configInput left an empty mwArray. This is a simplified interface that provides the bare-minimum information for analysis: the image files.
-
- Construct an imatest::stray_light::Config object and pass it in through the configInput parameter, which provides a means to input source field angles and azimuth angles associated with each input image file.
File list input example
In the example below, we set up a Stray Light analysis and supply only a list of files (see the Stray Light C++ sample for more details). Each file is assumed to be of a separate capture condition in this analysis.
// In the next example, we utilize the fileListInput parameter instead (and leave the ConfigInput parameter empty).
// iniFilePath is the file path for the Imatest INI file
mwArray iniFilePath("..\Imatest_INI\imatest-v2.ini");
mwArray fileListInput(4, 1, mxCELL_CLASS);
// The mwArray::Get() accessor uses a 1-based index with a prototype of the form
// Get(num_indices, index1, ...)
fileListInput.Get(1, 1).Set(mwArray(".\cap031_Az_90_Fa_0.png"));
fileListInput.Get(1, 2).Set(mwArray(".\cap039_Az_90_Fa_8.png"));
fileListInput.Get(1, 3).Set(mwArray(".\cap058_Az_90_Fa_27.png"));
fileListInput.Get(1, 4).Set(mwArray(".\cap061_Az_90_Fa_30.png"));
// Call the library function
mwArray jsonManifest;
stray_light_shell(1, jsonManifest, iniFilePath, mwArray(), fileListInput);
When stray_light_shell() completes, the results are returned in the jsonManifest mwArray as a JSON-encoded string. By default, this JSON object is structured as follows:
{
    "masks": [
        // ... file paths to saved masks ...
    ],
    "metric_images" : [
        // ... file paths to saved metric images ...
    ],
    "plots" : [
        // ... file paths to saved plots ...
    ],
    "videos" : [
        // ... file paths to saved videos ...
    ],
    "results" : [
        // ... file paths to saved results files ...
    ]
}
where each field in the JSON object contains an array of path strings.
Config input example
The next example (also borrowed from the Stray Light C++ sample) make use of the Config and CaptureConfig defined in the imatest::stray_light namespace (see StrayLightConfig.h/.cpp and StrayLightCaptureConfig.h/.cpp included in <IT install root>/libs/library/cpp).
using imatest::stray_light::Config;
using imatest::stray_light::CaptureConfig;
// iniFilePath is the file path for the Imatest INI file
mwArray iniFilePath("..\Imatest_INI\imatest-v2.ini");
// First we construct a imatest::stray_light::Config.
// In this example we have 4 images taken with the following capture conditions:
// ".\cap031_Az_90_Fa_0.png":
//    source field angle: 0 degrees
//    source azimuth angle: 90 degrees
// ".\cap039_Az_90_Fa_8.png":
//    source field angle: 8 degrees
//    source azimuth angle: 90 degrees
// ".\cap058_Az_90_Fa_27.png":
//    source field angle: 27 degrees
//    source azimuth angle: 90 degrees
// ".\cap061_Az_90_Fa_30.png":
//    source field angle: 30 degrees
//    source azimuth angle: 90 degrees
Config config;
config.runName = "Test run";
config.comment = "Test run within the Imatest IT sample for Stray Light";
config.captures.emplace_back(CaptureConfig({ ".\cap031_Az_90_Fa_0.png" }, 0, 90, "On-Axis"));
config.captures.emplace_back(CaptureConfig({ ".\cap039_Az_90_Fa_8.png" }, 8, 90, "Mid-Field"));
config.captures.emplace_back(CaptureConfig({ ".\cap058_Az_90_Fa_27.png" }, 27, 90, "Edge Of FOV"));
config.captures.emplace_back(CaptureConfig({ ".\cap061_Az_90_Fa_30.png" }, 30, 90, "Out Of FOV"));
mwArray configInput(config);
// Call the library function
mwArray jsonManifest;
stray_light_shell(1, jsonManifest, iniFilePath, configInput, mwArray());
with the results returned as JSON encoded string within the jsonManifest mwArray, as before.
The signature of the stray_light_shell() function is as follows:
stray_light_shell(int nargout, mwArray& jsonManifest, const mwArray& iniFilePath, const mwArray& configInput, const mwArray& fileListInput)
| Parameter Name | Data Type | Description |
| nargout | int | The number of expected output arguments. This will be set to 1. |
| jsonManifest | mwArray& [const char*] | The serialized JSON object array wrapped in a mwArray |
| iniFilePath | const mwArray& [const char*] | The path for the Imatest INI file used for analysis |
| configInput | const mwArray& [const char*] | An mwArray containing either a file path to a Stray Light config file (*.slconfig), or a Stray Light config in the form of a JSON-encoded string |
| fileListInput | const mwArray& [int] | A mwArray of type mxCELL_CLASS that contains a list of image file path strings |
The stray_light_shell() function has two mutually exclusive use cases:
-
- Input only a list of file paths via the fileListInput parameter, with configInput left an empty mwArray. This is a simplified interface that provides the bare-minimum information for analysis: the image files.
-
- Construct an imatest::stray_light::Config object and pass it in through the configInput parameter, which provides a means to input source field angles and azimuth angles associated with each input image file.
File list input example
In the example below, we set up a Stray Light analysis and supply only a list of files (see the Stray Light Objective-C sample for more details). Each file is assumed to be of a separate capture condition in this analysis.
// In the next example, we utilize the fileListInput parameter instead (and leave the ConfigInput parameter empty).
NSString* samplesRootPath = [[[@__FILE__ stringByDeletingLastPathComponent] stringByDeletingLastPathComponent] stringByDeletingLastPathComponent];
NSString* imageFolderPath = [[samplesRootPath stringByDeletingLastPathComponent] stringByAppendingPathComponent:@"images"];
NSString* iniFolderPath = [samplesRootPath stringByAppendingPathComponent:@"Imatest_INI"];
NSString* iniFilePath = [iniFolderPath stringByAppendingPathComponent:@"imatest-v2.ini"];
NSString* imageFilePath1 = [imageFolderPath stringByAppendingPathComponent:@"cap031_Az_90_Fa_0.png"];
NSString* imageFilePath2 = [imageFolderPath stringByAppendingPathComponent:@"cap039_Az_90_Fa_8.png"];
NSString* imageFilePath3 = [imageFolderPath stringByAppendingPathComponent:@"cap058_Az_90_Fa_27.png"];
NSString* imageFilePath4 = [imageFolderPath stringByAppendingPathComponent:@"cap061_Az_90_Fa_30.png"];
// iniFile is the file path for the Imatest INI file
mwArray iniFileParam([iniFilePath cStringUsingEncoding:NSASCIIStringEncoding]);
mwArray fileListInput(4, 1, mxCELL_CLASS);
// The mwArray::Get() accessor uses a 1-based index with a prototype of the form
// Get(num_indices, index1, ...)
fileListInput.Get(1, 1).Set(mwArray([imageFilePath1 cStringUsingEncoding:NSASCIIStringEncoding]));
fileListInput.Get(1, 2).Set(mwArray([imageFilePath2 cStringUsingEncoding:NSASCIIStringEncoding]));
fileListInput.Get(1, 3).Set(mwArray([imageFilePath3 cStringUsingEncoding:NSASCIIStringEncoding]));
fileListInput.Get(1, 4).Set(mwArray([imageFilePath4 cStringUsingEncoding:NSASCIIStringEncoding]));
// Call the library function
mwArray jsonManifest;
stray_light_shell(1, jsonManifest, iniFilePath, mwArray(), fileListInput);
When stray_light_shell() completes, the results are returned in the jsonManifest mwArray as a JSON-encoded string. By default, this JSON object is structured as follows:
{
    "masks": [
        // ... file paths to saved masks ...
    ],
    "metric_images" : [
        // ... file paths to saved metric images ...
    ],
    "plots" : [
        // ... file paths to saved plots ...
    ],
    "videos" : [
        // ... file paths to saved videos ...
    ],
    "results" : [
        // ... file paths to saved results files ...
    ]
}
where each field in the JSON object contains an array of path strings.
Config input example
The next example (also borrowed from the Stray Light C++ sample) make use of the Config and CaptureConfig defined in the imatest::stray_light namespace (see StrayLightConfig.h/.cpp and StrayLightCaptureConfig.h/.cpp included in <IT install root>/libs/library/cpp).
NSString* samplesRootPath = [[[@__FILE__ stringByDeletingLastPathComponent] stringByDeletingLastPathComponent] stringByDeletingLastPathComponent];
NSString* imageFolderPath = [[samplesRootPath stringByDeletingLastPathComponent] stringByAppendingPathComponent:@"images"];
NSString* iniFolderPath = [samplesRootPath stringByAppendingPathComponent:@"Imatest_INI"];
NSString* iniFilePath = [iniFolderPath stringByAppendingPathComponent:@"imatest-v2.ini"]; NSString* imageFilePath1 = [imageFolderPath stringByAppendingPathComponent:@"cap031_Az_90_Fa_0.png"];
NSString* imageFilePath2 = [imageFolderPath stringByAppendingPathComponent:@"cap039_Az_90_Fa_8.png"];
NSString* imageFilePath3 = [imageFolderPath stringByAppendingPathComponent:@"cap058_Az_90_Fa_27.png"];
NSString* imageFilePath4 = [imageFolderPath stringByAppendingPathComponent:@"cap061_Az_90_Fa_30.png"];
// iniFile is the file path for the Imatest INI file
mwArray iniFileParam([iniFilePath cStringUsingEncoding:NSASCIIStringEncoding]);
// First we construct a imatest::stray_light::Config.
// In this example we have 4 images taken with the following capture conditions:
// "cap031_Az_90_Fa_0.png":
//    source field angle: 0 degrees
//    source azimuth angle: 90 degrees
// "cap039_Az_90_Fa_8.png":
//    source field angle: 8 degrees
//    source azimuth angle: 90 degrees
// "cap058_Az_90_Fa_27.png":
//    source field angle: 27 degrees
//    source azimuth angle: 90 degrees
// "cap061_Az_90_Fa_30.png":
//    source field angle: 30 degrees
//    source azimuth angle: 90 degrees
imatest::stray_light::Config config;
config.runName = "Test run";
config.comment = "Test run within the Imatest IT sample for Stray Light";
config.captures.emplace_back(imatest::stray_light::CaptureConfig({ [imageFilePath1 cStringUsingEncoding:NSASCIIStringEncoding] }, 0, 90, "On-Axis"));
config.captures.emplace_back(imatest::stray_light::CaptureConfig({ [imageFilePath2 cStringUsingEncoding:NSASCIIStringEncoding] }, 8, 90, "Mid-Field"));
config.captures.emplace_back(imatest::stray_light::CaptureConfig({ [imageFilePath3 cStringUsingEncoding:NSASCIIStringEncoding] }, 27, 90, "Edge Of FOV"));
config.captures.emplace_back(imatest::stray_light::CaptureConfig({ [imageFilePath4 cStringUsingEncoding:NSASCIIStringEncoding] }, 30, 90, "Out Of FOV"));
mwArray configInputParam(config); // Call the library function
mwArray jsonManifest;
stray_light_shell(1, jsonManifest, iniFileParam, configInputParam, mwArray());
with the results returned as JSON encoded string within the jsonManifest mwArray, as before.
Stray light analysis can proceed a few different ways depending on what additional testing condition data is available.
-
- Input only a list of file paths via the fileList input parameter. This is a simplified interface that provides the bare-minimum information for analysis: the image files.
-
- Construct an StrayLightConfig object and pass it in through the config input parameter, which provides a means to input source field angles and azimuth angles associated with each input image file.
-
- Provide a file path to a serialized StrayLightConfig (i.e. a JSON-encoded file with the extension *.slconf).
The StrayLightConfig class has the following properties:
| Property Name | Data Type | Description |
| Captures | IEnumerable<StrayLightCaptureConfig> | The collection of captures used for this analysis. |
| RunName | string | An optional run name to assign to this analysis. |
| Comment | string | An optional comment about the configuration, test setup, etc. |
, where the StrayLightCaptureConfig class has the properties
| Property Name | Data Type | Description |
| ImagePaths | IEnumerable<string> | The collection of image file paths all taken at this source field angle and source azimuth angle. |
| SourceFieldAngleDeg | double | The source field angle in degrees. |
| SourceAzimuthAngleDeg | double | The source azimuth angle in degrees. |
| Comment | string | An optional comment for this collection of images. |
Depending on the input data source, analysis can then proceed via one of the overloaded methods in the Imatest.IT.Library.StrayLight library methods:
string Batch(string iniFilePath, StrayLightConfig config)
async Task<string> BatchAsync(string iniFilePath, StrayLightConfig config)
string Batch(string iniFilePath, string configFilePath)
async Task<string> BatchAsync(string iniFilePath, string configFilePath)
string Batch(string iniFilePath, String[] fileList)
async Task<string> BatchAsync(string iniFilePath, String[] fileList)
To demonstrate the functionality, below we walk through an example (which is largely identical to the example installed at <IT install root>/samples/.NET/C#/StrayLight, but with details omitted with ... for brevity). To set up the analysis we initiate an Imatest.IT.Library instance and define the Imatest INI and image file paths.
using System;
using System.Collections.Generic;
using System.Linq;
using System.Text;
using System.IO;
using System.Runtime.Serialization.Json;
using System.Threading.Tasks;
using MathWorks.MATLAB.NET.Arrays;
using Imatest.IT;
class Program
{
    public const string EXAMPLE_IMAGE_1 = "cap031_Az_90_Fa_0.png";
    public const string EXAMPLE_IMAGE_2 = "cap039_Az_90_Fa_8.png";
    public const string EXAMPLE_IMAGE_3 = "cap058_Az_90_Fa_27.png";
    public const string EXAMPLE_IMAGE_4 = "cap061_Az_90_Fa_30.png";
    static void Main(string[] args)
    {
        using (Library lib = new Library())
        {
            try
            {
                DirectoryInfo currentDirectory = new DirectoryInfo(Directory.GetCurrentDirectory());
                string rootDir = ... ;
                string iniFilePath = Path.Combine(rootDir, "imatest-v2.ini");
                string sampleImagesDir = ... ;
                List<string> imagePaths = new List<string> {
                    Path.Combine(sampleImagesDir, EXAMPLE_IMAGE_1),
                    Path.Combine(sampleImagesDir, EXAMPLE_IMAGE_2),
                    Path.Combine(sampleImagesDir, EXAMPLE_IMAGE_3),
                    Path.Combine(sampleImagesDir, EXAMPLE_IMAGE_4)
                };
next we construct a List<StrayLightCaptureConfig> from the image file paths
                List<StrayLightCaptureConfig> captureConfigs = new List<StrayLightCaptureConfig>();
                foreach (string imagePath in imagePaths) {
                    captureConfigs.Add(new StrayLightCaptureConfig(new List<string> { imagePath }));
                }
and then construct a StrayLightConfig instance from the List<StrayLightCaptureConfig>.
StrayLightConfig config = new StrayLightConfig(captureConfigs);
Lastly we supply the StrayLightConfig instance and the INI file path to Imatest.IT.StrayLight.Batch() and execute
                // Call Imatest IT library with JSON output
                string result = lib.StrayLight.Batch(iniFilePath, config);
                Console.Out.WriteLine(result);
            }
            catch (Exception ex)
            {
                ...
            }
        }
       }
}
Imatest.IT.StrayLight.Batch() will return a JSON-encoded string of the form
{
    "masks": [
        // ... file paths to saved masks ...
    ],
    "metric_images" : [
        // ... file paths to saved metric images ...
    ],
    "plots" : [
        // ... file paths to saved plots ...
    ],
    "videos" : [
        // ... file paths to saved videos ...
    ],
    "results" : [
        // ... file paths to saved results files ...
    ]
}
which lists the file paths of any file produced by the analysis.
Stray light analysis can proceed a few different ways depending on what additional testing condition data is available.
-
- Input only a list of file paths via the fileList input parameter. This is a simplified interface that provides the bare-minimum information for analysis: the image files.
-
- Construct an StrayLightConfig object and pass it in through the config input parameter, which provides a means to input source field angles and azimuth angles associated with each input image file.
-
- Provide a file path to a serialized StrayLightConfig (i.e. a JSON-encoded file with the extension *.slconf).
The StrayLightConfig class has the following properties:
| Property Name | Data Type | Description |
| Captures | IEnumerable<StrayLightCaptureConfig> | The collection of captures used for this analysis. |
| RunName | string | An optional run name to assign to this analysis. |
| Comment | string | An optional comment about the configuration, test setup, etc. |
, where the StrayLightCaptureConfig class has the properties
| Property Name | Data Type | Description |
| ImagePaths | IEnumerable<string> | The collection of image file paths all taken at this source field angle and source azimuth angle. |
| SourceFieldAngleDeg | double | The source field angle in degrees. |
| SourceAzimuthAngleDeg | double | The source azimuth angle in degrees. |
| Comment | string | An optional comment for this collection of images. |
Depending on the input data source, analysis can then proceed via one of the overloaded methods in the Imatest.IT.Library.StrayLight library methods:
Public Function Batch(iniFilePath as String, config as StrayLightConfig) as  String
Public Function BatchAsync(iniFilePath as String, config as StrayLightConfig) As Task(Of String)
Public Function Batch(iniFilePath as String, configFilePath as String) as String
Public Function BatchAsync(iniFilePath as String, configFilePath as String) As Task(Of String)
Public Function Batch(string iniFilePath, fileList as String()) as String
Public Function BatchAsync(iniFilePath as String, fileList as String()) As Task(Of String)
To demonstrate the functionality, below we walk through an example (which is largely identical to the example installed at <IT install root>/samples/.NET/VB.NET/StrayLight, but with details omitted with ... for brevity). To set up the analysis we initiate an Imatest.IT.Library instance, declare needed variables, and define the Imatest INI and image file paths.
Imports System.IO
Imports Imatest.IT
Module Program
    Public Const EXAMPLE_IMAGE_1 As String = "cap031_Az_90_Fa_0.png"
    Public Const EXAMPLE_IMAGE_2 As String = "cap039_Az_90_Fa_8.png"
    Public Const EXAMPLE_IMAGE_3 As String = "cap058_Az_90_Fa_27.png"
    Public Const EXAMPLE_IMAGE_4 As String = "cap061_Az_90_Fa_30.png"
    Public Sub Main()
        Using library = New Library()
            Try
                Dim currentDirectory As DirectoryInfo
                Dim rootDir As String
                Dim iniFilePath As String
                Dim sampleImagesDir As String
                Dim result As String
                Dim captureConfigs(3) As StrayLightCaptureConfig
                Dim captureConfig As StrayLightConfig
                rootDir = ...
                iniFilePath = Path.Combine(rootDir, "imatest-v2.ini")
                sampleImagesDir = ...
next we construct the StrayLightCaptureConfig array from the image file paths
                captureConfigs(0) = New StrayLightCaptureConfig(New String() {Path.Combine(sampleImagesDir, EXAMPLE_IMAGE_1)})
                captureConfigs(1) = New StrayLightCaptureConfig(New String() {Path.Combine(sampleImagesDir, EXAMPLE_IMAGE_2)})
                captureConfigs(2) = New StrayLightCaptureConfig(New String() {Path.Combine(sampleImagesDir, EXAMPLE_IMAGE_3)})
                captureConfigs(3) = New StrayLightCaptureConfig(New String() {Path.Combine(sampleImagesDir, EXAMPLE_IMAGE_4)})
and then construct a StrayLightConfig instance from the List<StrayLightCaptureConfig>.
captureConfig = New StrayLightConfig(captureConfigs)
Lastly we supply the StrayLightConfig instance and the INI file path to Imatest.IT.StrayLight.Batch() and execute
                ' Call Imatest IT library with JSON output without Stray Light Config values
                result = library.StrayLight.Batch(iniFilePath, captureConfig)
            Catch ex As Exception
                ...
            End Try
        End Using
    End Sub
End Module
Imatest.IT.StrayLight.Batch() will return a JSON-encoded string of the form
{
    "masks": [
        // ... file paths to saved masks ...
    ],
    "metric_images" : [
        // ... file paths to saved metric images ...
    ],
    "plots" : [
        // ... file paths to saved plots ...
    ],
    "videos" : [
        // ... file paths to saved videos ...
    ],
    "results" : [
        // ... file paths to saved results files ...
    ]
}
which lists the file paths of any file produced by the analysis.
The Stray Light IT/EXE module has the following command-line interface
 stray_light_exe --help
Usage: stray_light_exe [--echo-result-manifest] [--help] iniFilePath [configFilePath] [imageFileList]
Analyze stray light images via the stray light module
Positional arguments:
	iniFilePath   		The full path to the INI file.
	configFilePath		The full path to the analysis config file.
	imageFileList 		The full path to all image files to analyze.
Options:
	--echo-result-manifest		After a successful run, echo the result manifest json to stdout.
	-h, --help            		Display this help information.
The Stray Light IT/EXE interface has two mutually exclusive use cases:
-
- Input only a list of file paths via the
imageFileListparameter, withconfigFilePathleft an empty string. This is a simplified interface that provides the bare-minimum information for analysis: the image files.
- Input only a list of file paths via the
-
- Supply a file path to an *.slconf file, which provides a means to input source field angles and azimuth angles associated with each input image file. *.slconf are a JSON encoded file that can be generated from a StrayLightConfig object in the IT/Python interface, or the equivalent class in the C++, C# or VB.NET interfaces. This *.slconf file provides more information to the Stray Light module and thus a richer analysis.
To execute stray_light_shell.exe, supply the require filed paths as below
stray_light_exe.exe "imatest-v2.ini" "my_capture.slconf"
The Stray Light IT/EXE module has the following command-line interface
 stray_light_exe --help
Usage: stray_light_exe [--echo-result-manifest] [--help] iniFilePath [configFilePath] [imageFileList]
Analyze stray light images via the stray light module
Positional arguments:
	iniFilePath   		The full path to the INI file.
	configFilePath		The full path to the analysis config file.
	imageFileList 		The full path to all image files to analyze.
Options:
	--echo-result-manifest		After a successful run, echo the result manifest json to stdout.
	-h, --help            		Display this help information.
The Stray Light IT/EXE interface has two mutually exclusive use cases:
-
- Input only a list of file paths via the
imageFileListparameter, withconfigFilePathleft an empty string. This is a simplified interface that provides the bare-minimum information for analysis: the image files.
- Input only a list of file paths via the
-
- Supply a file path to an *.slconf file, which provides a means to input source field angles and azimuth angles associated with each input image file. *.slconf are a JSON encoded file that can be generated from a StrayLightConfig object in the IT/Python interface, or the equivalent class in the C++, C# or VB.NET interfaces. This *.slconf file provides more information to the Stray Light module and thus a richer analysis.
To execute stray_light_shell.exe, supply the require filed paths as below
./run_stray_light_exe.sh "imatest-v2.ini" "my_capture.slconf"
Troubleshooting
[kb_block category_id=22 showposts=30]2