Introduction to New Imatest Main Window Features
New UI features in 25.1
- Open With Imatest - Open files directly from Windows Explorer and MacOS Finder.
- Imatest Store - Includes links to the Imatest Store for most analysis targets to easily view Imatest's chart offerings.
- Console Panel - Improved Console Panel layout with docking and full-screen options.
- Image Preview - Navigate to another image using the left and right navigation buttons without leaving image preview.
- Settings - The Settings page has been reorganized with easier access to Imatest Master analysis and UI settings, a new "Save + Re-Analyze" button, performance improvements, and a better search experience.
- Operating system preferred applications - Respects operating system preferred applications when opening files and images from Imatest Master.
New UI features in 24.2
- Batch Folder Processing - Folders can be dropped into the Main Window and have their contents run as a customizable batch with filtering by file extension, manual inclusion by checkbox, and drag-and-drop reordering.
- General Settings - Improved validation and Stray Light settings format. Warnings will be displayed if invalid values are loaded from the INI and indicated in the General Settings window.
- Console Panel - Monitor errors, warnings, and informational messages in real-time during analysis.
- Restore Session - Imatest will remember the last images and selected analysis when closed, and ask if you would like to load them when re-launching.
New UI features in 24.1
- Custom Metadata - Annotate images with personalized custom fields in the Image Preview window.
- General Settings - Improved search capabilities with highlighting.
- Tour Mode - Improved Tour with the additional demonstration of Image Preview, Settings and Custom Metadata.
New UI features in 23.2
- License Manager - New Main Window License Manager for administering your Imatest license. Activate, deactivate, and more.
- Image Preview - Now includes the ability to view the first frame of video files.
- General Settings - Significant performance improvements.
New UI features in 23.1
- Improved Settings - With improved user experience: search for settings, navigate to different module settings, and save settings. These new settings replace the ROI Options, Options II, Options III in previous releases.
- Imatest Database - Store image metadata in the Imatest database. Open Image Preview to view EXIF data from your images, and Imatest will store the data.
- Image Preview Improvements - Now allows you to open any image that may not be visible in the main window otherwise. In addition, images now load and display faster than before, and minimap improvements allow for seamless movement around the image.
- Tour Mode - starts from the welcome window to demonstrate the usage of the new main window.
New UI features in 22.1
- Automatic Chart Identification - Imatest will automatically identify the chart type when an image is uploaded. If an image is identified, a green badge will appear on the Chart icon in the bottom right of the Image card. Based on the chart type detected, an image analysis will be recommended. Click on the recommended analysis type, to select that analysis, then click the Analyze button on the left to perform the analysis. This feature can be set to be Automatic or Manual, by setting the Chart Identification switch in the Drop image section. This feature identifies the 20 most common charts - if no chart is identified in the image, the CI icon will have a blue badge, and the desired Analysis can be chosen in the left column.
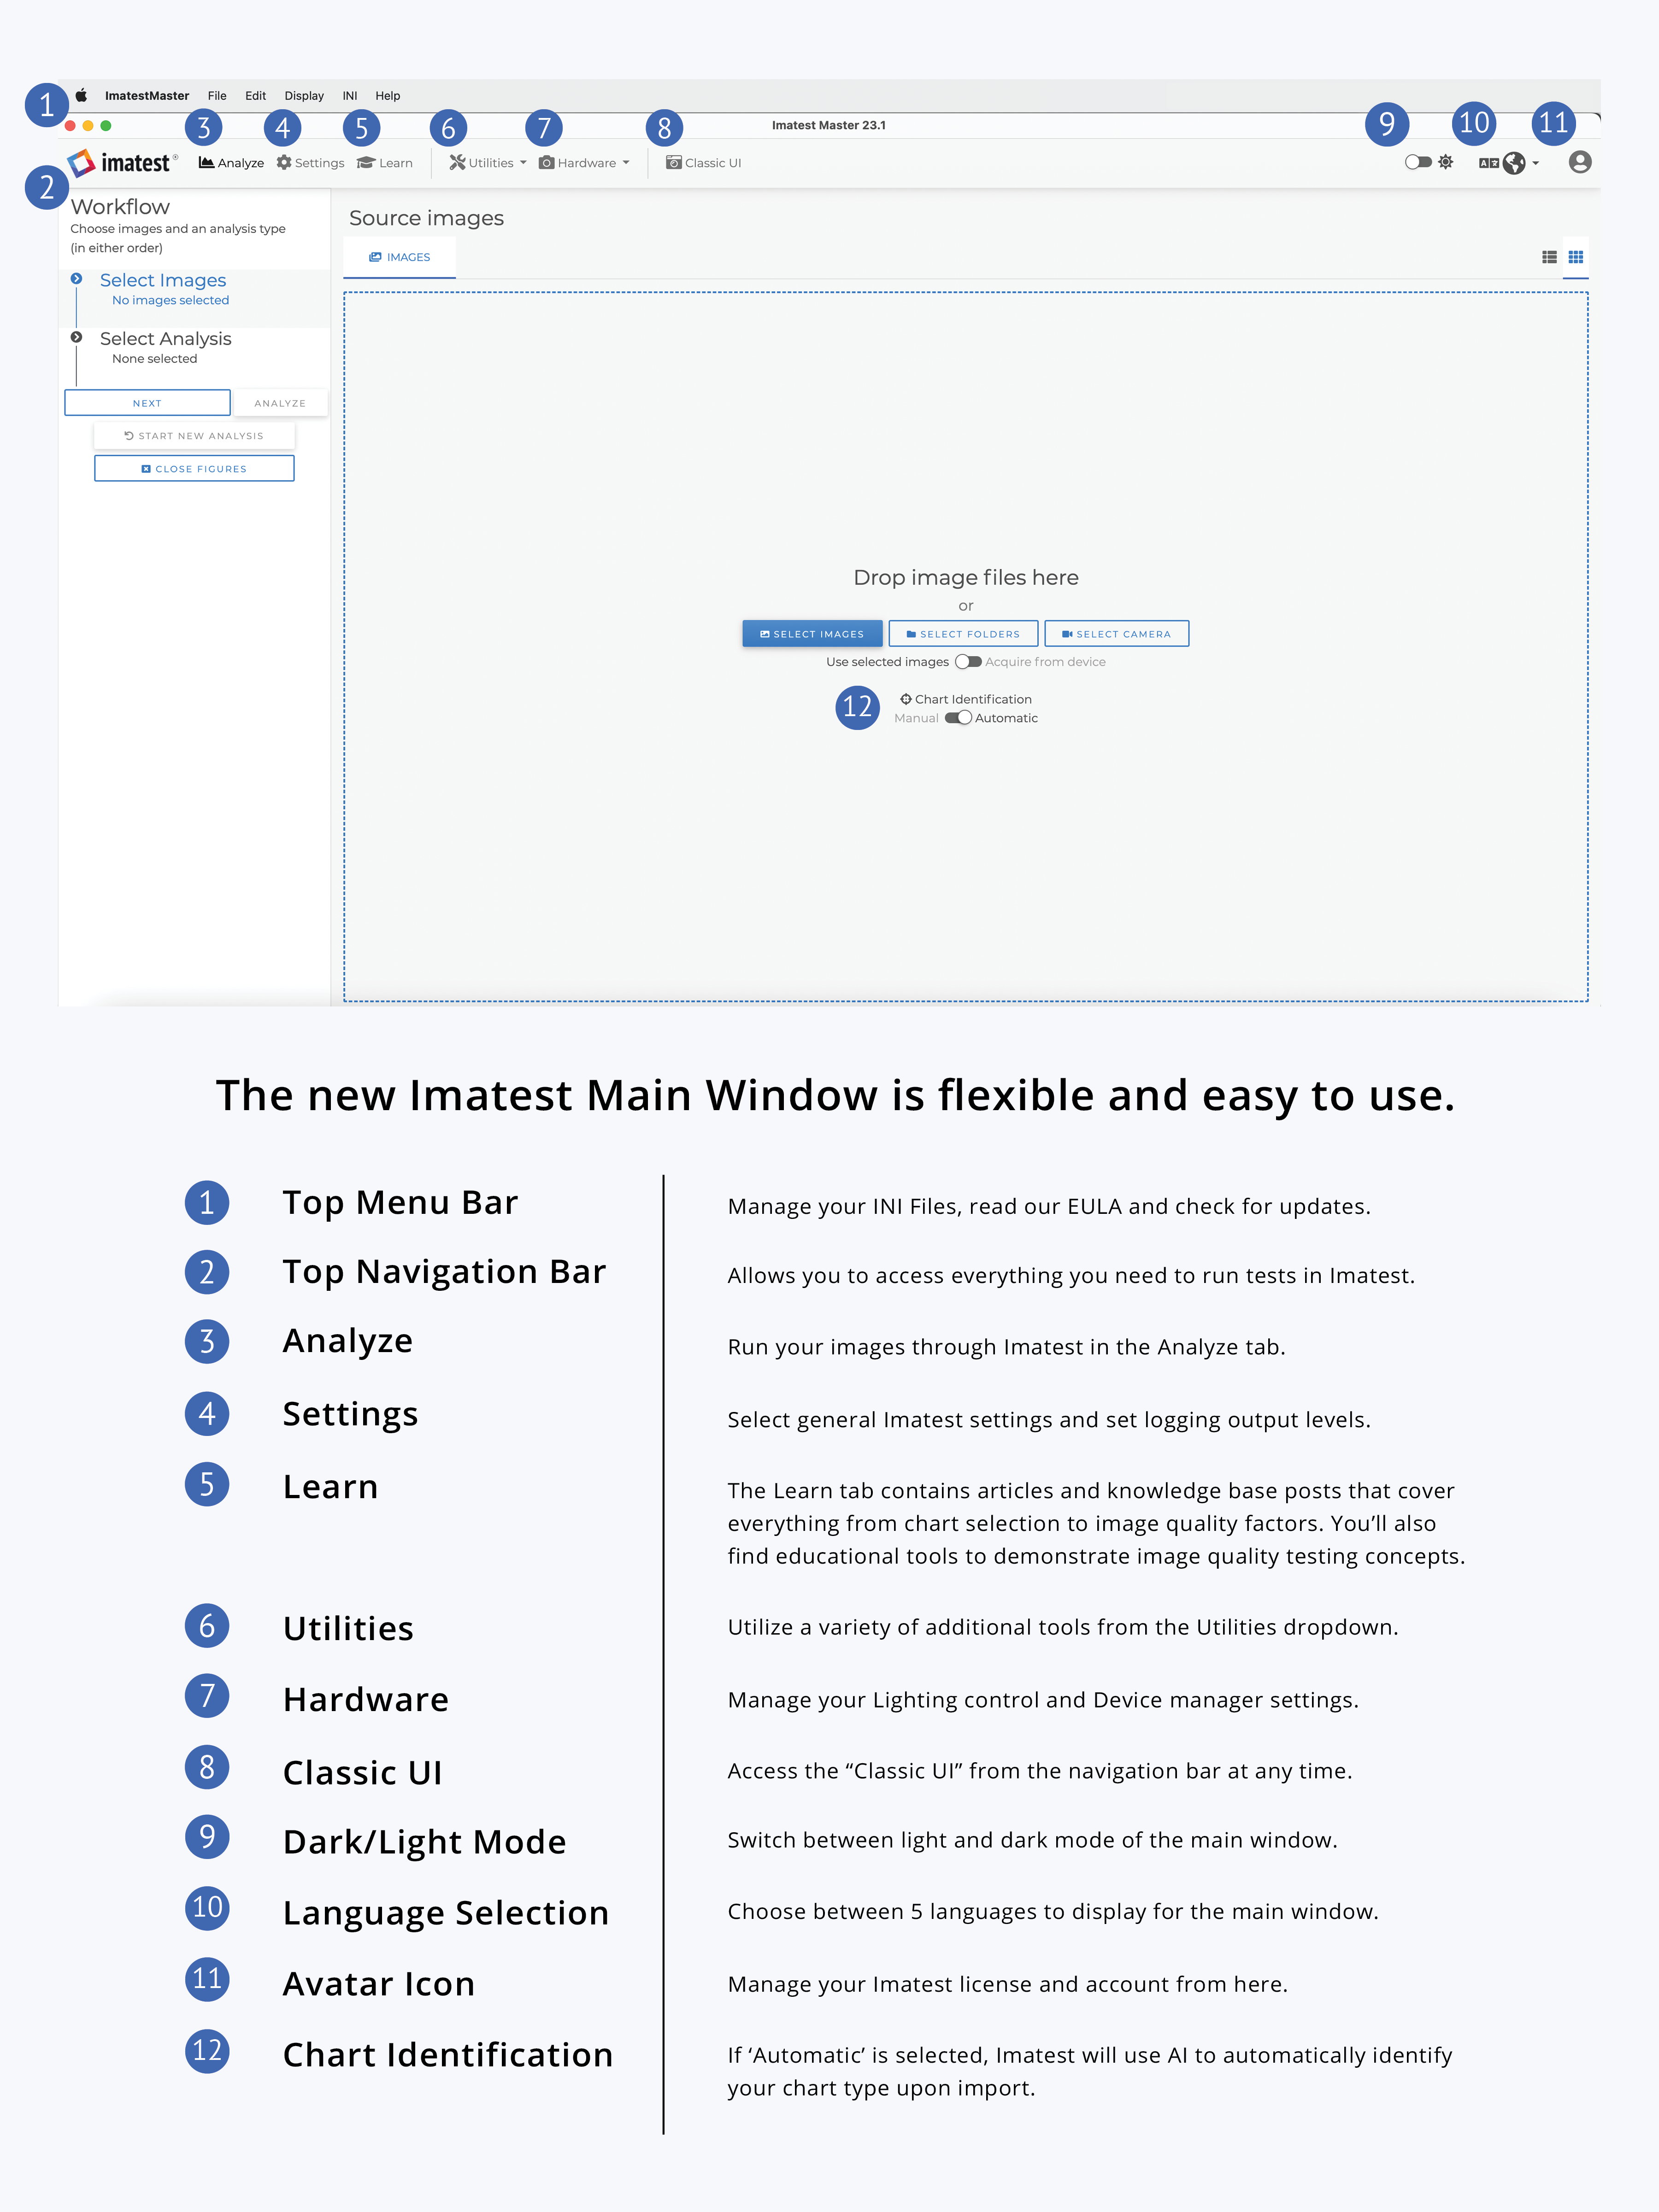
- Internationalization - Click on the globe icon in the top menu bar to select language. Choose from English, Japanese, Korean, Traditional Chinese and Simplified Chinese.
- Tooltips have been added for Analysis types, and Image Quality Factors
- View full filepath of image - by hovering over image filename
- Improved image preview for multiple images - now, more images will be shown in the Select Images box.
- List view for Analysis types
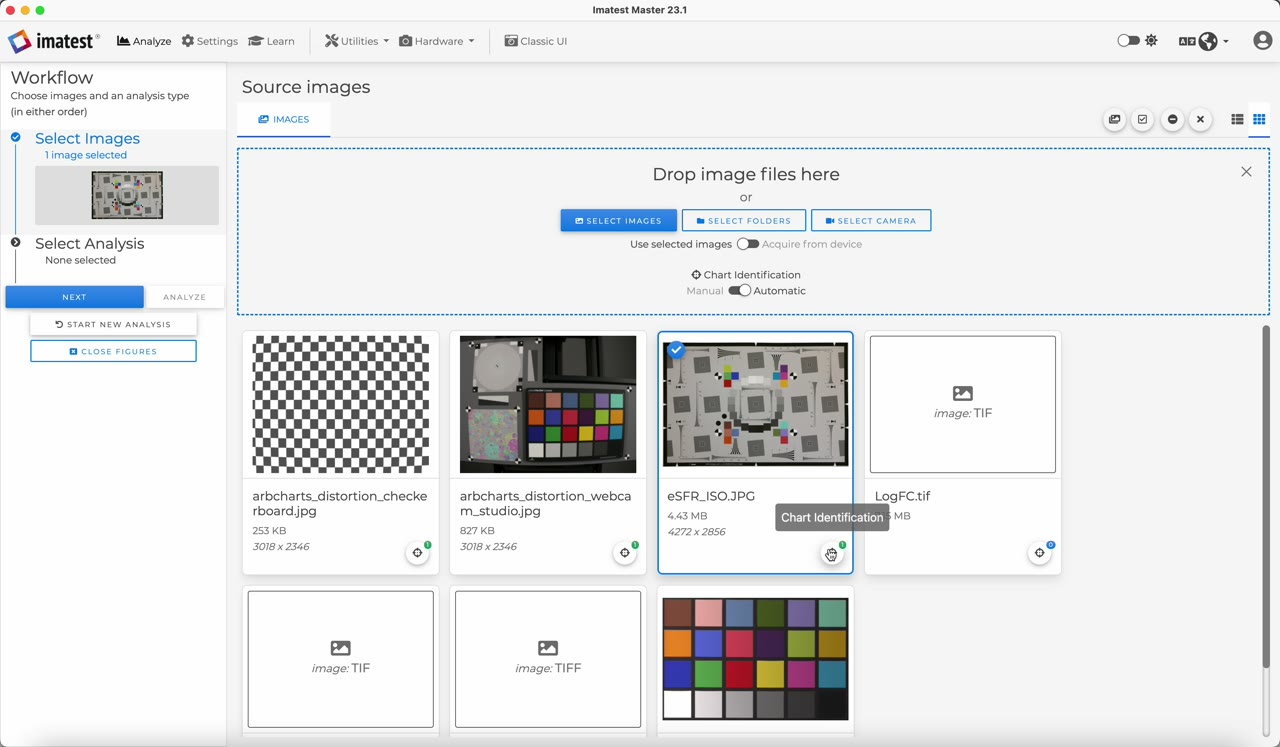 ▶
▶This video demonstrates using the Release 23.1 version Main Window.
After watching the video, follow the Step by Step Instructions Below to choose an image and analysis.
Select your Image + Analysis
To analyze an image, click the Analyze icon in the main menu.
The window has a large area for Source images. Drag and drop images into the window, or click Select Images to pick files, or Select Folders to pick whole folders, from your computer. Images can also come straight from a camera or frame grabber instead of from files: see Acquire images from a device below.
Acquire images from a device
Below the source buttons is a switch that sets where the analysis reads its images from. Use selected images analyzes the files listed in the Source images area; Acquire from device analyzes a live image from a camera or frame grabber, so nothing has to be saved as a file first.
To analyze a live image:
- Click Select Camera and choose the device you want to acquire from.
- Move the switch beneath the buttons to Acquire from device.
- Choose the analysis as you would for a file, then click Analyze.
The device, its capture format (resolution, color space, bit depth) and its controls are set in the Imatest Image Acquisition Device Manager, which can also be opened from Device Manager in the Settings dropdown menu. Acquisition needs roughly 2 GB of free memory, and no other program may be holding the device at the time, including the Device Manager’s own preview.
Two related pages go further: Using direct image acquisition covers realtime (continuously reloading) analysis and signal averaging, and Supported image acquisition hardware lists the devices Imatest can acquire from.
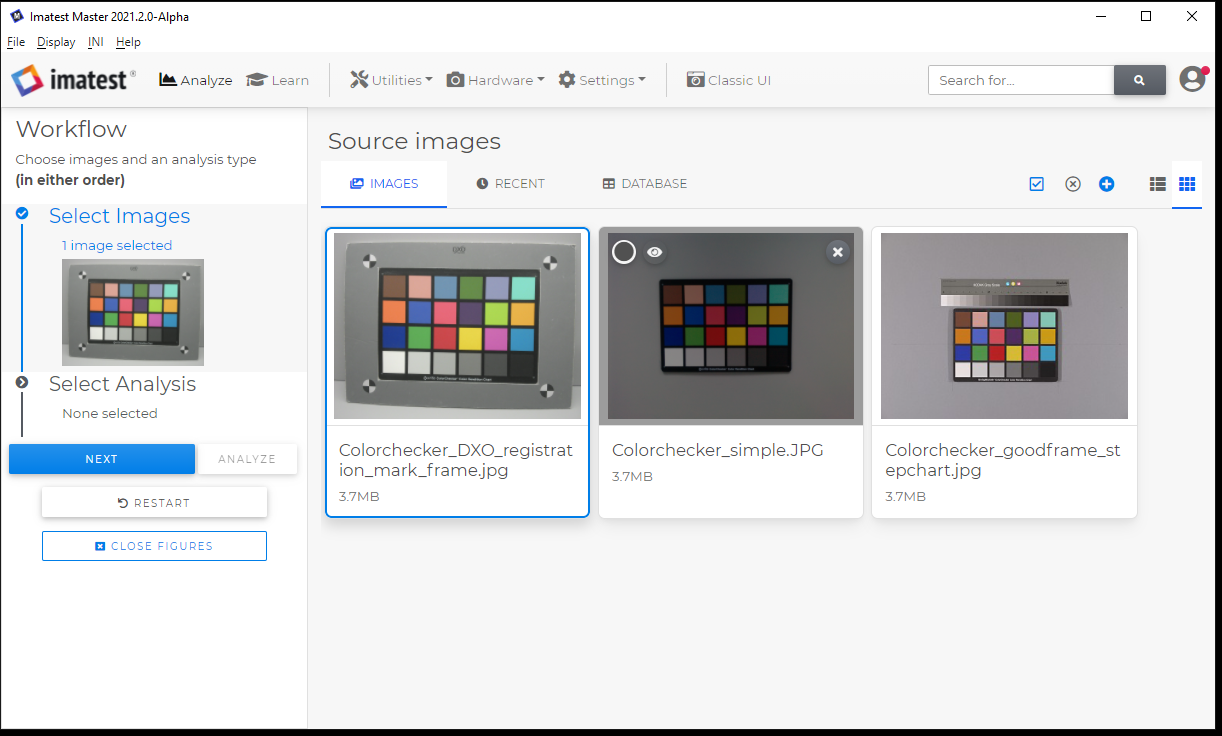
Once your images have been added to the window, they will be automatically selected for analysis. (The blue outline indicates selection.)
Use the icons in the right corner of the image window, to
- deselect images,
- add more images.
- choose List View.
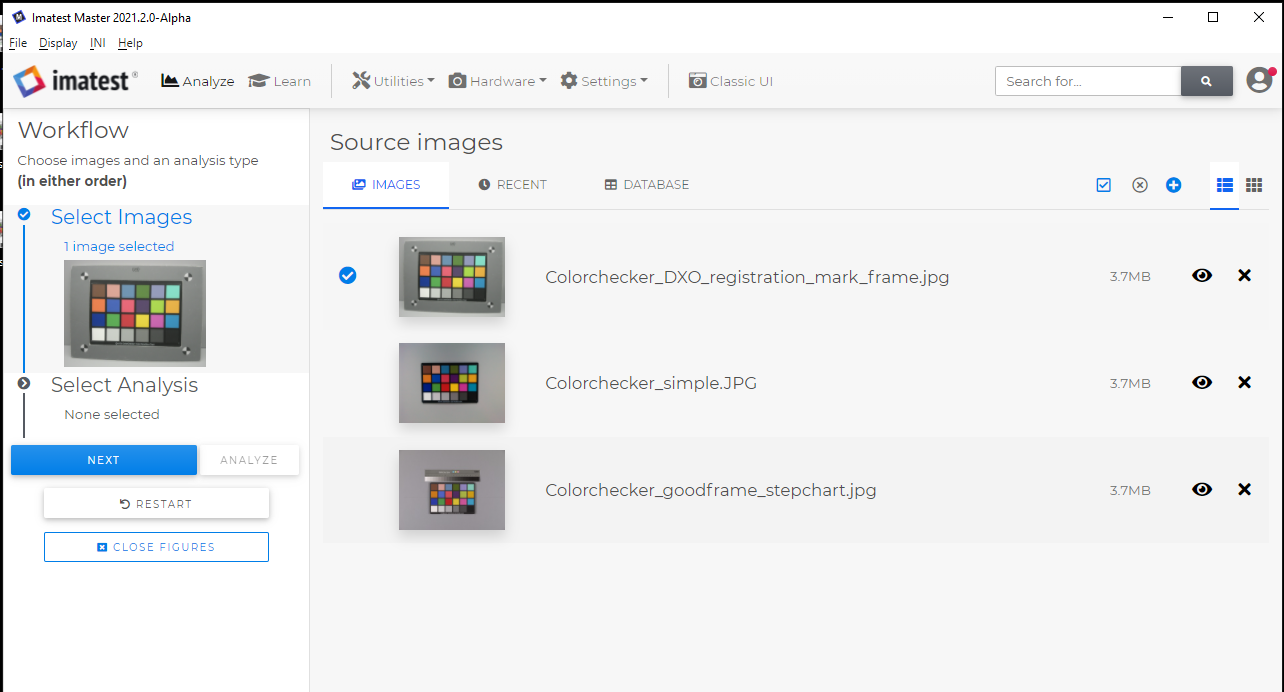
File List view
View your files in icon view (above), or list view.
Select the image(s) you wish to analyze,
then click the Next button in the left column, to select the type of Analysis.
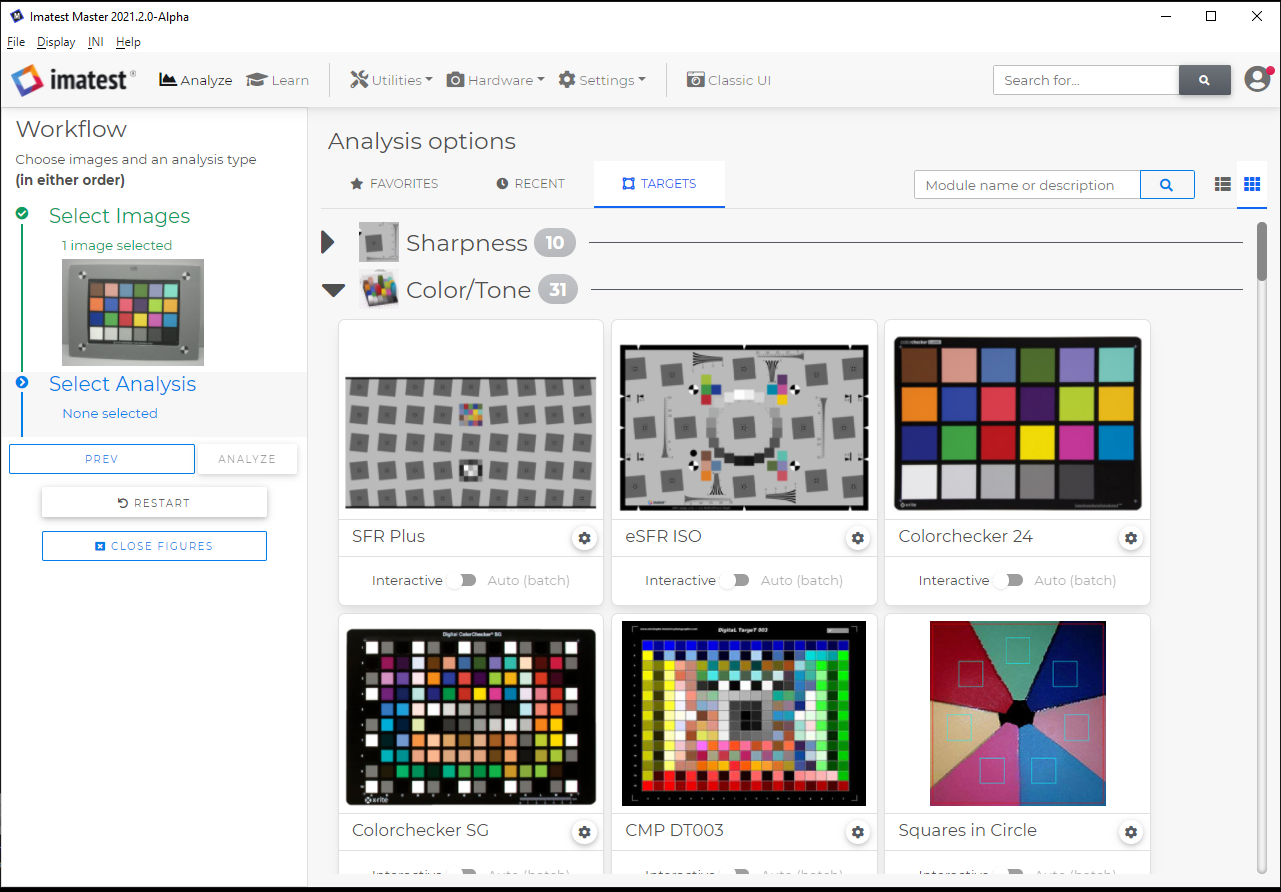
The Analysis options window will appear in the window on the right.
Analysis options are organized, based on the Image Quality Factor they measure.
Click on the triangle next to the IQF you wish to measure, to see target options.
In this example, it is Color/Tone.
Several choices will be shown. Select the Target that was used for your image.
This image was taken with a Colorchecker 24 chart, so we can select "Colorchecker 24" by Clicking on it.
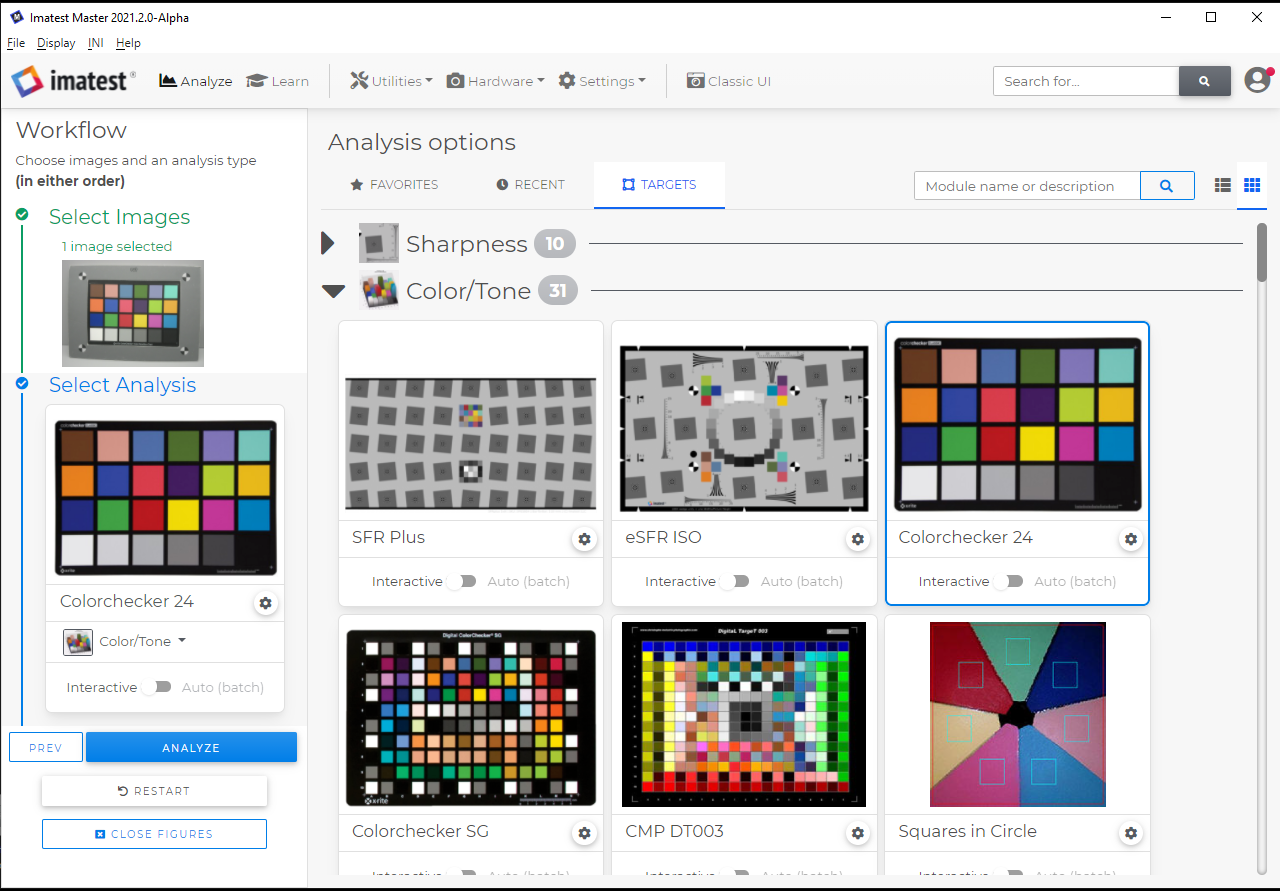
The Image and Analysis type chosen are now shown in the Left Column.
There are additional settings, to run the analysis in Interactive or Auto(Batch) mode just above the blue "Analyze" button.
Once the image and Analysis are chosen, click the blue "Analyze" button to start the Analysis.
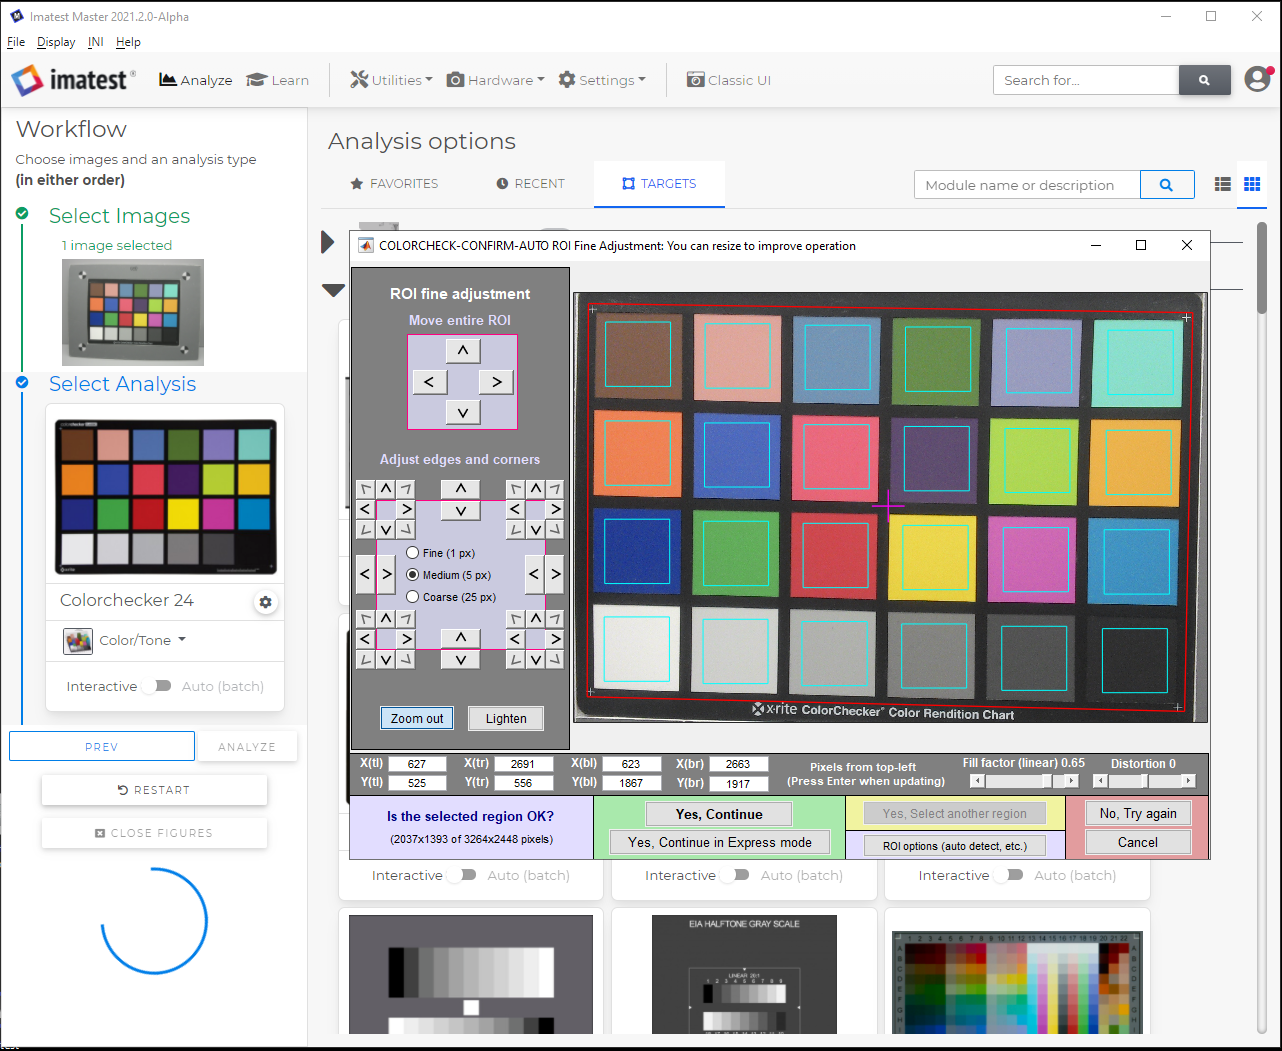
In this example, Interactive Analysis was chosen, so the ROI Adjustment Window will appear.
Adjust ROIs, if needed - then click Yes to continue analysis.
The Results window will appear.
Imatest Results Window
Imatest will run the Analysis on your image, and pop up the window that displays analysis results, based on your preferences.
Use the Display dropdown, to choose a different output graph.
Results can be saved using the Save Data or Save Screen buttons.
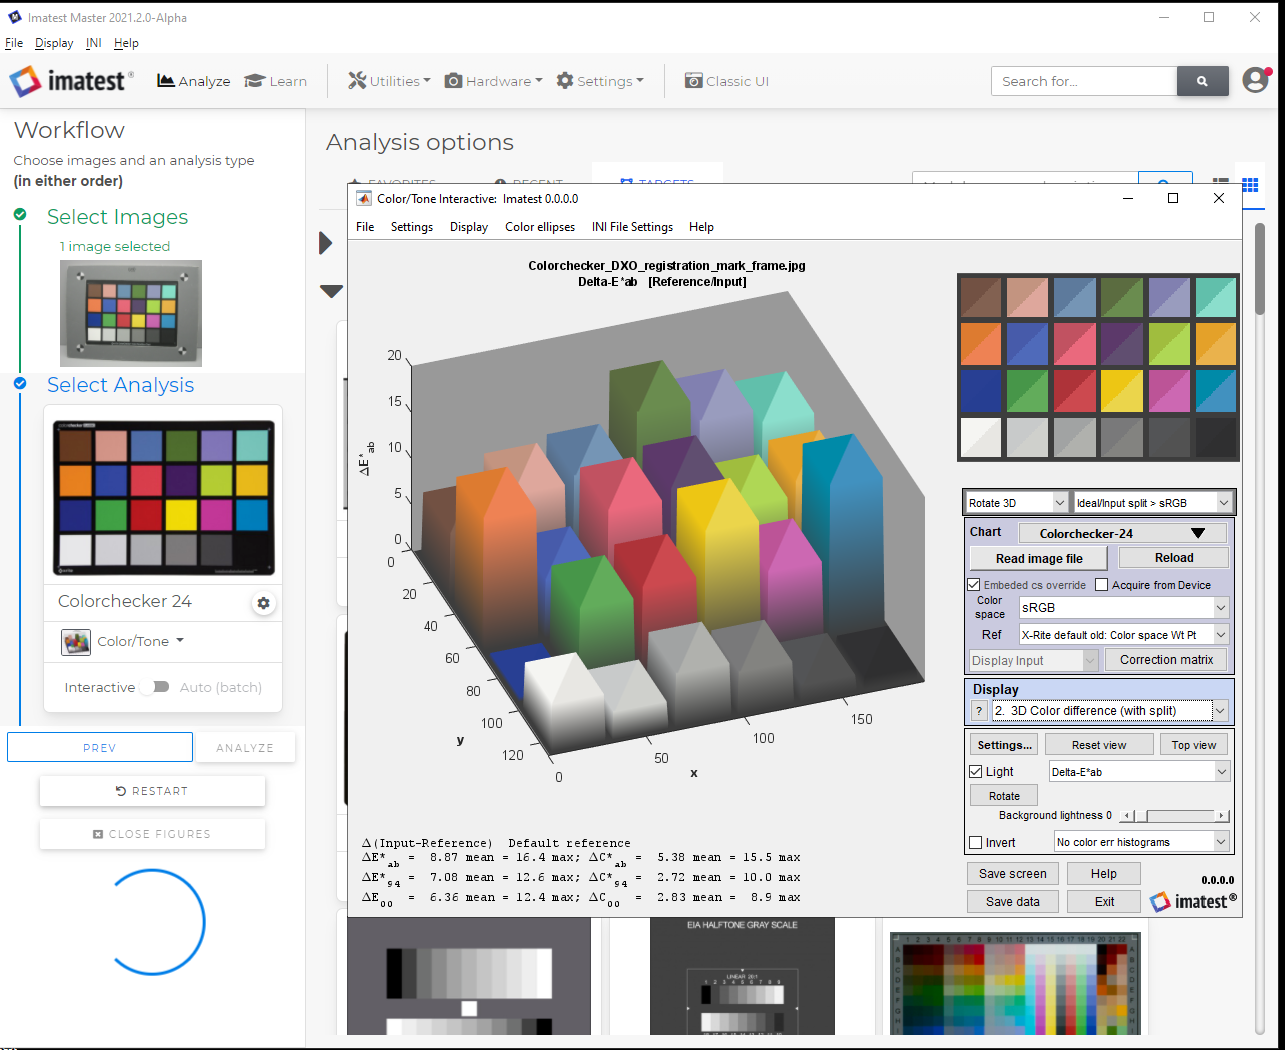
Click Exit to close Result window, and return to the Analysis screen.
With Imatest 2021.2, choose your Images or Analysis type first - the choice is yours.